🟢 📩 OVH Stalwart Mail Server yannig.net

Stalwart Mail Server est une solution open source conçue pour simplifier l’auto-hébergement des serveurs de mail, en mettant l’accent sur la sécurité et la confidentialité. Écrit en Rust, il offre une alternative moderne aux logiciels de serveurs de mail existants, souvent complexes et obsolètes.
Stalwart Mail Server
![]()
Exigences :
- VPS avec un port 25 ouvert : OVH vps-1780de45 yannig.net
- IPV6: 2001:41d0:305:2100::c1c
- IPV4: 51.38.37.240
- IPV6: 2001:41d0:305:2100::c1c
- Un nom de domaine enregistré : yannig.net
- Domaine mail: mail.yannig.net
OVH domaine yannig.net
Enregistrements DNS
Avant modifications
1
2
3
4
5
6
7
8
9
$TTL 3600
@	IN SOA dns14.ovh.net. tech.ovh.net. (2076760362 86400 3600 3600000 60)
        IN NS     dns14.ovh.net.
        IN NS     ns14.ovh.net.
        IN MX     1 mx1.mail.ovh.net.
        IN MX     5 mx2.mail.ovh.net.
        IN MX     100 mx3.mail.ovh.net.
        IN A     51.38.37.240
        IN TXT     "v=spf1 include:mx.ovh.com -all"
Configuration DNS OVH basique domaine yannig.net
1
2
3
4
5
6
7
$TTL 3600
@	IN SOA dns14.ovh.net. tech.ovh.net. (2076760577 86400 3600 3600000 60)
        IN NS     dns14.ovh.net.
        IN NS     ns14.ovh.net.
        IN A     51.38.37.240
        IN AAAA     2001:41d0:305:2100::c1c
        IN TXT     "v=spf1 include:mx.ovh.com -all"
Reverse DNS
Network –> Adresses IP publiques


Outils
1
sudo apt install dnsutils
Vérification
1
2
dig -x 51.38.37.240 +short            # --> yannig.net.
dig -x 2001:41d0:305:2100::c1c +short       # --> yannig.net.
VPS
SMTP Port 25
Vérifier que le fournisseur d’accès internet ne bloque pas le trafic SMTP port TCP 25
Depuis un poste externe :
1
sudo nmap -sS -p25 51.38.37.240
1
2
3
4
5
6
7
8
Starting Nmap 7.99 ( https://nmap.org ) at 2026-04-22 14:30 +0200
Nmap scan report for yannig.net (51.38.37.240)
Host is up (0.013s latency).

PORT   STATE SERVICE
25/tcp open  smtp

Nmap done: 1 IP address (1 host up) scanned in 0.16 seconds
ACME.sh
Création des certificats SSL Let’s encrypt via Acme
1
2
3
4
5
6

# Git
git clone https://github.com/acmesh-official/acme.sh.git
cd ./acme.sh
# Installation sans crontab --force
./acme.sh --install --force
Se reconnecter pour prise en charge
Les clé OVH
1
2
export OVH_AK="wxxxxxxxxxxxxxxxx"
export OVH_AS="yxxxxxxxxxxxxxxxxxxxxxxx"
Créer les certificats
1
acme.sh --dns dns_ovh --server letsencrypt --issue --keylength ec-384 -d 'yannig.net' -d '*.yannig.net'
Ouvrir le lien généré pour valider l’authentification OVH
puis relancer la commande
1
acme.sh --dns dns_ovh --server letsencrypt --issue --keylength ec-384 -d 'yannig.net' -d '*.yannig.net'
Les certificats
1
2
3
4
[mar. 21 avril 2026 16:10:41 CEST] Your cert is in: /home/yann/.acme.sh/yannig.net_ecc/yannig.net.cer
[mar. 21 avril 2026 16:10:41 CEST] Your cert key is in: /home/yann/.acme.sh/yannig.net_ecc/yannig.net.key
[mar. 21 avril 2026 16:10:41 CEST] The intermediate CA cert is in: /home/yann/.acme.sh/yannig.net_ecc/ca.cer
[mar. 21 avril 2026 16:10:41 CEST] And the full-chain cert is in: /home/yann/.acme.sh/yannig.net_ecc/fullchain.cer
Installation des certificats
Droits dossier
1
2
sudo chown $USER:stalwart /etc/ssl/private/
sudo chmod 750 /etc/ssl/private/
Si vous utilisez acme.sh pour gérer vos certificats, vous pouvez simplement exécuter
1
2
3
4
acme.sh --ecc --install-cert -d 'yannig.net' \
  --key-file       /etc/ssl/private/privkey.pem  \
  --fullchain-file /etc/ssl/private/fullchain.pem \
  --reloadcmd      "sudo systemctl restart stalwart"
Mise à jour des certificats
Le VPS n’a pas crontab installé, on va utiliser systemd timer
Le fichier de service
1
sudo nano /etc/systemd/system/update-certificat.service
contenu
1
2
3
4
[Unit]
Description="Update certificat"
[Service]
ExecStart="/home/yann/.acme.sh"/acme.sh --cron --home "/home/yann/.acme.sh"
Le fichier minuteur
1
sudo nano /etc/systemd/system/update-certificat.timer
Exécution service tous les jours (lundi au dimanche) à 1h20
1
2
3
4
5
6
7
[Unit]
Description="Renouvellement certificat si date validité atteinte"
[Timer]
OnCalendar=Mon..Sun *-*-* 1:20:00
Unit=update-certificat.service
[Install]
WantedBy=multi-user.target
Activer le minuteur
1
sudo systemctl enable update-certificat.timer --now
Vérification
1
systemctl list-timers
Résultat
1
2
NEXT                            LEFT LAST                               PASSED UNIT                         ACTIVATES
Wed 2026-04-22 01:20:00 CEST      9h -                                       - update-certificat.timer      update-certificat.service
Tester la mise à jour des certificats
On va forcer (--force) la procédure et voir le résultat
1
"/home/yann/.acme.sh"/acme.sh --force --cron --home "/home/yann/.acme.sh"
Résultat
1
2
3
4
5
6
7
8
9
10
11
12
13
14
15
16
17
18
19
20
21
22
23
24
25
26
27
28
29
[mer. 22 avril 2026 15:29:27 CEST] ===Starting cron===
[mer. 22 avril 2026 15:29:27 CEST] Renewing: 'yannig.net'
[mer. 22 avril 2026 15:29:27 CEST] Renewing using Le_API=https://acme-v02.api.letsencrypt.org/directory
[mer. 22 avril 2026 15:29:28 CEST] Using CA: https://acme-v02.api.letsencrypt.org/directory
[mer. 22 avril 2026 15:29:28 CEST] Multi domain='DNS:yannig.net,DNS:*.yannig.net'
[mer. 22 avril 2026 15:29:31 CEST] Getting webroot for domain='yannig.net'
[mer. 22 avril 2026 15:29:31 CEST] Getting webroot for domain='*.yannig.net'
[mer. 22 avril 2026 15:29:32 CEST] yannig.net is already verified, skipping dns-01.
[mer. 22 avril 2026 15:29:32 CEST] *.yannig.net is already verified, skipping dns-01.
[mer. 22 avril 2026 15:29:32 CEST] Verification finished, beginning signing.
[mer. 22 avril 2026 15:29:32 CEST] Let's finalize the order.
[mer. 22 avril 2026 15:29:32 CEST] Le_OrderFinalize='https://acme-v02.api.letsencrypt.org/acme/finalize/3261565761/503263123221'
[mer. 22 avril 2026 15:29:34 CEST] Downloading cert.
[mer. 22 avril 2026 15:29:34 CEST] Le_LinkCert='https://acme-v02.api.letsencrypt.org/acme/cert/06f1d2dce6d6abf103b51aeacd877777dced'
[mer. 22 avril 2026 15:29:34 CEST] Cert success.
-----BEGIN CERTIFICATE-----
MIIDqzCCAzKgAwIBAgISBvHS3ObWq/EDtRrqzYd3d9ztMAoGCCqGSM49BAMDMDIx
................................................................
wlGN9+2d/jpHlXCDhVKto+dTRvSOSWpI4LLnyujefQ==
-----END CERTIFICATE-----
[mer. 22 avril 2026 15:29:34 CEST] Your cert is in: /home/yann/.acme.sh/yannig.net_ecc/yannig.net.cer
[mer. 22 avril 2026 15:29:34 CEST] Your cert key is in: /home/yann/.acme.sh/yannig.net_ecc/yannig.net.key
[mer. 22 avril 2026 15:29:34 CEST] The intermediate CA cert is in: /home/yann/.acme.sh/yannig.net_ecc/ca.cer
[mer. 22 avril 2026 15:29:34 CEST] And the full-chain cert is in: /home/yann/.acme.sh/yannig.net_ecc/fullchain.cer
[mer. 22 avril 2026 15:29:35 CEST] Installing key to: /etc/ssl/private/privkey.pem
[mer. 22 avril 2026 15:29:35 CEST] Installing full chain to: /etc/ssl/private/fullchain.pem
[mer. 22 avril 2026 15:29:35 CEST] Running reload cmd: sudo systemctl restart stalwart
[mer. 22 avril 2026 15:29:36 CEST] Reload successful
[mer. 22 avril 2026 15:29:36 CEST] ===End cron===
Les certificats ont été mis à jour et installés dans le dossier /etc/ssl/private/ puis le service stalwart est redémarré.
Parefeu
Ports essentiels à maintenir ouverts :
- Port 25 (SMTP) : Pour la réception d’e-mails d’autres serveurs de messagerie.
- Port 465 (SMTPS) : Recommandé pour l’envoi sécurisé d’e-mails sortants des clients utilisateurs avec TLS implicite. À privilégier par rapport au port 587.•
- Port 993 (IMAPS) : Pour l’accès sécurisé aux e-mails via les clients IMAP avec TLS implicite.
- Port 443 (HTTPS) : Pour l’administration web, JMAP, l’API REST, OAuth, le provisionnement de certificats TLS (ACME) et d’autres services web sécurisés.
Ports non essentiels à désactiver si non utilisés :
- Port 587 (SMTP Submission) : Si tous vos clients utilisent le port 465, ce port peut être désactivé.
- Port 143 (IMAP4) : Le port IMAP standard sans chiffrement. Il devrait généralement être désactivé au profit du port 993 (IMAPS).
- Port 4190 (ManageSieve) : À garder ouvert uniquement si vos utilisateurs gèrent activement des scripts Sieve.
- Port 110 (POP3) et Port 995 (POP3S) : POP3 est largement obsolète au profit d’IMAP. Désactivez-les sauf en cas de besoin spécifique.
- Port 8080 (HTTP) : Principalement fourni pour la configuration initiale. Il est fortement recommandé de désactiver ce port après la configuration pour prévenir les accès non authentifiés et non chiffrés.
Installation Debian / Ubuntu
1
sudo apt install ufw
Les règles à ajouter pour le serveur de messagerie
1
2
sudo ufw allow 53240 # ssh
sudo ufw allow 443
Activer le parefeu
1
sudo ufw enable
1
2
3
4
# Ouvrir les ports 25,465 et 993 pour le serveur messagerie
sudo ufw allow 25
sudo ufw allow 465
sudo ufw allow 993
Parefeu final
1
2
3
4
5
6
7
8
9
10
11
12
55240/tcp                  ALLOW       Anywhere
443                        ALLOW       Anywhere
25                         ALLOW       Anywhere
993                        ALLOW       Anywhere
465                        ALLOW       Anywhere
587/tcp                    ALLOW       Anywhere
55240/tcp (v6)             ALLOW       Anywhere (v6)
443 (v6)                   ALLOW       Anywhere (v6)
25 (v6)                    ALLOW       Anywhere (v6)
993 (v6)                   ALLOW       Anywhere (v6)
465 (v6)                   ALLOW       Anywhere (v6)
587/tcp (v6)               ALLOW       Anywhere (v6)
Stalwart - Installation
Stalwart est livré avec un script d’installation qui télécharge la dernière version, crée un compte de service dédié, installe le binaire sous les chemins Unix standard, écrit une unité de service et démarre le démon. L’accès root sur la machine cible et la connectivité HTTPS sortante sont nécessaires pour les étapes ci-dessous.
Ouvrez un terminal sur l’hôte cible et récupérez le script d’installation en mode utilisateur (PAS root):
1
curl --proto '=https' --tlsv1.2 -sSf https://get.stalw.art/install.sh -o install.sh
Exécutez le script comme root:
1
sudo sh install.sh
Aucun argument n’est requis. Le script suit la norme de hiérarchie du système de fichiers et place le binaire sous /usr/local/bin/stalwart, le fichier de configuration sous /etc/stalwart/config.json, variables d’environnement sous /etc/stalwart/stalwart.env, données d’application sous /var/lib/stalwart/et de journaux fichiers sous /var/log/stalwart/.
Un dédié stalwartUn compte de service est créé s’il n’existe pas déjà. Le script écrit alors l’unité de service appropriée (systemd, SysV init.d, ou launchden fonction du système d’exploitation), active le service au démarrage et le démarre immédiatement.
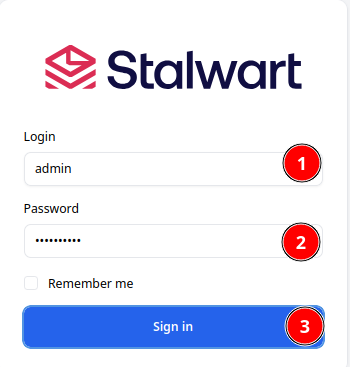
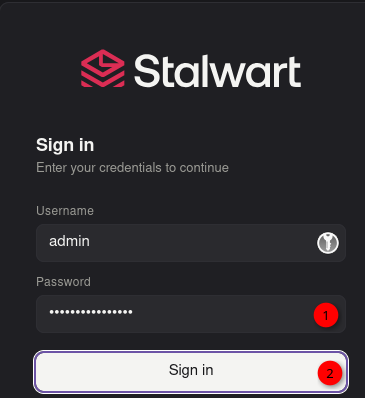
En utilisant les identifiants fournis, connectez-vous à votre Stalwart
1
2
3
4
5
6
7
8
9
10
11
12
13
14
15
16
17
18
19
20
⏳ Downloading stalwart for x86_64-unknown-linux-gnu...
Warning: Not enforcing strong cipher suites for TLS, this is potentially less secure
Warning: Not enforcing TLS v1.2, this is potentially less secure
📝 Writing env file at /etc/stalwart/stalwart.env...
🔐 Setting permissions...
🚀 Starting service...
Created symlink '/etc/systemd/system/multi-user.target.wants/stalwart.service' → '/etc/systemd/system/stalwart.service'.

🎉 Installation complete!

Stalwart is running in bootstrap mode. A temporary administrator
password was generated at startup and printed to the service logs.

👉 To find the password, inspect the service logs:
     journalctl -u stalwart -n 200 | grep -A8 'bootstrap mode'

   Or set STALWART_RECOVERY_ADMIN=admin:<password> in
   /etc/stalwart/stalwart.env and restart the service to pin a credential.

   Finish setup at: http://yannig.net:8080/admin
Les fichiers log
1
2
sudo mkdir /var/log/stalwart
sudo chown stalwart:stalwart /var/log/stalwart
Stalwart - Mises à jour
Stalwart suit le versioning sémantique (semver), qui utilise un numéro de version dans le format MAJOR.MINOR.PATCH (par exemple, 0.16.3). Ce système indique la nature et l’impact de chaque rejet:
- Les versions de patch (le dernier numéro) n’incluent que de petites corrections rétrocompatibles. Mise à niveau entre les versions de patch, telles que à partir de
0.16.1à0.16.3, est sûr et ne nécessite pas de lire les notes de libération au préalable. - Les versions mineures (le numéro moyen) peuvent introduire de nouvelles fonctionnalités ou des ajustements qui pourraient nécessiter des modifications de configuration ou des migrations. Il est essentiel de lire attentivement les notes de publication avant la mise à niveau pour comprendre ce qui a pu changer.
- Les versions principales (le premier numéro) peuvent inclure des changements de rupture, en particulier avant la version
1.0.0, et nécessitent toujours un examen et une planification avant la mise à niveau.
[0.16.3] - 2026-04-30
If you are upgrading from v0.16.x, replace the binary (or run docker pull). If you are upgrading from v0.15.x and below, please read the upgrading documentation for more information on how to upgrade from previous versions.
1
2
3
4
5
6
7
8
9
10
11
12
Version="v0.16.8"
mkdir -p ~/temp
cd ~/temp
wget https://github.com/stalwartlabs/stalwart/releases/download/$Version/stalwart-x86_64-unknown-linux-gnu.tar.gz
tar xzvf stalwart-x86_64-unknown-linux-gnu.tar.gz
chmod +x stalwart
sudo systemctl stop stalwart
sudo cp stalwart /usr/local/bin/stalwart
sudo systemctl start stalwart
stalwart -V
rm ~/temp/stalwart*
cd ..
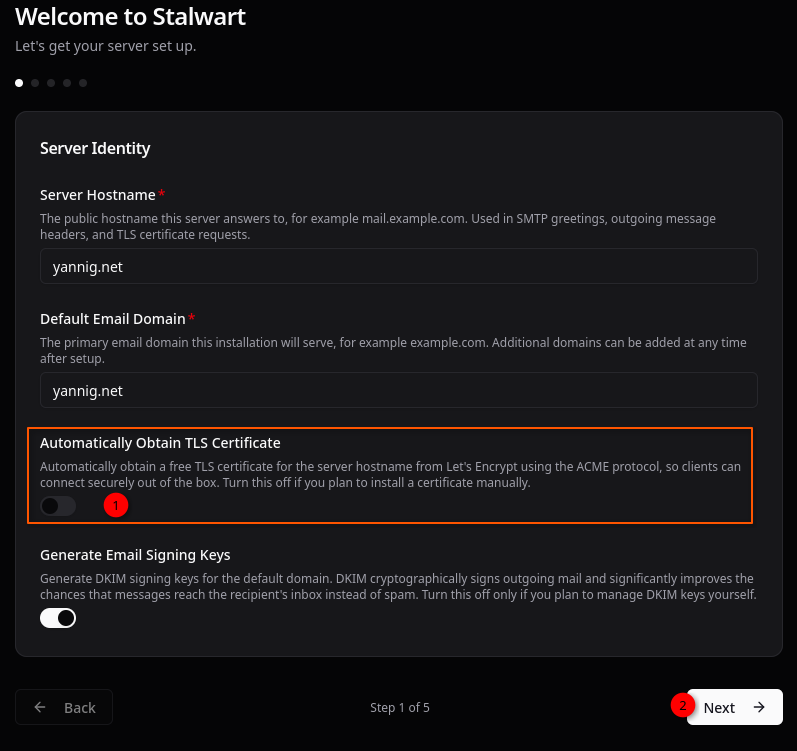
Domaine principal yannig.net
Administration
Le serveur n’a pas de carte graphique, on utilise le proxy ssh depuis un poste linux ayant les accès
1
ssh -L 9500:localhost:8080 -p 55240 -i ~/.ssh/vps-1780de45 yann@51.38.37.240
Ouvrir le lien http://localhost:9500/admin sur le poste appelant
Logging 01 **************

Logging 02 **************
Relever les information de connexion et redémarrer le service stalwart
1
sudo systemctl restart stalwart
Paramétrage
Connexion sur le lien https://yannig.net/admin
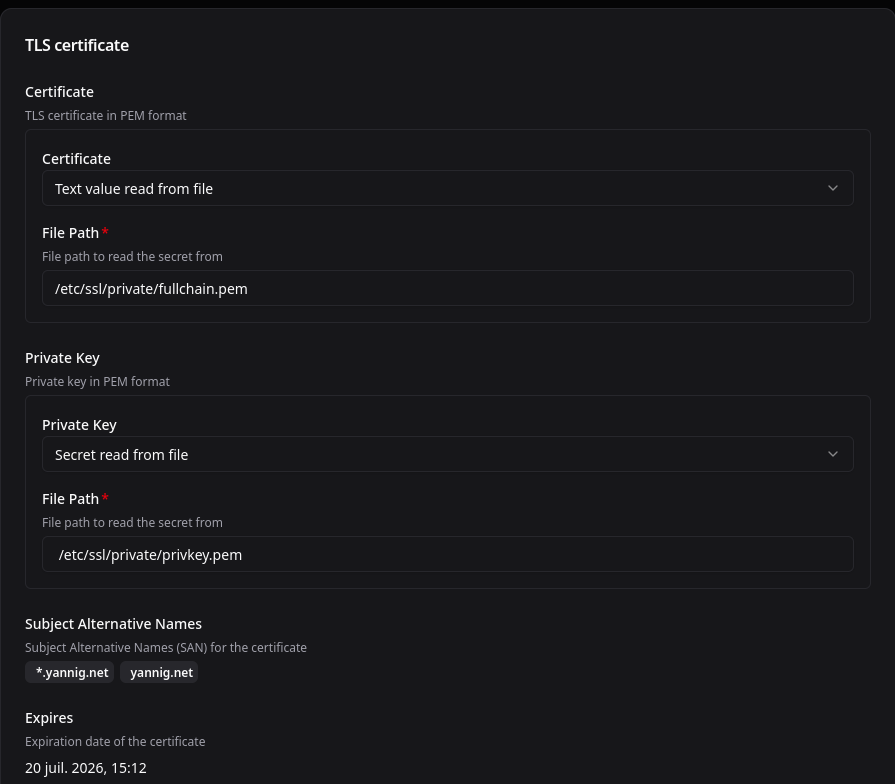
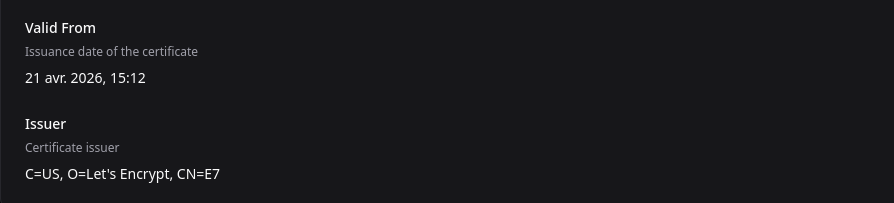
Les certificats ne sont pas au bon endroits, il faut forcer la connexion
Se rendre dans settings
On copie le certificat /home/yann/.acme.sh/yannig.net_ecc/fullchain.cer et la clé /home/yann/.acme.sh/yannig.net_ecc/yannig.net.key

Lecture certificats par stalwart
on doit utiliser les ACLs
1
2
sudo apt install acl # si non installé
sudo setfacl -R -m u:stalwart:rX /etc/ssl/private/privkey.pem /etc/ssl/private/fullchain.pem
Vérification: sudo getfacl /etc/ssl/private/*.pem
1
2
3
4
5
6
7
8
9
10
11
12
13
14
15
16
17
18
getfacl : suppression du premier « / » des noms de chemins absolus
# file: etc/ssl/private/fullchain.pem
# owner: yann
# group: yann
user::rw-
user:stalwart:r--
group::rw-
mask::rw-
other::r--

# file: etc/ssl/private/privkey.pem
# owner: yann
# group: yann
user::rw-
user:stalwart:r--
group::---
mask::r--
other::---
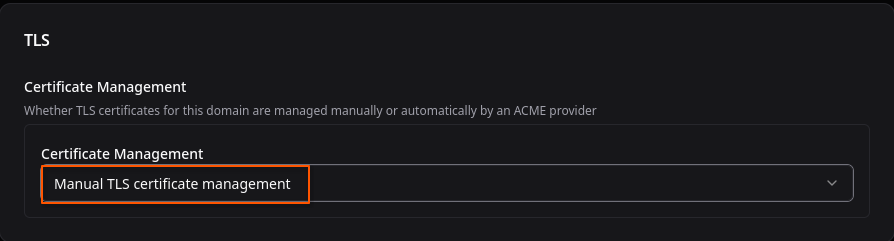
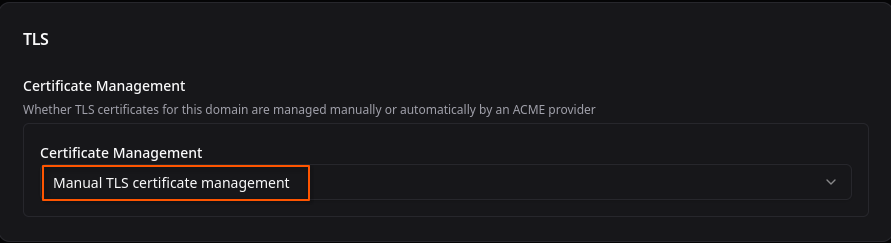
“Settings” –> “TLS” –> “Certificates”
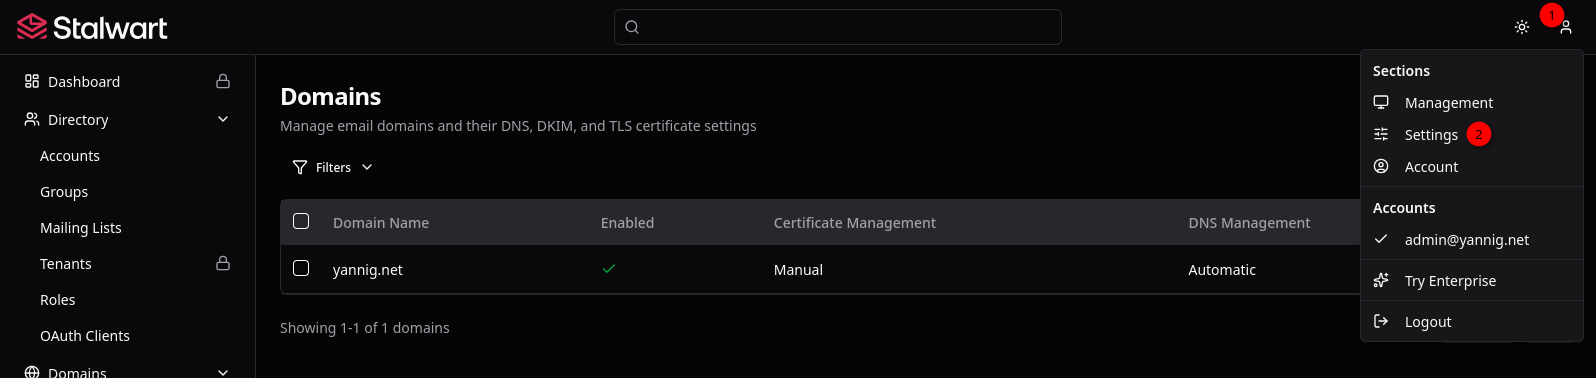
Vérifications Management –> Domains
Domain yannig.net
Zonefile
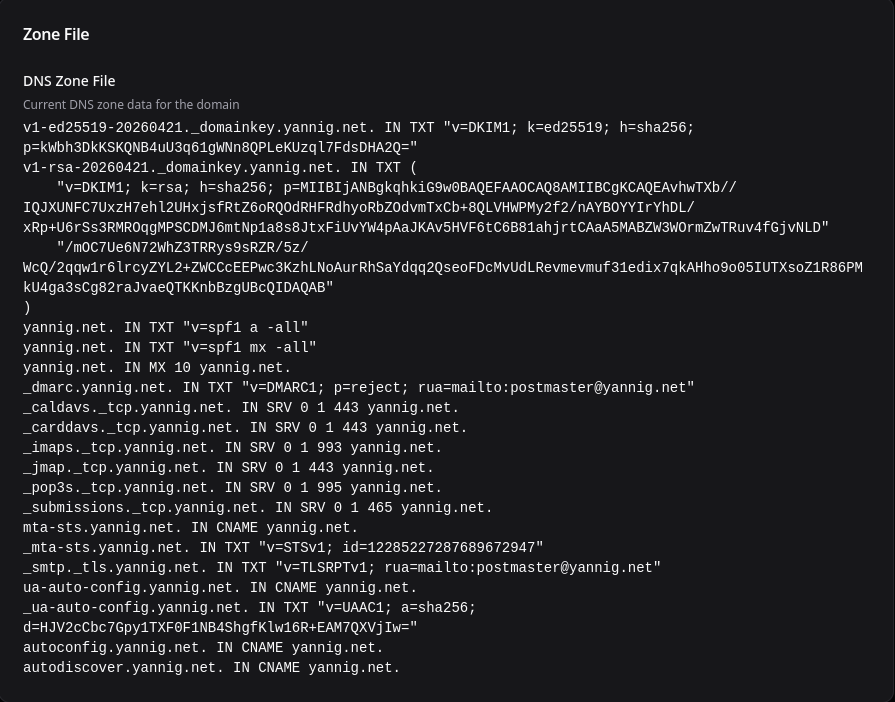
Submission port 587
L’accès smtp via le port 587 est ajouté pour une utilisation dans le serveur de notification ntfy
Préalable:
Ouvrir le port 587 sur le parefeu UFW
1
sudo ufw allow 587
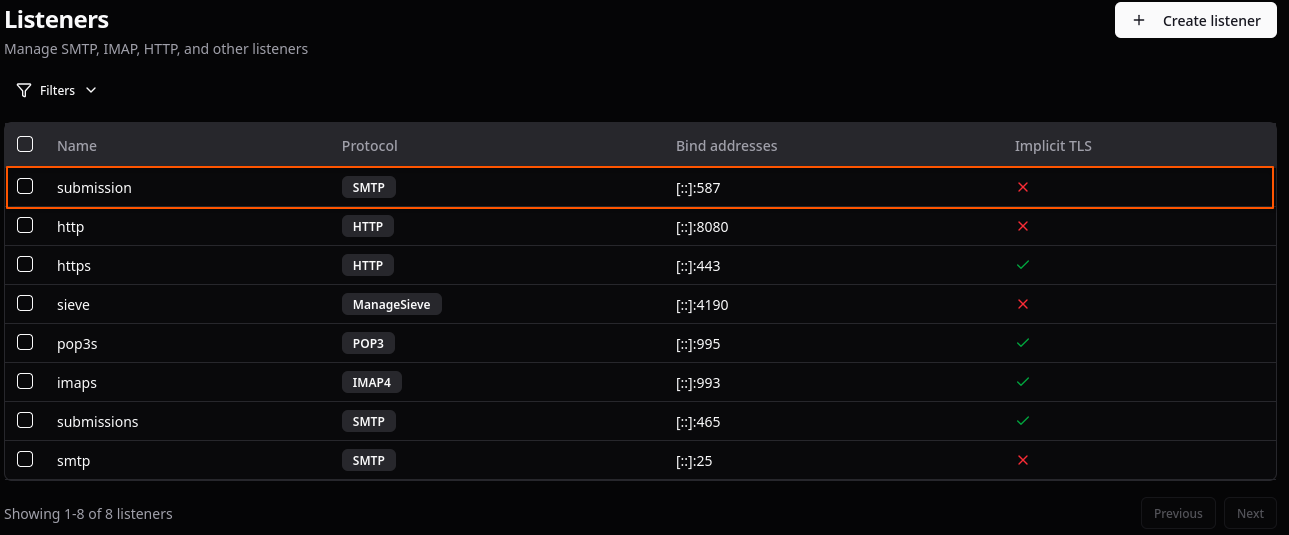
Stalwart, ajouter un listener:
“Settings –> Network –> Listeners” et “+ Create listener”
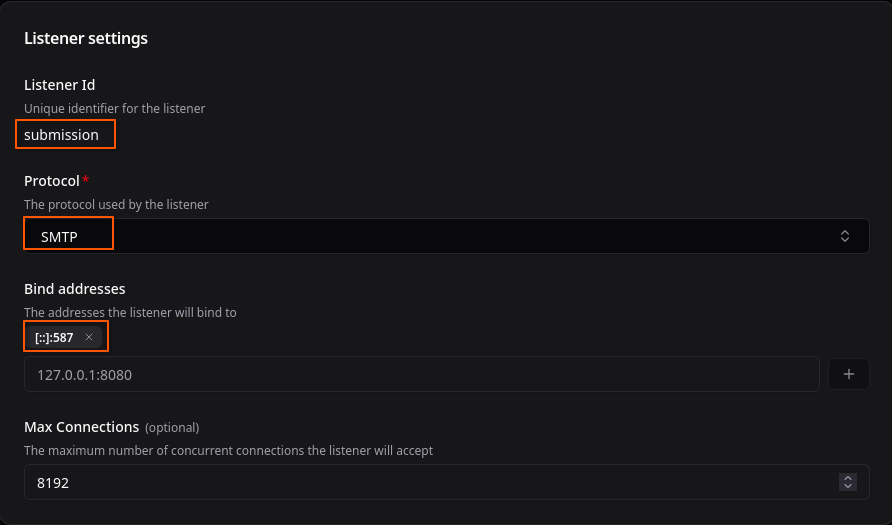
Cliquer sur “Save”
Redémarrer le service
1
sudo systemctl restart stalwart
Account
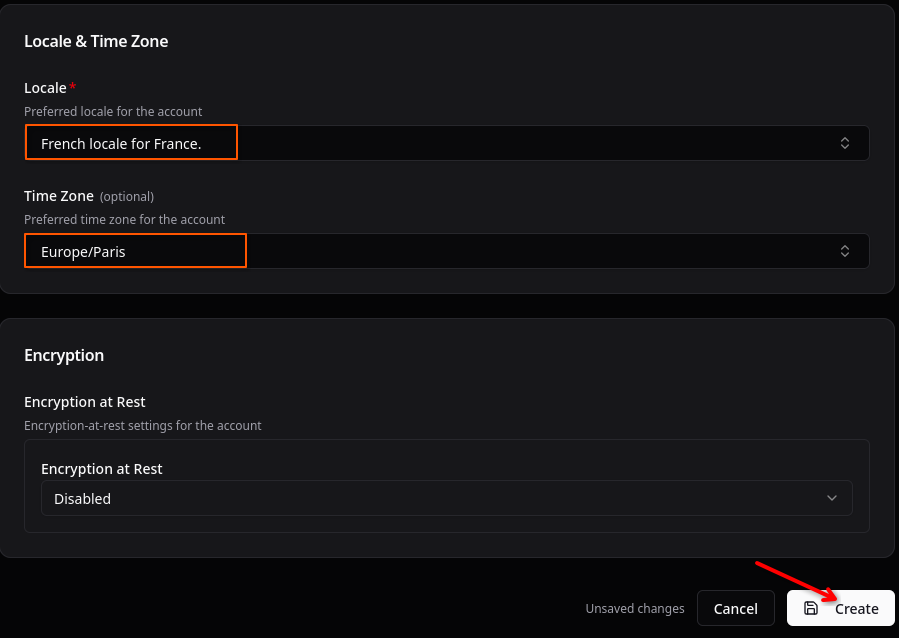
Configurez les préférences de votre compte, notamment les paramètres régionaux, le fuseau horaire, le cryptage au repos et une description personnelle
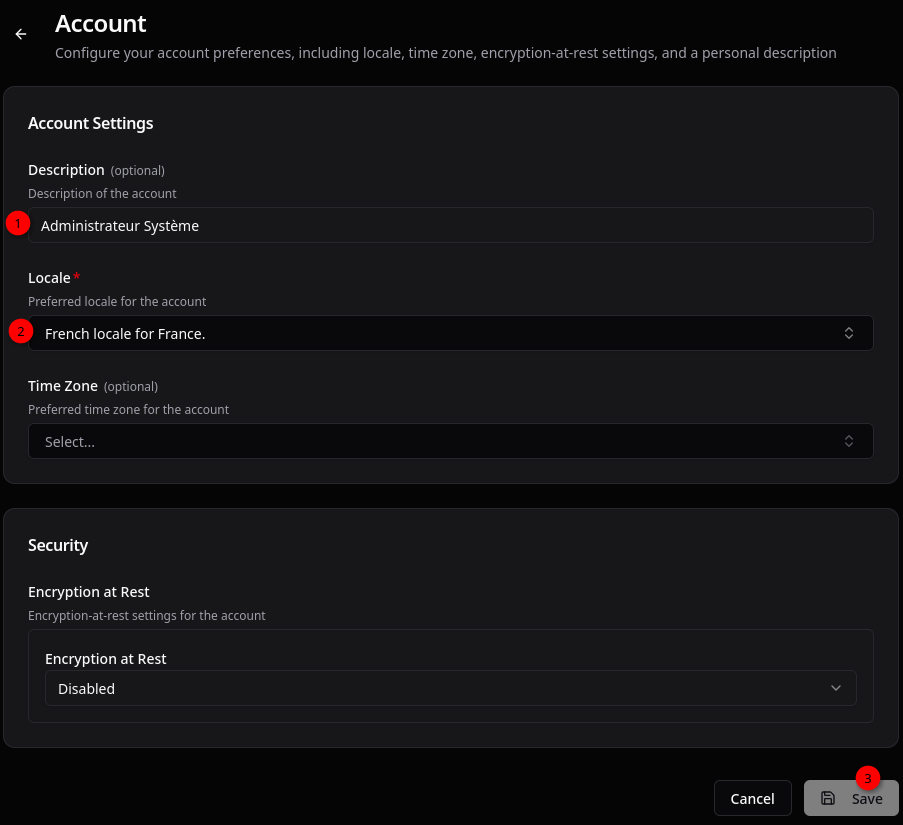
Utilisateur yann
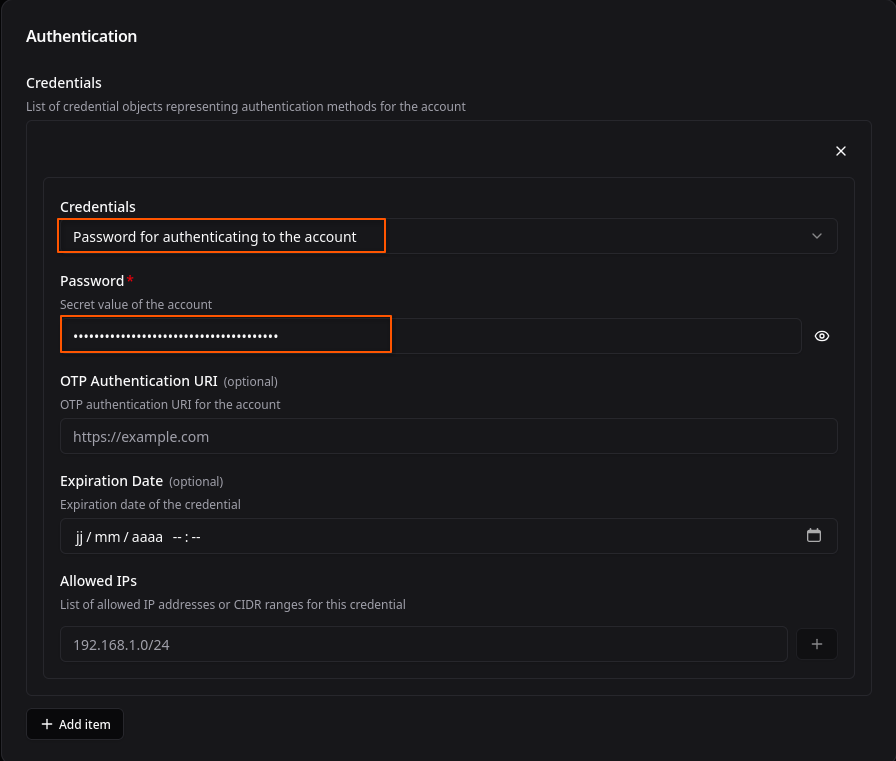
Compte de messagerie
Nous ajoutons un compte email.
Allez à Management > Directory > Accounts

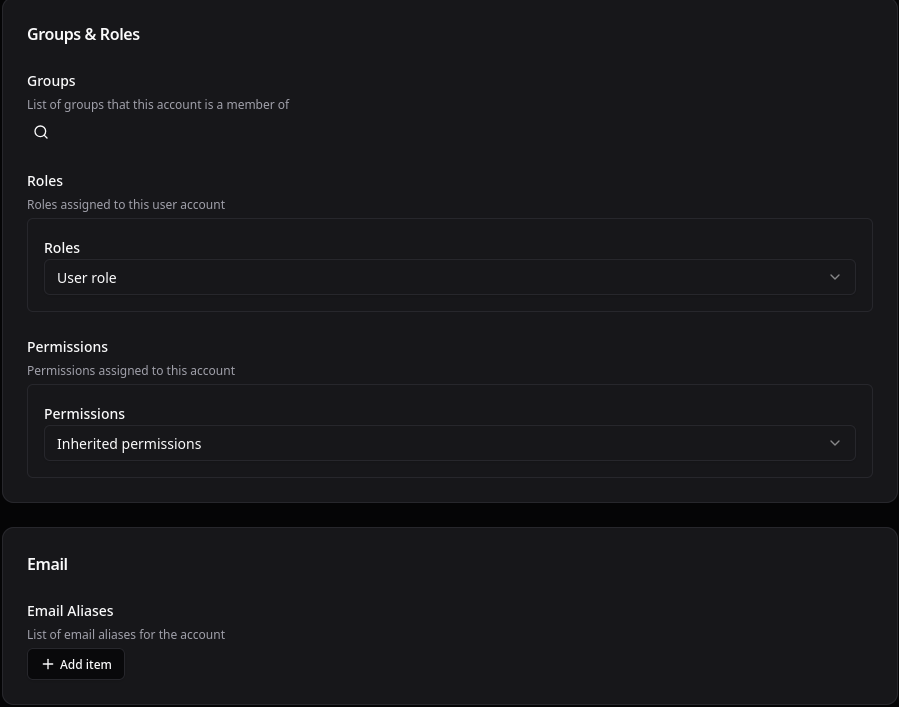
Calendrier et contacts
Accès Settings › Calendar & Contacts
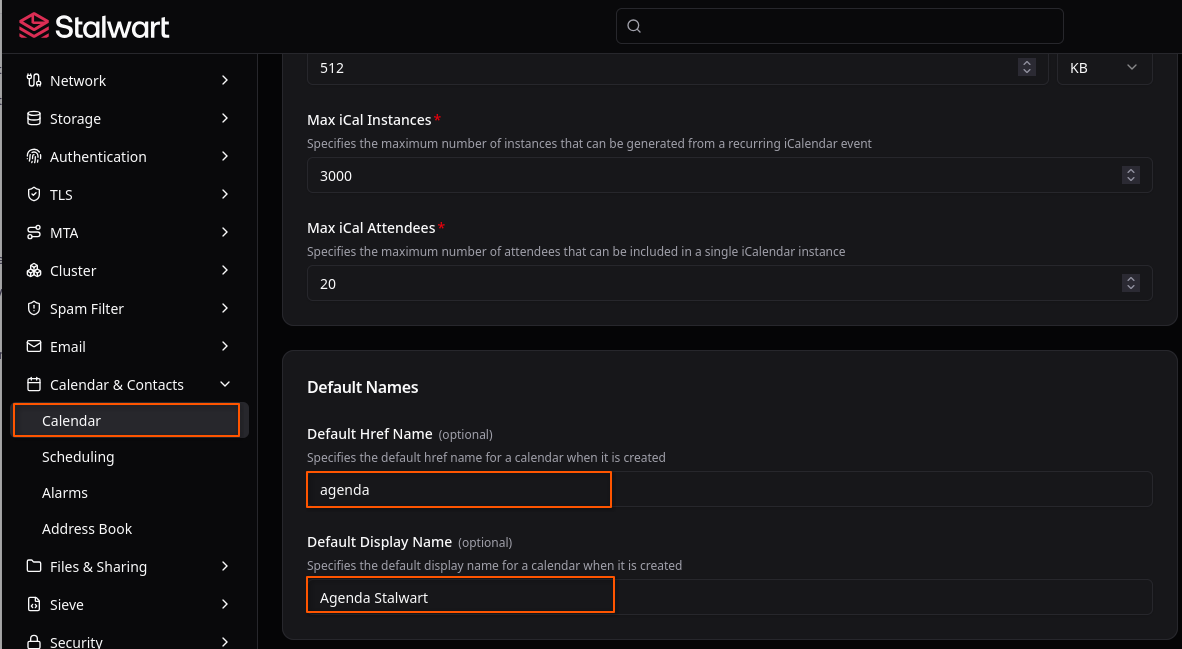
Ne pas oublier de cliquer sur “Save”
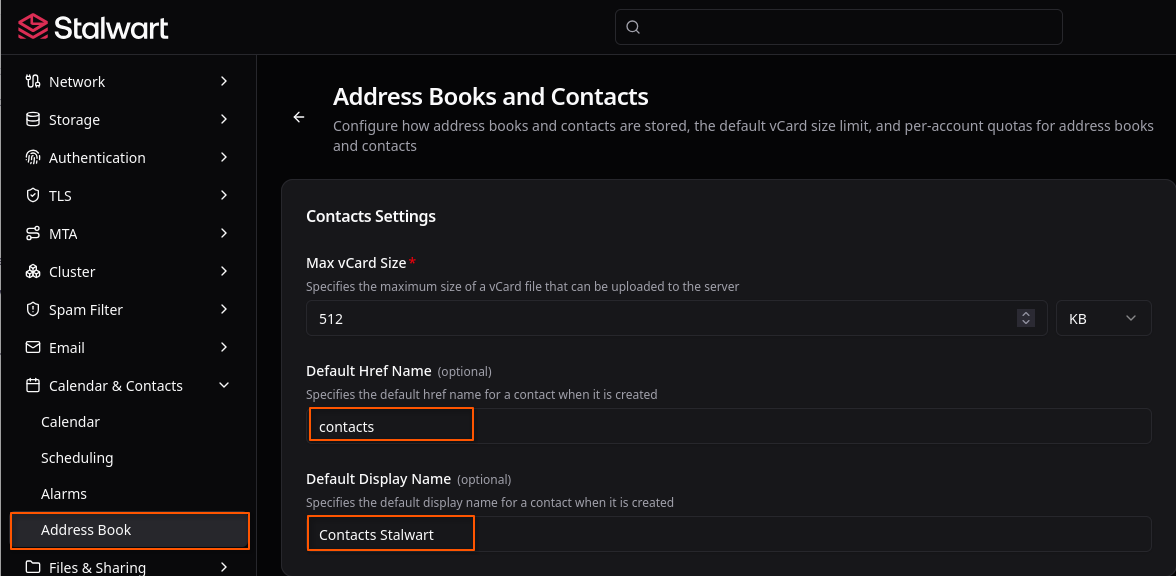
Ne pas oublier de cliquer sur “Save”
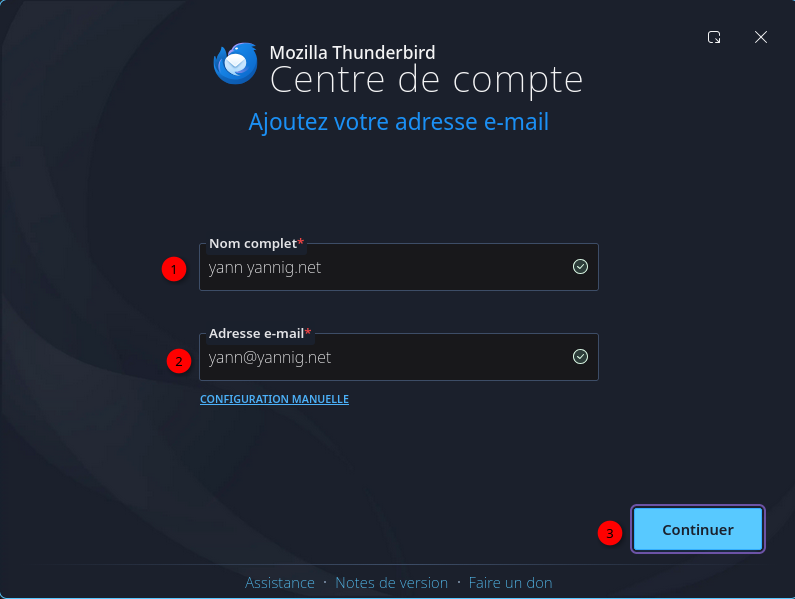
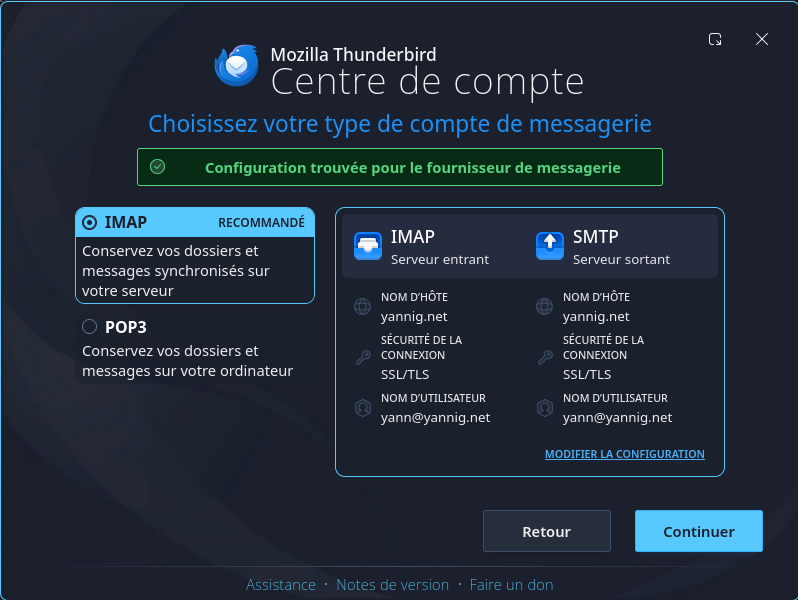
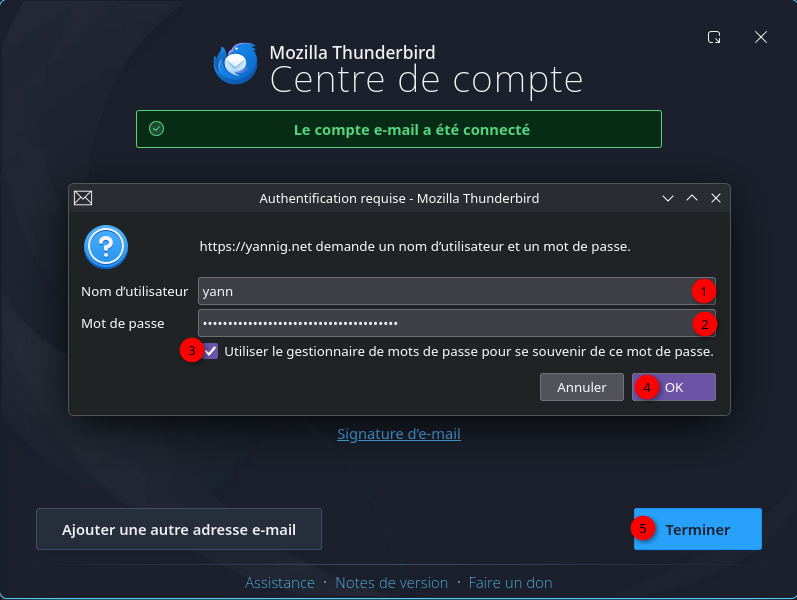
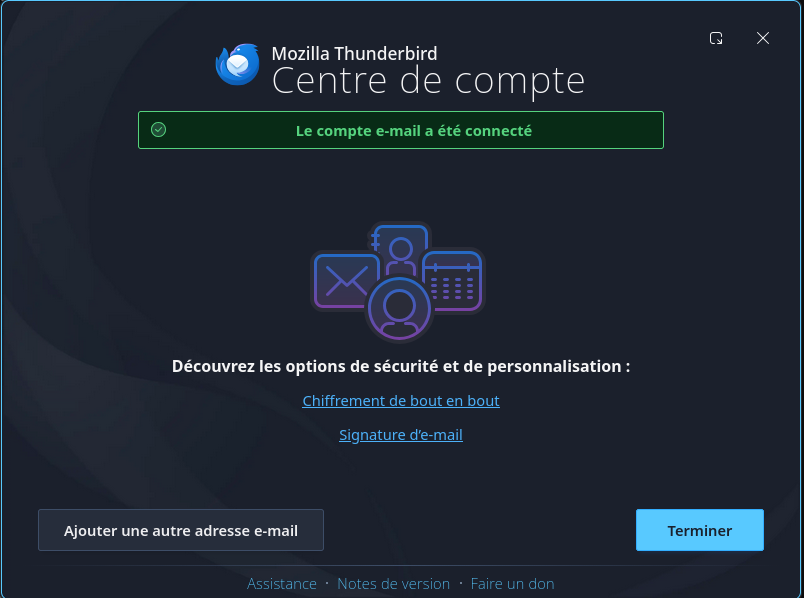
Thunderbird
Stalwart n’a pas d’email web, donc nous devons utiliser un client de messagerie externe.
Aller dans Paramètre des comptes et ajouter


Test messagerie
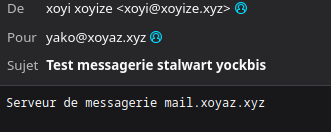
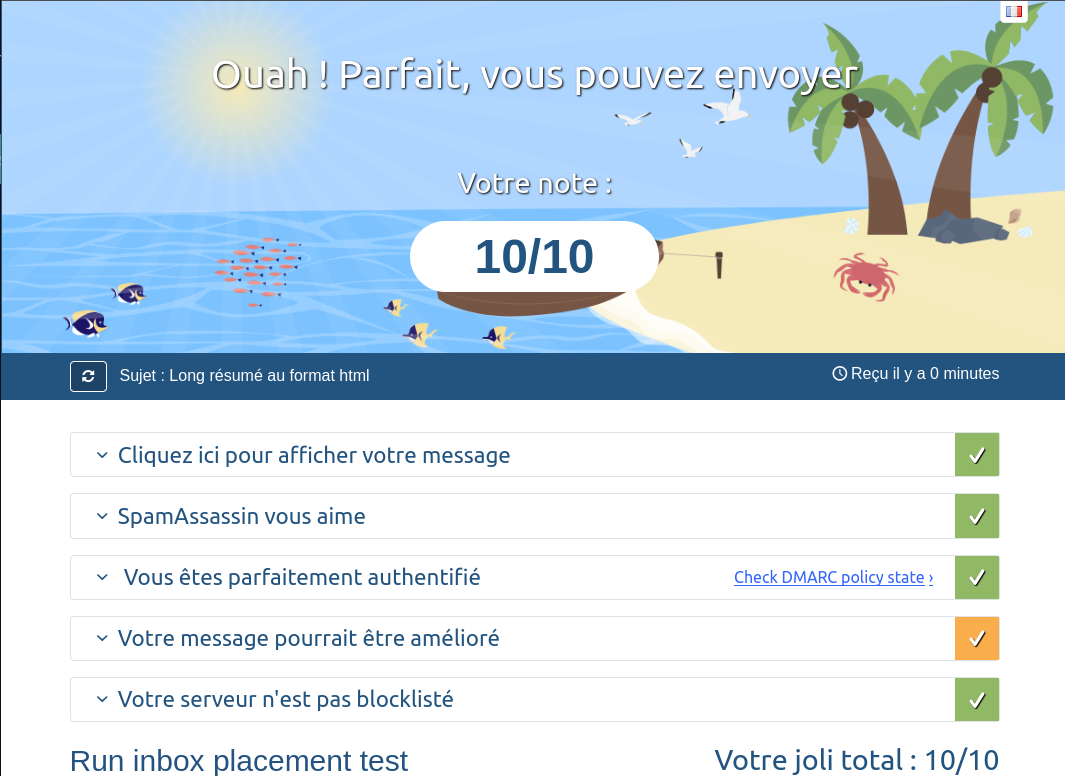
Maintenant que nous avons connecté notre Stalwart à Thunderbird, laissez-nous tester notre e-mail.
Allez au testeur de courrier https://www.mail-tester.com/.
Je vais envoyer un e-mail de test.

⚠️ Il faut saisir un sujet et du contenu

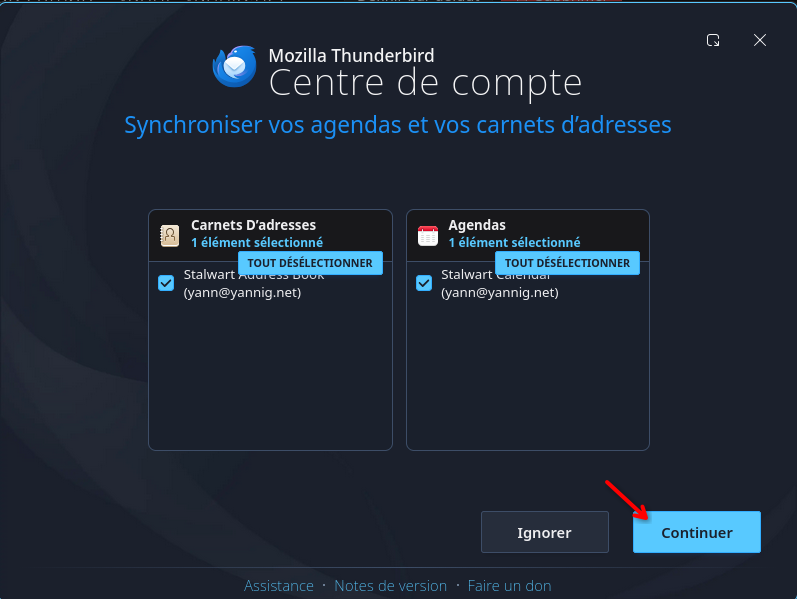
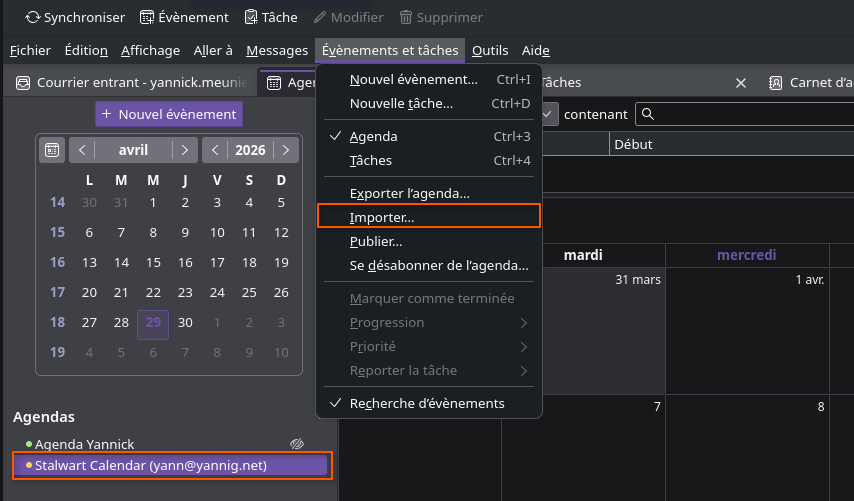
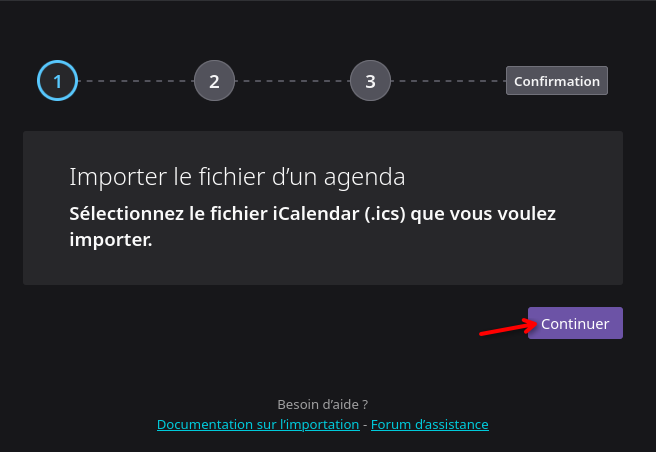
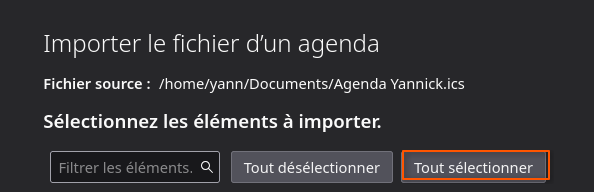
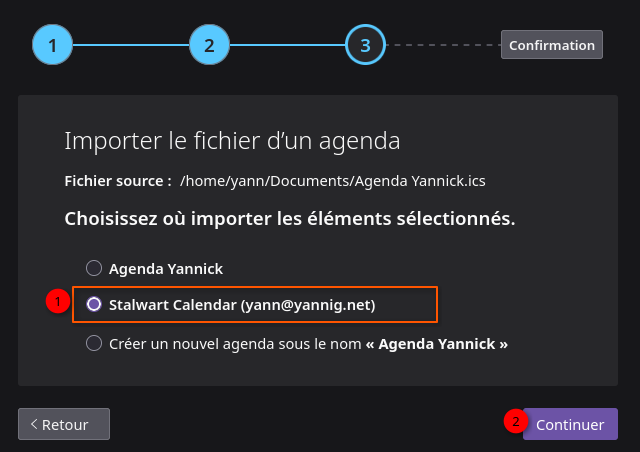
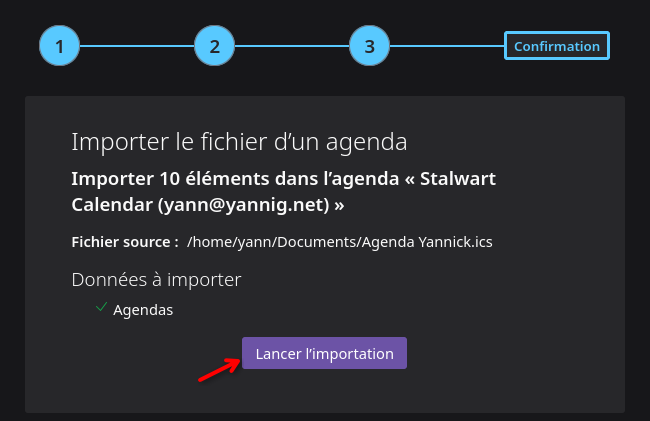
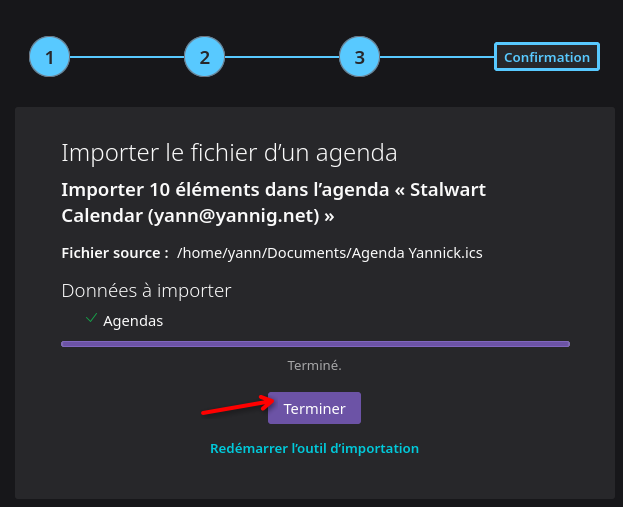
Importer un agenda
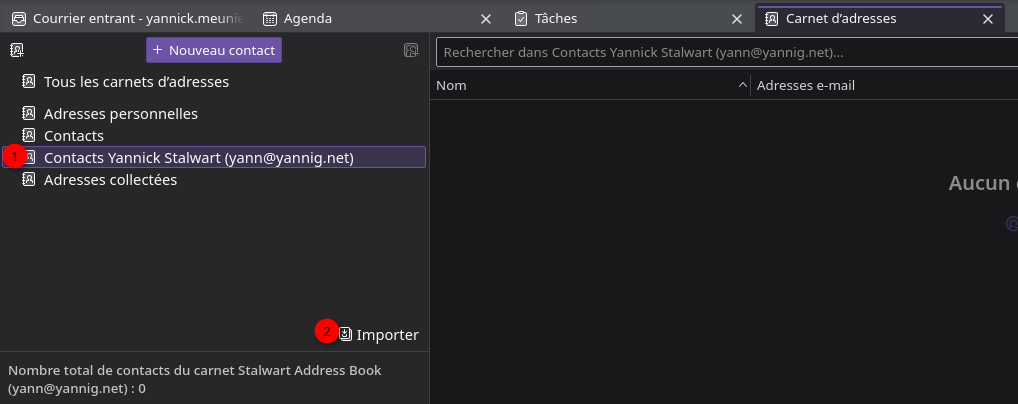
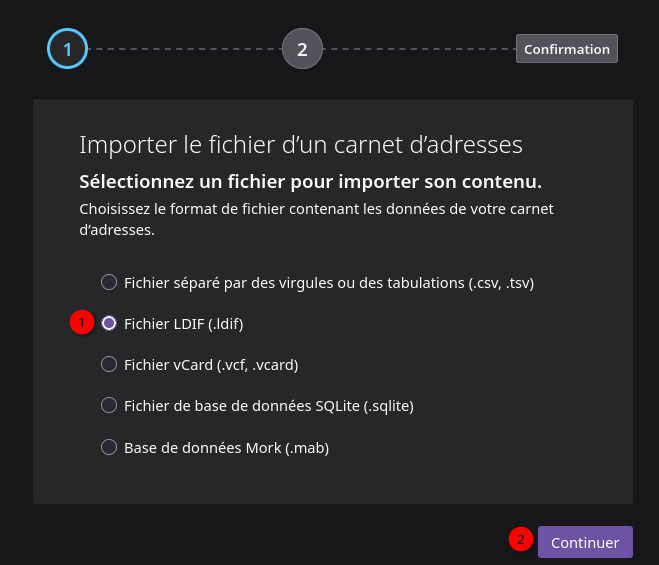
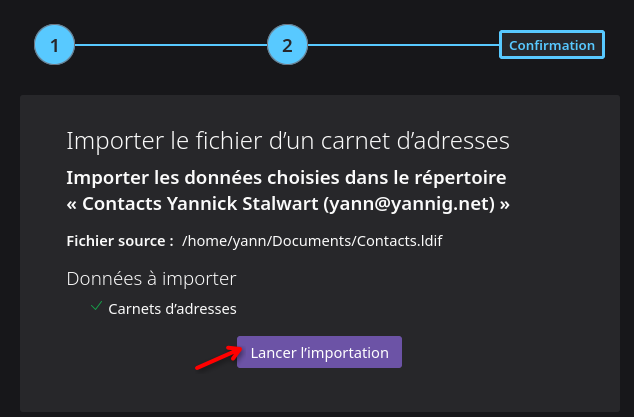
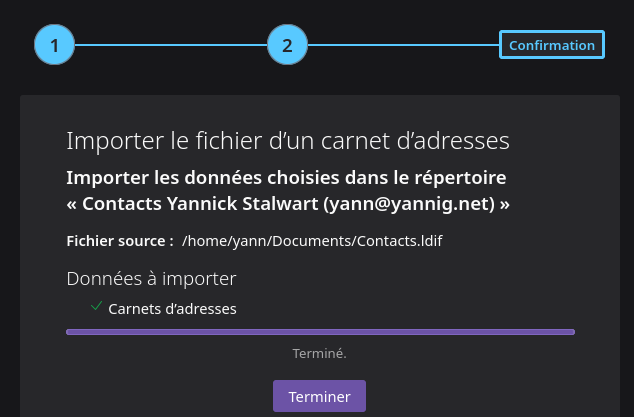
Importer un carnet d’adresse

Domaine yick.eu
Certificats TLS
On a une création de certificats existante pour le domaine yannig.net, regénérer les certificats en ajoutant le domaine yick.eu
Les clé OVH
1
2
export OVH_AK="wxxxxxxxxxxxxxxxx"
export OVH_AS="yxxxxxxxxxxxxxxxxxxxxxxx"
Générer les certificats des domaines
1
acme.sh --dns dns_ovh --server letsencrypt --issue --keylength ec-384 -d 'yannig.net' -d '*.yannig.net' -d 'yick.eu' -d 'cinay.eu'
Les certificats
1
2
3
4
[jeu. 23 avril 2026 16:40:34 CEST] Your cert is in: /home/yann/.acme.sh/yannig.net_ecc/yannig.net.cer
[jeu. 23 avril 2026 16:40:34 CEST] Your cert key is in: /home/yann/.acme.sh/yannig.net_ecc/yannig.net.key
[jeu. 23 avril 2026 16:40:34 CEST] The intermediate CA cert is in: /home/yann/.acme.sh/yannig.net_ecc/ca.cer
[jeu. 23 avril 2026 16:40:34 CEST] And the full-chain cert is in: /home/yann/.acme.sh/yannig.net_ecc/fullchain.cer
Installer les certificats et redémarrer le service stalwart
1
2
3
4
acme.sh --ecc --install-cert -d 'yannig.net' \
  --key-file       /etc/ssl/private/privkey.pem  \
  --fullchain-file /etc/ssl/private/fullchain.pem \
  --reloadcmd      "sudo systemctl restart stalwart"
Résultat commande ci-dessus
1
2
3
4
[jeu. 23 avril 2026 16:50:28 CEST] Installing key to: /etc/ssl/private/privkey.pem
[jeu. 23 avril 2026 16:50:28 CEST] Installing full chain to: /etc/ssl/private/fullchain.pem
[jeu. 23 avril 2026 16:50:28 CEST] Running reload cmd: sudo systemctl restart stalwart
[jeu. 23 avril 2026 16:50:30 CEST] Reload successful
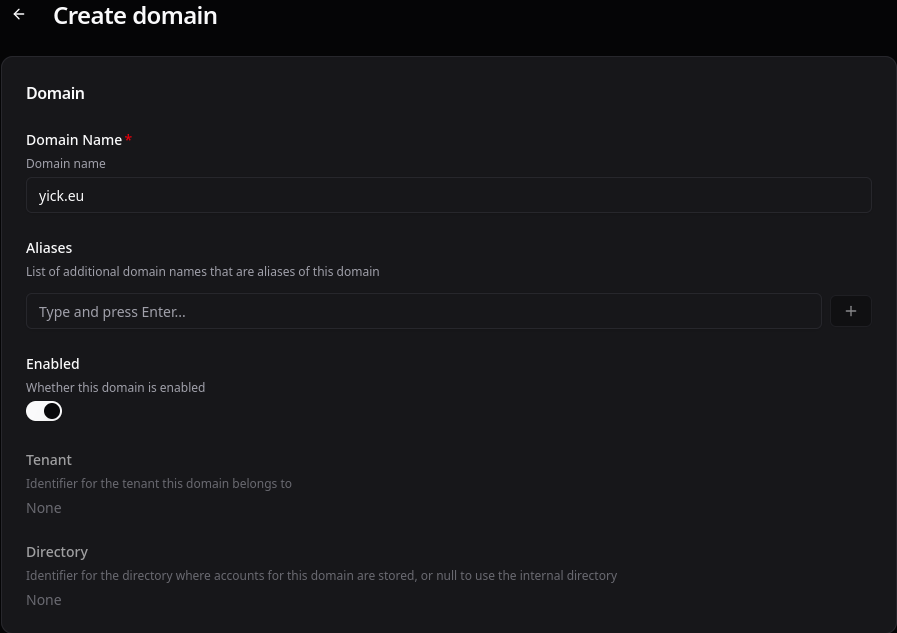
Stalwart domaine yick.eu
Connectez-vous au panneau d’administration de Stalwart avec un compte administrateur.
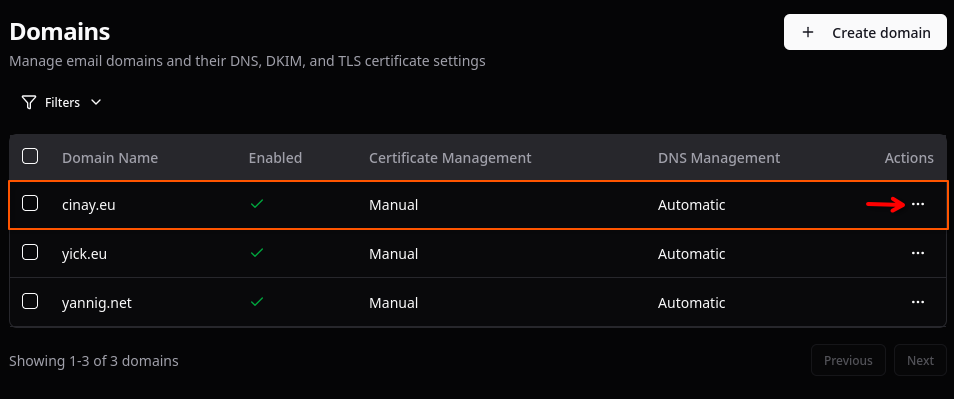
Dans la section Management –> Domains –> Domains
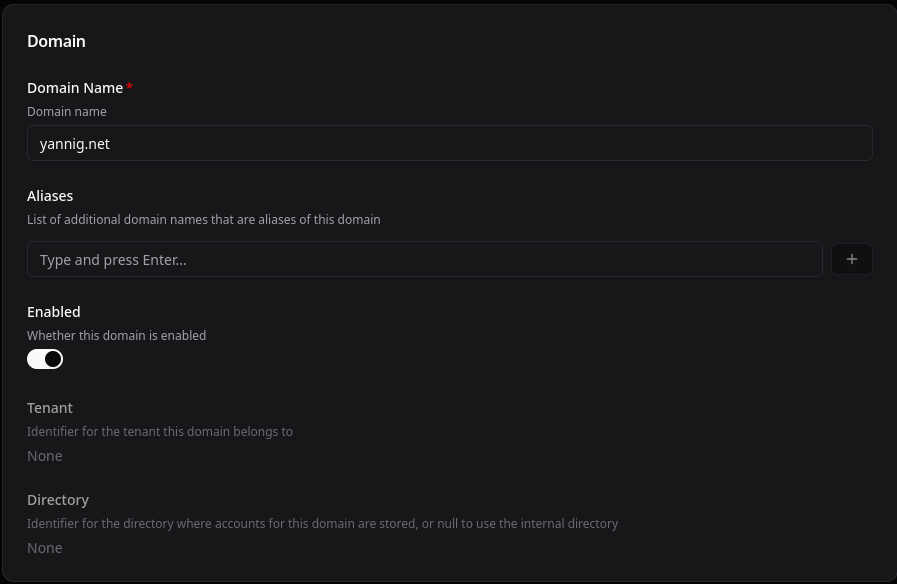
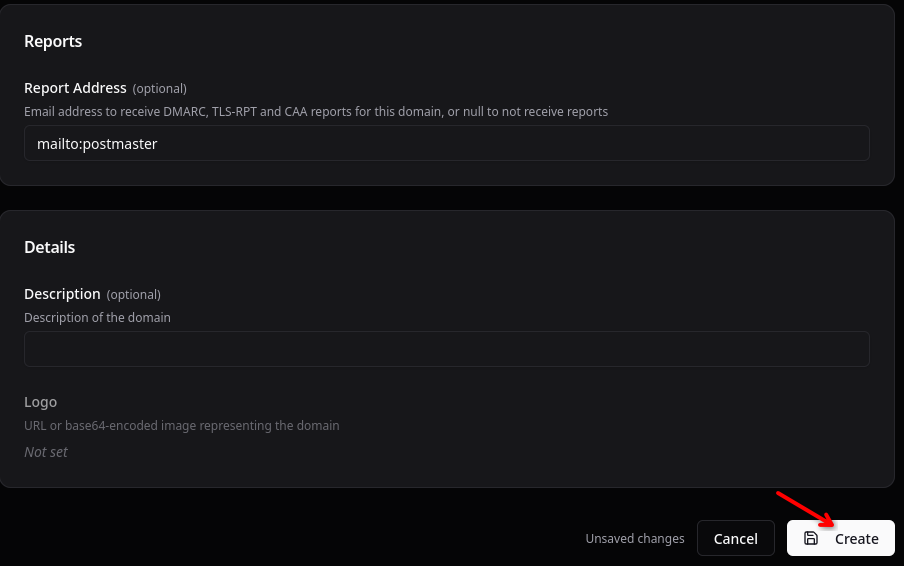
Ajouter un domaine, Cliquer sur “Create domain”
Créer un utilisateur yick@yick.eu
Ajout utilisateur à Thunderbird

Test https://www.mail-tester.com
Domaine cinay.eu
Certificats TLS
On a une création de certificats existante pour le domaine yannig.net, regénérer les certificats en ajoutant le domaine cinay.eu
Les clé OVH
1
2
export OVH_AK="wxxxxxxxxxxxxxxxx"
export OVH_AS="yxxxxxxxxxxxxxxxxxxxxxxx"
Générer les certificats des domaines
1
acme.sh --dns dns_ovh --server letsencrypt --issue --keylength ec-384 -d 'yannig.net' -d '*.yannig.net' -d 'yick.eu' -d 'cinay.eu'
Installer les certificats et redémarrer le service stalwart
1
2
3
4
acme.sh --ecc --install-cert -d 'yannig.net' \
  --key-file       /etc/ssl/private/privkey.pem  \
  --fullchain-file /etc/ssl/private/fullchain.pem \
  --reloadcmd      "sudo systemctl restart stalwart"
Stalwart domaine cinay.eu
Connectez-vous au panneau d’administration de Stalwart avec un compte administrateur.
Dans la section Management –> Domains –> Domains
Ajouter un domaine, Cliquer sur “Create domain”


“View Zone File”
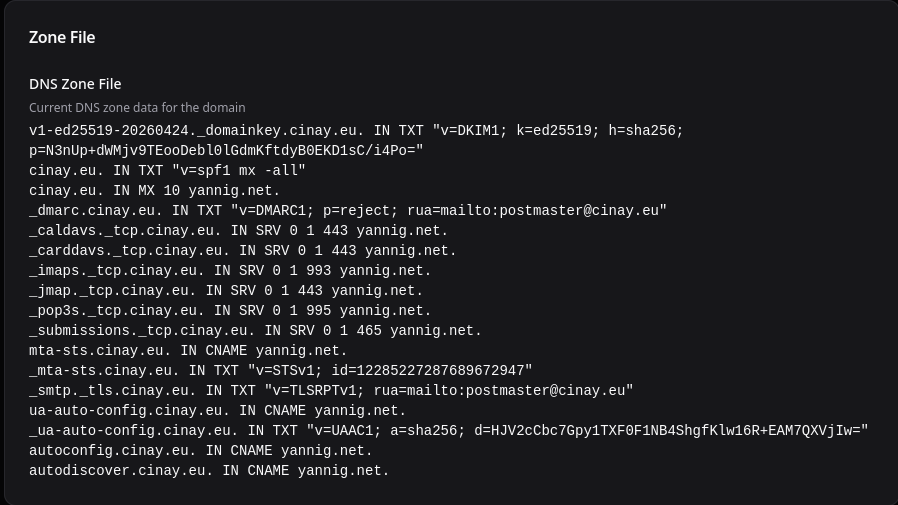
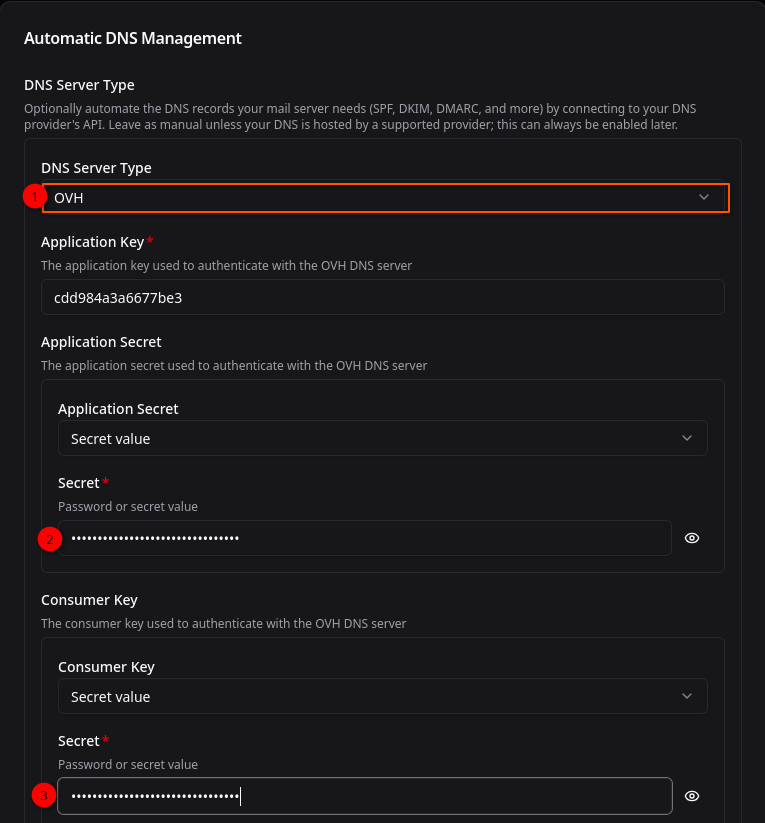
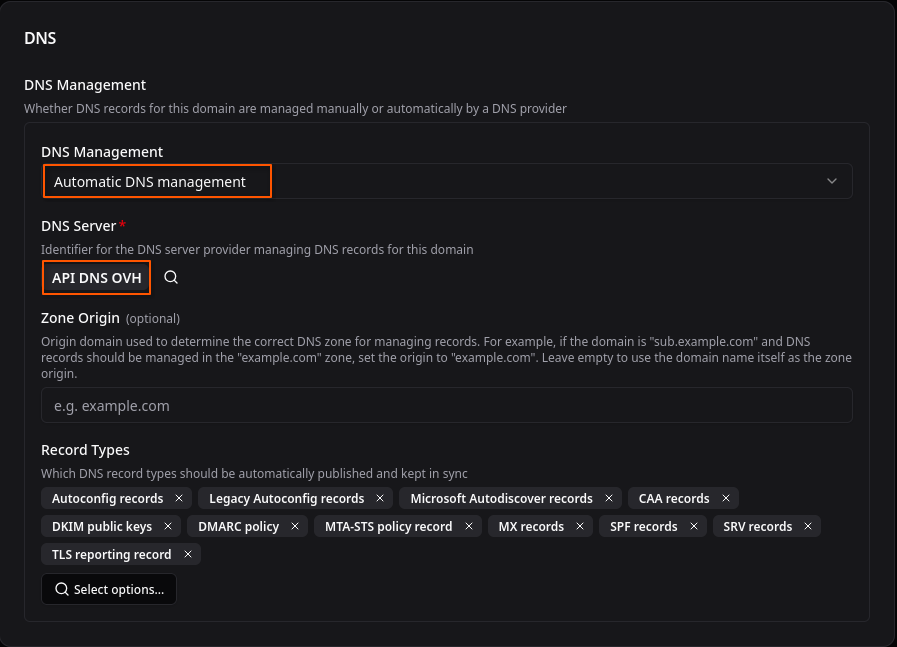
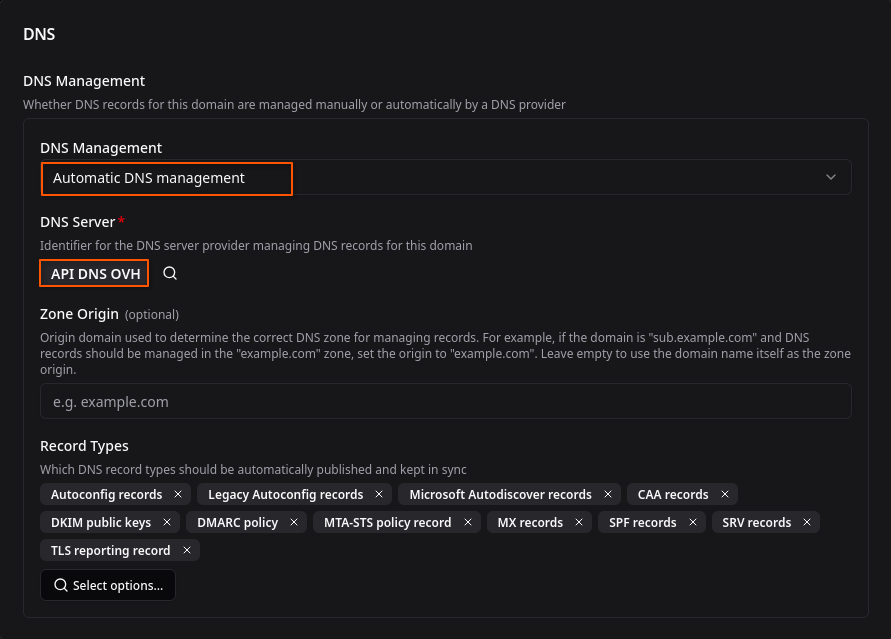
Les enregistrements du domaine cinay.eu sont mises à jour automatiquement par API DNS OVH
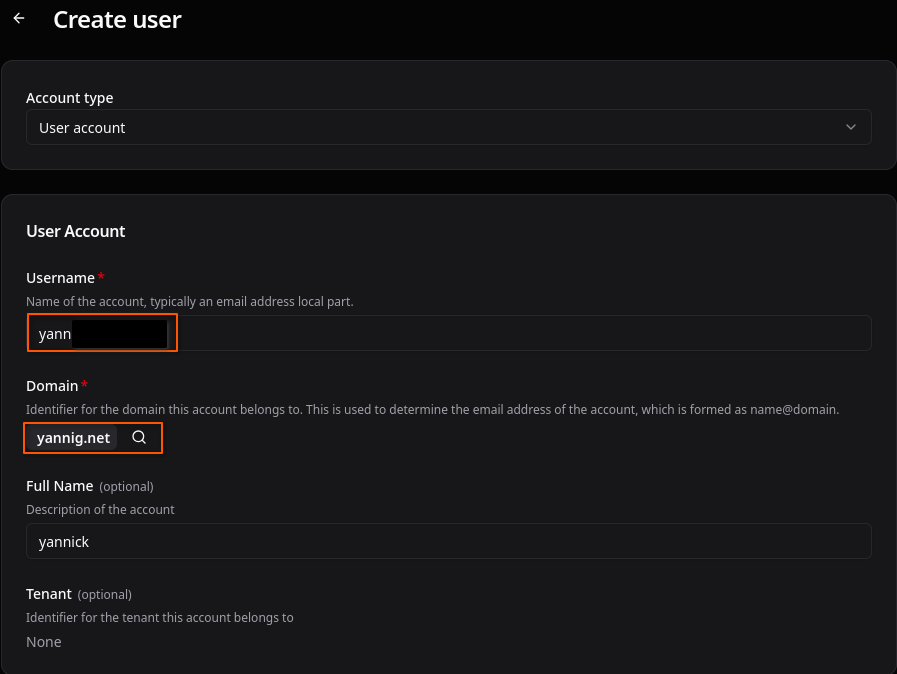
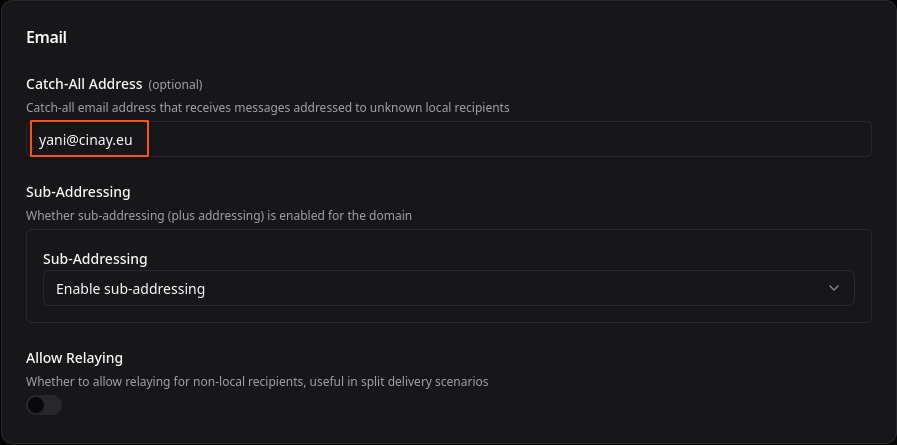
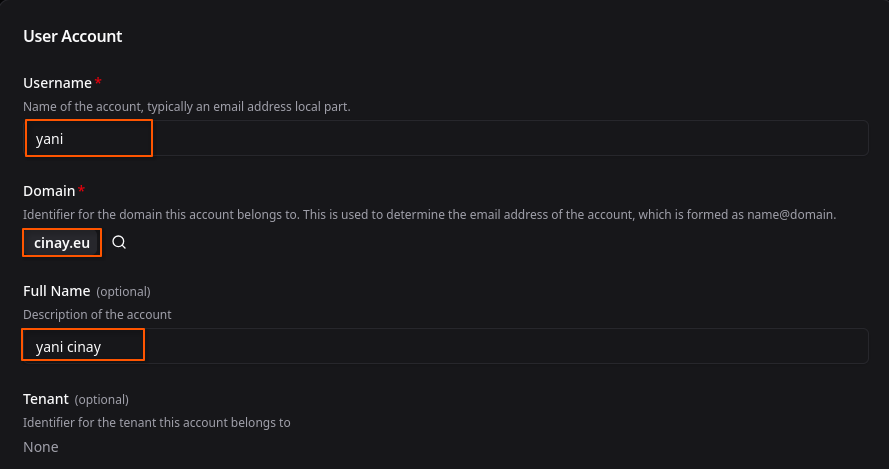
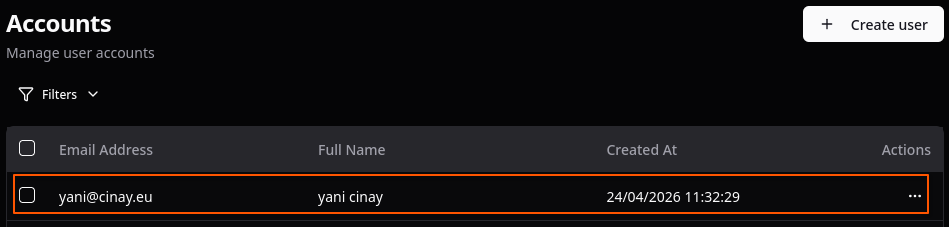
Créer un compte de messagerie “yani”
Nous ajoutons un compte email.
Allez à Management > Directory > Accounts
Cliquer sur “Create user”
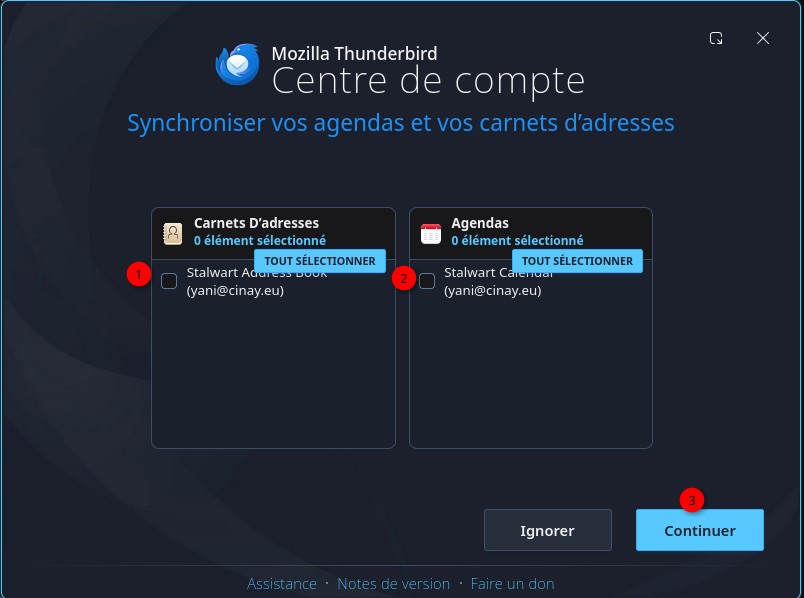
Ajout utilisateur à Thunderbird


Test https://www.mail-tester.com
Annexe
Définition SPF DKIM DMARC
SPF
SPF est une norme pour vérifier l’adresse IP expéditrice d’un email. La vérification se fait en utilisant le nom de domaine de l’expéditeur d’enveloppe (MAIL FROM:) et en récupérant un enregistrement DNS qui va lister les adresses IP autorisées. La vérification peut aussi se faire par rapport au FQDN annoncé dans le HELO (cf (RFC 7208, 2.3)
Voici un exemple d’enregistrement DNS pour du SPF :
1
@ IN TXT "v=spf1 mx ip4:192.0.2.142 ip4:192.0.2.0/24 ip6:2001:db8::/32 -all"
Voici un exemple d’enregistrement DNS n’autorisant aucun envoi (à mettre pour vos domaines voire sous-domaines qui n’envoient jamais d’emails) :
1
@ IN TXT "v=spf1 -all"
On peut utiliser des include: vers un autre enregistrement TXT.
Chez Evolix, on utilise ainsi include:spf.protection.evolix.net. Si vous utilisez Mailchimp vous devez ajouter include:spf.mandrillapp.com par exemple.
Il faut savoir que l’on peut contourner la longueur maximale de 255 caractères pour un enregistrement TXT en concatener plusieurs chaînes. On notera qu’au moins une des deux chaînes doit contenir une espace. Voici un exemple :
1
@ IN TXT "v=spf1 mx ip4:192.0.2.142 ip4:192.0.2.0/24" " ip6:2001:db8::/32 ~all"
En pratique il est conseillé d’éviter une longueur totale du champ TXT (FQDN compris) de plus de 450 octets (à vérifier via MSG SIZE rcvd: avec dig).
Il est également conseillé de ne pas mettre plus de 101 adresses ou préfixes IP (Gmail refuserait au-delà et de ne pas avoir besoin de plus de 10 résolutions DNS pour savoir si l’IP expéditrice est incluse dans l’enregistrement SPF.
Attention, la RFC 7208 spécifie que le mot clé PTR ne devrait pas être utilisé même si en pratique ça semble toujours utilisé (OVH l’utilise par exemple).
Enfin, on se demande souvent si l’on doit mettre “~all” ou “-all” : on a tendance à privilégier de plus en plus -all car cela donnera davantage de rejets explicites (au niveau SMTP par exemple, au lieu d’aller en Spam ou Quarantaine).
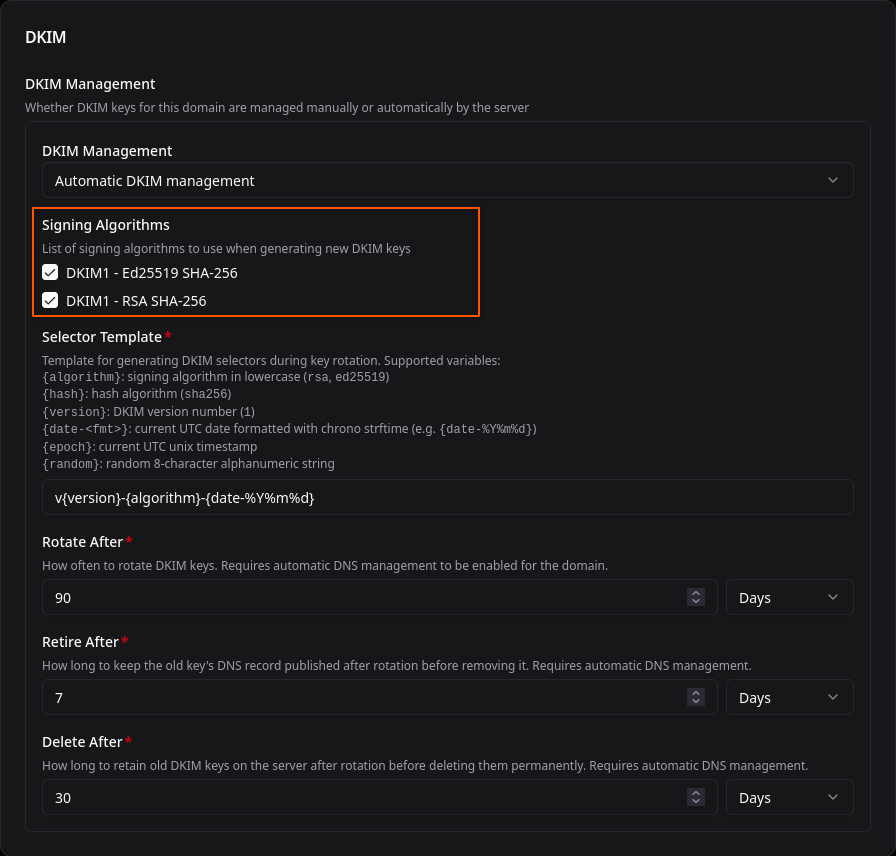
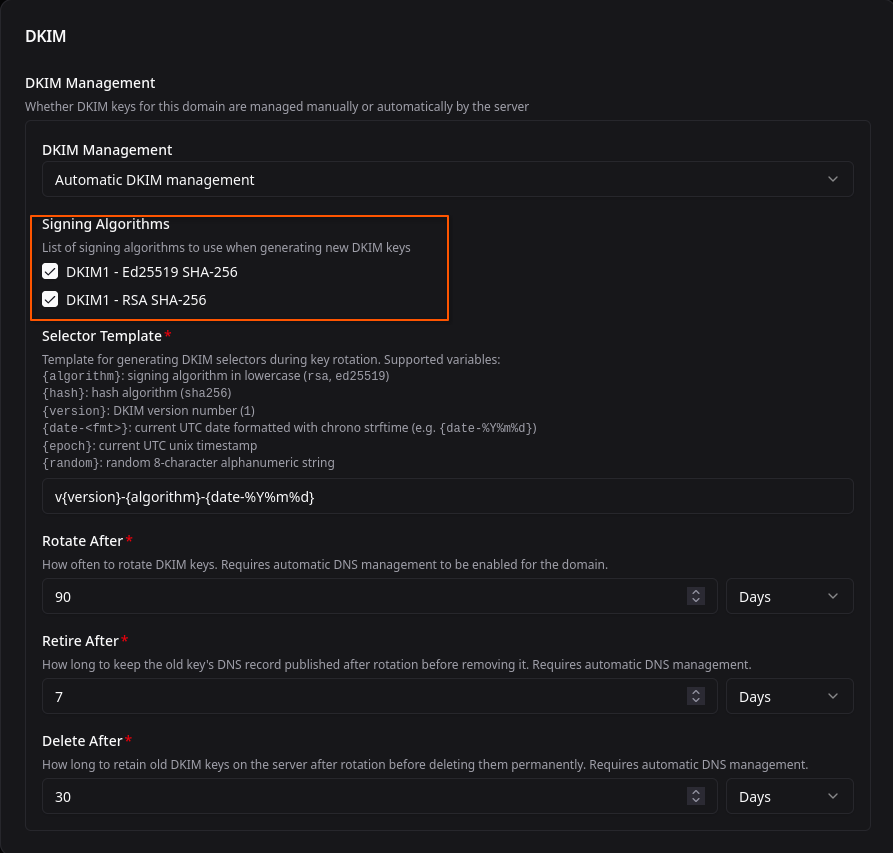
DKIM
DKIM est une norme pour ajouter une signature cryptographique dans les entêtes d’un email envoyé. La signature se fait à partir à de l’expéditeur d’entête (From: d’un email), des entêtes au choix (sujet, date, etc.) et le corps du message. Cela utilise aussi une clé publique stockée dans un enregistrement DNS TXT.
Voir https://wiki.evolix.org/HowtoOpenDKIM
DMARC
DMARC est une spécification qui vient en complément de DKIM et SPF. Cela permet de spécifier aux serveurs de messagerie comment traiter les emails reçus non conformes aux vérifications SPF et/ou DKIM. Cela permet également de récupérer des informations voire des emails complets si ils ne sont pas conformes. Encore une fois, cela se fait avec un enregistrement DNS TXT.
Attention, l’enregistrement DMARC recherché est celui du domaine de l’expéditeur d’entête (From:), appelé aussi “RFC5322.From”.
Pour que la vérification DMARC passe, il suffit que l’un des cas soit rempli :
- DKIM passe (et le “RFC5322.From” aligné, mais c’est le principe de base sauf cas tordu)
- SPF passe ET le “RFC5321.MailFrom” est aligné avec le “RFC5322.From”.
DMARC n’exige pas que DKIM et SPF soit valide. Ainsi DMARC peut ainsi très bien être “PASS” avec un SPF invalide ou avec une signature DKIM invalide !
Plus d’infos dans la RFC7489 : Domain-based Message Authentication, Reporting, and Conformance (DMARC)
Voici un exemple d’enregistrement DNS basique :
1
_dmarc IN TXT "v=DMARC1; p=reject; sp=reject; aspf=s; adkim=s"
On pourra spécifier :
p=nonesi l’on ne veut pas que les emails non conformes soient rejetésp=rejectsi l’on veut que les emails non conformes soient rejetés (rarement utilisé)p=quarantinesi l’on veut que les emails non conformes soient mis de côté (dans une sous-boîte Spam en général)
De façon similaire, on peut spécifier la politique par défaut pour les sous-domaines avec sp=. En effet, si un enregistrement _dmarc n’est pas trouvé pour un sous-domaine, il interrogera le « top-level domain » (ou encore appelé « organizational domain »).
Attention, si vous spécifiez rua=mailto:dmarc@example.com vous recevrez pas mal de rapports Report domain de Google, Outlook, etc. vous notifiant des emails non conformes. Les rapports incluent un fichier XML, on peut le lire via des outils comme mxtoolbox ou easydmarc.
On pourra aussi spécifier que l’on veut un alignement entre l’expéditeur d’enveloppe (MAIL FROM: utilisé par SPF) et l’expéditeur d’entête (From:) :
aspf=r: relaxed, on exige un alignement mais cela peut-être des sous-domainesaspf=s: strict, on exige que cela soit exactement le même FQDN
De façon similaire, on peut aussi spécifier que la signature DKIM corresponde bien à l’expéditeur d’entête (From:) :
adkim=r: relaxed, on exige que cela correspond à un domaine ou sous-domaineadkim=s: strict, on exige que cela soit exactement le même FQDN
Voici un exemple d’un enregistrement DNS plus avancé :
1
_dmarc IN TXT "v=DMARC1;p=reject;sp=none;rua=mailto:dmarc+aggr@example.com;ruf=mailto:dmarc+forensic@example.com;fo=1;adkim=s;aspf=s;pct=100"
Un outil génial pour tester DMARC est https://www.learndmarc.com/ : il faut envoyer un email et l’on a toutes les explications sur SPF / DKIM / DMARC et notamment l’alignement.
Test et vérification serveur mail
- Swaks est le “Couteau de l’armée suisse pour SMTP”
-
17 outils SMTP pour diagnostiquer et tester la sécurité du courrier électronique
- DMARC ADVISOR: Free DMARC Tools
- Validateur MTA-STS gratuit
- CheckTLS vous permet de vérifier la sécurité de votre messagerie et le fonctionnement de vos courriels. EmailSentry Outlook vous aide à vous assurer que tous les courriels que vous envoyez sont privés, légaux et sûrs.
- Web Wiz: Outil de test de serveur de messagerie.Mail Server Test Tool
- Vérifier DKIM
- Testeur de courrier https://www.mail-tester.com/
Parefeu - Rejeter une adresse IP
Pour rejeter l’IP publique 77.83.39.87 (sur tous les ports) :
1
sudo ufw reject from 77.83.39.87 to any
Si vous voulez bloquer seulement le SMTP (ports 25 et 587) :
1
2
sudo ufw reject from 77.83.39.87 to any port 25
sudo ufw reject from 77.83.39.87 to any port 587
Ensuite rechargez/activez et vérifiez :
1
2
sudo ufw reload
sudo ufw status numbered
Pour supprimer plus tard (remplacez N par le numéro de la règle) :
1
sudo ufw delete N
Pour un blocage silencieux (ne pas répondre aux tentatives de connexion), utilisez
denyau lieu dereject.
Le parefeu après modification
1
2
3
4
5
6
7
8
9
10
11
12
13
14
15
16
17
Status: active

     To                         Action      From
     --                         ------      ----
[ 1] 55240/tcp                  ALLOW IN    Anywhere
[ 2] 443                        ALLOW IN    Anywhere
[ 3] 25                         ALLOW IN    Anywhere
[ 4] 993                        ALLOW IN    Anywhere
[ 5] 465                        ALLOW IN    Anywhere
[ 6] 587/tcp                    ALLOW IN    Anywhere
[ 7] Anywhere                   DENY IN     77.83.39.87
[ 8] 55240/tcp (v6)             ALLOW IN    Anywhere (v6)
[ 9] 443 (v6)                   ALLOW IN    Anywhere (v6)
[10] 25 (v6)                    ALLOW IN    Anywhere (v6)
[11] 993 (v6)                   ALLOW IN    Anywhere (v6)
[12] 465 (v6)                   ALLOW IN    Anywhere (v6)
[13] 587/tcp (v6)               ALLOW IN    Anywhere (v6)
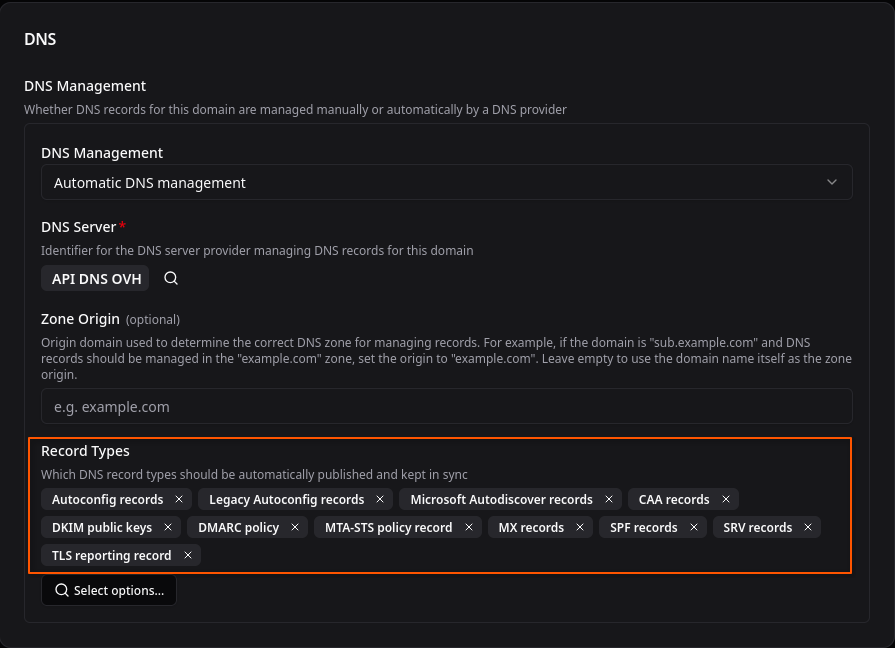
Modification domain
Management –> Domains –> yannig.net
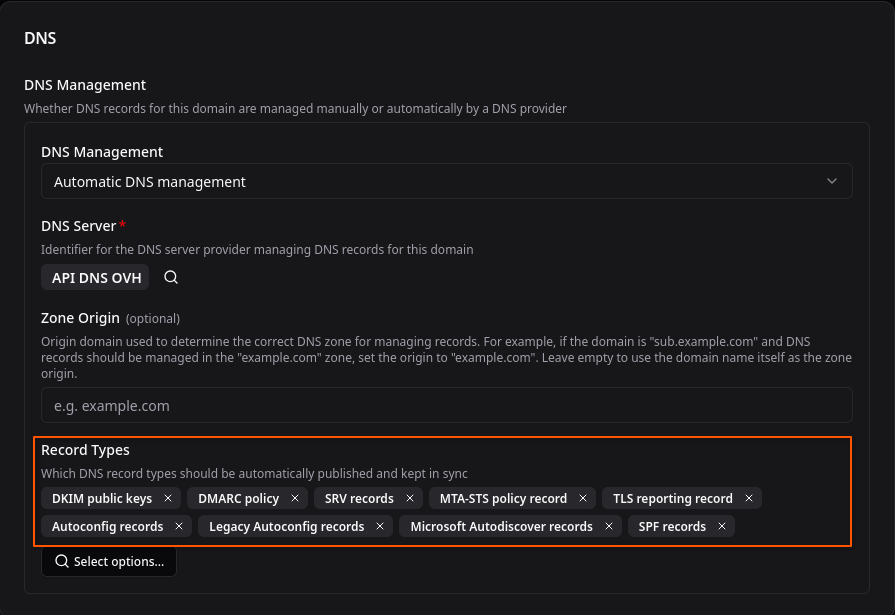
- Les options
- DKIM public keys
- TLSA records
- SPF records
- MX records
- DMARC policy
- SRV records
- MTA-STS policy record
- TLS reporting record
- CAA records
- Autoconfig records
- Legacy Autoconfig records
- Microsoft Autodiscover records
Management –> Domains –> cinay.eu
- Les options
- DKIM public keys
- TLSA records
- SPF records
- MX records
- DMARC policy
- SRV records
- MTA-STS policy record
- TLS reporting record
- CAA records
- Autoconfig records
- Legacy Autoconfig records
- Microsoft Autodiscover records
Management –> Domains –> yick.eu

- Les options
- DKIM public keys
- TLSA records
- SPF records
- MX records
- DMARC policy
- SRV records
- MTA-STS policy record
- TLS reporting record
- CAA records
- Autoconfig records
- Legacy Autoconfig records
- Microsoft Autodiscover records