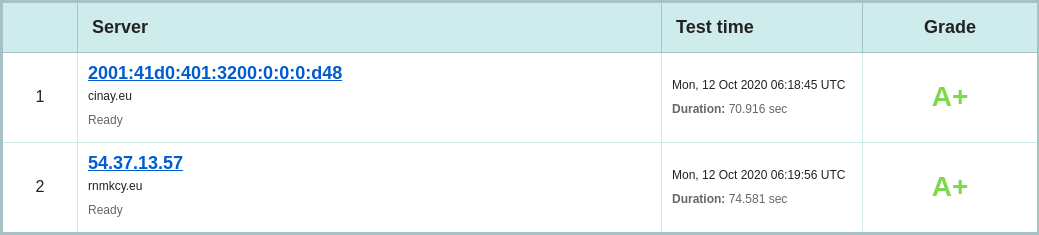
vps785909 debian 10 - audio - wireguard - rnmkcy.eu (INACTIF)
OVH vps785909 (1 vCore/2GoRam/20GoSSD) Debian Buster
 Serveur vps785909
 Debian 10
PARAMETRES D’ACCES:
L’adresse IPv4 du VPS est : 54.37.13.57
L’adresse IPv6 du VPS est : 2001:41d0:401:3200:0:0:0:d48
Le nom du VPS est : vps785909.ovh.net
Connexion SSH en “root” ( jHeW45mA )
1
ssh root@54.37.13.57
Installer noyau 5.6+
1
2
3
echo "deb http://deb.debian.org/debian/ unstable main" | sudo tee /etc/apt/sources.list.d/unstable-wireguard.list
printf 'Package: *\nPin: release a=unstable\nPin-Priority: 90\n' | sudo tee /etc/apt/preferences.d/limit-unstable
apt update && apt upgrade
Rechercher l’image
1
2
apt search linux-image-5
apt install linux-image-5.8.0-2-cloud-amd64
 Réseau
Créer un bash pour désactiver l’initialisation réseau par le cloud sur le VPS OVH
1
nano initres.sh
1
2
3
4
5
6
7
8
9
10
11
12
13
14
15
16
17
18
19
20
21
22
23
24
25
26
27
28
29
30
31
32
33
34
#!/bin/bash
#
# To disable cloud-init's network configuration capabilities, write a file
# /etc/cloud/cloud.cfg.d/99-disable-network-config.cfg with the following:
# network: {config: disabled}
#
#Création du fichier **/etc/cloud/cloud.cfg.d/99-disable-network-config.cfg** en mode su
echo "network: {config: disabled}" > /etc/cloud/cloud.cfg.d/99-disable-network-config.cfg
#
# Effacerle fichier /etc/network/interfaces
rm /etc/network/interfaces
# Recréer le fichier /etc/network/interfaces
cat > /etc/network/interfaces << EOF
auto lo
iface lo inet loopback

auto eth0
iface eth0 inet dhcp
iface eth0 inet6 static
 address 2001:41d0:401:3200:0:0:0:d48
 netmask 128
 post-up /sbin/ip -6 route add 2001:41d0:0401:3200:0000:0000:0000:0001 dev eth0
 post-up /sbin/ip -6 route add default via 2001:41d0:0401:3200:0000:0000:0000:0001 dev eth0
 pre-down /sbin/ip -6 route del default via 2001:41d0:0401:3200:0000:0000:0000:0001 dev eth0
 pre-down /sbin/ip -6 route del 2001:41d0:0401:3200:0000:0000:0000:0001 dev eth0
EOF
#
# Configuration OVH à modifier /etc/cloud/cloud.cfg
sed -i 's/preserve_hostname: false/preserve_hostname: true/g' /etc/cloud/cloud.cfg
sed -i 's/manage_etc_hosts: true/manage_etc_hosts: false/g' /etc/cloud/cloud.cfg
#
# Redémarrage de la machine
systemctl reboot
Droits et exécution
1
chmod +x initres.sh && ./initres.sh
Patienter quelques minutes avant la reconnexion…
1
2
3
54.37.13.57
2001:41d0:401:3200:0:0:0:d48
2001:41d0:0401:3200:0000:0000:0000:0001
Se connecter en root via SSH
1
ssh root@54.37.13.57
Vérifier le réseau ip a et noyau uname -r
1
2
3
4
5
6
7
8
9
10
11
12
13
14
1: lo: <LOOPBACK,UP,LOWER_UP> mtu 65536 qdisc noqueue state UNKNOWN group default qlen 1000
    link/loopback 00:00:00:00:00:00 brd 00:00:00:00:00:00
    inet 127.0.0.1/8 scope host lo
       valid_lft forever preferred_lft forever
    inet6 ::1/128 scope host
       valid_lft forever preferred_lft forever
2: eth0: <BROADCAST,MULTICAST,UP,LOWER_UP> mtu 1500 qdisc pfifo_fast state UP group default qlen 1000
    link/ether fa:16:3e:61:4e:9a brd ff:ff:ff:ff:ff:ff
    inet 54.37.13.57/32 brd 54.37.13.57 scope global dynamic eth0
       valid_lft 86304sec preferred_lft 86304sec
    inet6 2001:41d0:401:3200::d48/128 scope global
       valid_lft forever preferred_lft forever
    inet6 fe80::f816:3eff:fe61:4e9a/64 scope link
       valid_lft forever preferred_lft forever
Linux vps785909 5.8.0-2-cloud-amd64 #1 SMP Debian 5.8.10-1 (2020-09-19) x86_64 GNU/Linux
Fuseau Europe/Paris : dpkg-reconfigure tzdata
 Domaine rnmkcy.eu
Zone dns OVH
1
2
3
4
5
6
$TTL 3600
@	IN SOA dns20.ovh.net. tech.ovh.net. (2020022809 86400 3600 3600000 300)
        IN NS     ns20.ovh.net.
        IN NS     dns20.ovh.net.
        IN A      54.37.13.57
        IN AAAA   2001:41d0:401:3200:0:0:0:d48
Reverse DNS sur “server” , IP 54.37.13.57 → rnmkcy.eu
Hostname
1
hostnamectl set-hostname rnmkcy.eu
1
2
3
4
5
6
7
8
9
   Static hostname: rnmkcy.eu
         Icon name: computer-vm
           Chassis: vm
        Machine ID: 0ef30511d74646618d92e464efb187ce
           Boot ID: 324a20f68c0e450cb9a0cfba56ecb180
    Virtualization: kvm
  Operating System: Debian GNU/Linux 10 (buster)
            Kernel: Linux 5.8.0-2-cloud-amd64
      Architecture: x86-64
Création utilisateur
Utilisateur vpsrnm
1
useradd -m -d /home/vpsrnm/ -s /bin/bash vpsrnm
Mot de passe vpsrnm
1
passwd vpsrnm
Visudo pour les accès root via utilisateur vpsrnm
1
echo "vpsrnm     ALL=(ALL) NOPASSWD: ALL" >> /etc/sudoers
Changer le mot de passe root
1
passwd root
 OpenSSH, clé et script
connexion avec clé
sur l'ordinateur de bureau
Générer une paire de clé curve25519-sha256 (ECDH avec Curve25519 et SHA2) nommé kvm-cinay pour une liaison SSH avec le serveur KVM.
1
ssh-keygen -t ed25519 -o -a 100 -f ~/.ssh/kvm-vps785909
Envoyer la clé publique sur le serveur KVM
1
scp ~/.ssh/kvm-vps785909.pub vpsrnm@54.37.13.57:/home/vpsrnm/
sur le serveur KVM On se connecte
1
ssh vpsrnm@54.37.13.57
Copier le contenu de la clé publique dans /home/$USER/.ssh/authorized_keys
1
cd ~
Sur le KVM ,créer un dossier .ssh
1
2
3
4
mkdir .ssh
cat $HOME/kvm-vps785909.pub >> $HOME/.ssh/authorized_keys
chmod 600 $HOME/.ssh/authorized_keys  # donner les droits
rm $HOME/kvm-vps785909.pub  # effacer le fichier de la clé
Modifier la configuration serveur SSH
1
sudo nano /etc/ssh/sshd_config  # attention aux 2 dernières lignes
Modifier
1
2
3
Port 55034
PasswordAuthentication no    # avant dernière ligne
PermitRootLogin no           # dernière ligne
session SSH ne se termine pas correctement lors d'un "reboot" à distance
Si vous tentez de redémarrer/éteindre une machine distance par ssh, vous pourriez constater que votre session ne se termine pas correctement, vous laissant avec un terminal inactif jusqu’à l’expiration d’un long délai d’inactivité. Il existe un bogue 751636 à ce sujet. Pour l’instant, la solution de contournement à ce problème est d’installer :
1
sudo apt install libpam-systemd  # installé par défaut sur debian buster
cela terminera la session ssh avant que le réseau ne tombe.
Veuillez noter qu’il est nécessaire que PAM soit activé dans sshd.
Relancer openSSH
1
sudo systemctl restart sshd
Accès depuis le poste distant avec la clé privée
1
ssh -p 55034 -i ~/.ssh/kvm-vps785909 vpsrnm@54.37.13.57
Outils, scripts motd et ssh_rc_bash
Installer utilitaires
1
sudo apt install rsync curl tmux jq figlet git dnsutils tree -y
Motd
1
sudo rm /etc/motd && sudo nano /etc/motd
1
2
3
4
5
6
7
8
                 ____  ___  ___  ___   __   ___
 __ __ _ __  ___|__  |( _ )| __|/ _ \ /  \ / _ \
 \ V /| '_ \(_-<  / / / _ \|__ \\_, /| () |\_, /
  \_/ | .__//__/ /_/ _\___/|___/ /_/  \__/  /_/
  _ _ |_|__   _ __  | |__ __  _  _     ___  _  _
 | '_|| '  \ | '  \ | / // _|| || | _ / -_)| || |
 |_|  |_|_|_||_|_|_||_\_\\__| \_, |(_)\___| \_,_|
                              |__/
Script ssh_rc_bash
ATTENTION!!! Les scripts sur connexion peuvent poser des problèmes pour des appels externes autres que ssh
1
2
3
wget https://static.xoyaz.xyz/files/ssh_rc_bash
chmod +x ssh_rc_bash # rendre le bash exécutable
./ssh_rc_bash        # exécution

Certificats 
Installer acme: Serveur , installer et renouveler les certificats SSL Let’s encrypt via Acme
1
2
3
4
5
6
cd ~
sudo apt install socat -y # prérequis
git clone https://github.com/Neilpang/acme.sh.git
cd acme.sh
./acme.sh --install # se déconnecter pour prise en compte
# export des clé API OVH
Générer les certificats pour le domaine rnmkcy.eu
1
acme.sh --dns dns_ovh --ocsp --issue --keylength ec-384 -d 'rnmkcy.eu' -d 'wg.rnmkcy.eu' -d 'zic.rnmkcy.eu'
1
2
3
4
[dimanche 11 octobre 2020, 11:56:26 (UTC+0200)] Your cert is in  /home/vpsrnm//.acme.sh/rnmkcy.eu_ecc/rnmkcy.eu.cer
[dimanche 11 octobre 2020, 11:56:26 (UTC+0200)] Your cert key is in  /home/vpsrnm//.acme.sh/rnmkcy.eu_ecc/rnmkcy.eu.key
[dimanche 11 octobre 2020, 11:56:26 (UTC+0200)] The intermediate CA cert is in  /home/vpsrnm//.acme.sh/rnmkcy.eu_ecc/ca.cer
[dimanche 11 octobre 2020, 11:56:26 (UTC+0200)] And the full chain certs is there:  /home/vpsrnm//.acme.sh/rnmkcy.eu_ecc/fullchain.cer
Les liens avec /etc/ssl/private
1
2
3
4
sudo ln -s /home/vpsrnm//.acme.sh/rnmkcy.eu_ecc/fullchain.cer /etc/ssl/private/rnmkcy.eu-fullchain.pem   # full chain certs
sudo ln -s /home/vpsrnm//.acme.sh/rnmkcy.eu_ecc/rnmkcy.eu.key /etc/ssl/private/rnmkcy.eu-key.pem     # cert key
sudo ln -s /home/vpsrnm//.acme.sh/rnmkcy.eu_ecc/rnmkcy.eu.cer /etc/ssl/private/rnmkcy.eu-chain.pem   # cert domain
sudo ln -s /home/vpsrnm//.acme.sh/rnmkcy.eu_ecc/ca.cer /etc/ssl/private/rnmkcy.eu-ca.pem                 # intermediate CA cert
 Parefeu
UFW, ou pare - feu simple , est une interface pour gérer les règles de pare-feu dans Arch Linux, Debian ou Ubuntu. UFW est utilisé via la ligne de commande (bien qu’il dispose d’interfaces graphiques disponibles), et vise à rendre la configuration du pare-feu facile (ou simple).
Installation Debian / Ubuntu
1
sudo apt-get install ufw
Par défaut, les jeux de règles d’UFW sont vides, de sorte qu’il n’applique aucune règle de pare-feu, même lorsque le démon est en cours d’exécution.
Les règles
1
2
3
4
5
sudo ufw allow 55034/tcp  # port SSH , 55034
sudo ufw allow http       # port 80
sudo ufw allow https      # port 53
sudo ufw allow DNS        # port 53
sudo ufw allow 51820/udp  # wireguard
Activer le parefeu
1
sudo ufw enable
1
2
Command may disrupt existing ssh connections. Proceed with operation (y|n)? y
Firewall is active and enabled on system startup
Status
1
 sudo ufw status verbose
1
2
3
4
5
6
7
8
9
10
11
12
13
14
15
16
17
Status: active
Logging: on (low)
Default: deny (incoming), allow (outgoing), disabled (routed)
New profiles: skip

To                         Action      From
--                         ------      ----
55034/tcp                  ALLOW IN    Anywhere
80/tcp                     ALLOW IN    Anywhere
443/tcp                    ALLOW IN    Anywhere
53 (DNS)                   ALLOW IN    Anywhere
51820/udp                  ALLOW IN    Anywhere
55034/tcp (v6)             ALLOW IN    Anywhere (v6)
80/tcp (v6)                ALLOW IN    Anywhere (v6)
443/tcp (v6)               ALLOW IN    Anywhere (v6)
53 (DNS (v6))              ALLOW IN    Anywhere (v6)
51820/udp (v6)             ALLOW IN    Anywhere (v6)
 Nginx + PHP + MariaDb
Debian 10 Buster : installer et configurer la dernière version de Nginx et PHP 7.3 FPM
Debian Buster compilation Nginx 1.18 + TLSv1.3
1
2
3
4
sudo -s
curl -o compil.sh https://static.xoyaz.xyz/files/debian10-compilation-nginx-tls1.3.sh
chmod +x compil.sh
./compil.sh         # Patienter quelques minutes (5 à 10 suivant CPU)
A la fin de la compilation
![]() nginx/1.18.0
nginx/1.18.0
![]() 1.1.1d 10 Sep 2019
1.1.1d 10 Sep 2019
Debian Buster PHP 7.3
1
2
3
curl -o compilphp.sh https://static.xoyaz.xyz/files/debian10-php7.3.sh
chmod +x compilphp.sh
./compilphp.sh
ssl headers
Configuration nginx , ssl (tls1.2 tls1.3) , Diffie Hellman ,Headers et OCSP
Diffie-Hellman , générer le fichier dh2048.pem (en mode su):
1
openssl dhparam -out /etc/ssl/private/dh2048.pem -outform PEM -2 2048
Si DNS ubound n’est pas installé , relever le résolveur utilisé cat /etc/resolv.conf : nameserver 213.186.33.99
Regroupement dans un fichier /etc/nginx/ssl_dh_headers_ocsp
1
nano /etc/nginx/ssl_dh_headers_ocsp
1
2
3
4
5
6
7
8
9
10
11
12
13
14
15
16
17
18
19
20
21
22
23
24
25
26
27
28
29
30
# /etc/nginx/ssl_dh_headers_ocsp

    ssl_certificate /etc/ssl/private/rnmkcy.eu-fullchain.pem;
    ssl_certificate_key /etc/ssl/private/rnmkcy.eu-key.pem;
    ssl_session_timeout 1d;
    ssl_session_cache shared:MozSSL:10m;  # about 40000 sessions
    ssl_session_tickets off;

    ssl_dhparam /etc/ssl/private/dh2048.pem;

    # intermediate configuration
    ssl_protocols TLSv1.2 TLSv1.3;
    ssl_ciphers ECDHE-ECDSA-AES128-GCM-SHA256:ECDHE-RSA-AES128-GCM-SHA256:ECDHE-ECDSA-AES256-GCM-SHA384:ECDHE-RSA-AES256-GCM-SHA384:ECDHE-ECDSA-CHACHA20-POLY1305:ECDHE-RSA-CHACHA20-POLY1305:DHE-RSA-AES128-GCM-SHA256:DHE-RSA-AES256-GCM-SHA384;
    ssl_prefer_server_ciphers off;

    # Add headers to serve security related headers
    add_header X-Content-Type-Options nosniff;
    add_header X-XSS-Protection "1; mode=block";
    add_header X-Robots-Tag none;
    add_header X-Download-Options noopen;
    add_header X-Permitted-Cross-Domain-Policies none;
    add_header X-Frame-Options "SAMEORIGIN";
    add_header Strict-Transport-Security 'max-age=31536000; includeSubDomains;';
    add_header Referrer-Policy "no-referrer" always;

    # OCSP settings
    ssl_stapling on;
    ssl_stapling_verify on;
    ssl_trusted_certificate /etc/ssl/private/rnmkcy.eu-fullchain.pem;
    resolver 213.186.33.99; # 127.0.0.1 si DNS Unbound installé
Configuration de base /etc/nginx/conf.d/rnmkcy.eu.conf
On va renommer le default.conf
1
2
mv /etc/nginx/conf.d/default.conf /etc/nginx/conf.d/rnmkcy.eu.conf
nano /etc/nginx/conf.d/rnmkcy.eu.conf
1
2
3
4
5
6
7
8
9
10
11
12
13
14
15
16
17
18
19
20
21
22
23
24
25
26
27
28
29
30
31
32
33
34
35
36
37
38
39
40
41
42
43
44
45
46
47
# /etc/nginx/conf.d/rnmkcy.eu.conf
	##
	# Virtual Host rnmkcy.eu
	##

	server {
	    listen 80;
	    listen [::]:80;

	    ## redirect http to https ##
	    server_name rnmkcy.eu;
	    return  301 https://$server_name$request_uri;
	}

	server {
	    listen 443 ssl http2;
	    listen [::]:443 ssl http2;
	    server_name rnmkcy.eu;

	    ####    Locations
	    # On cache les fichiers statiques
	    location ~* \./|css|js|png|jpg|jpeg|gif|ico|svg|eot|woff|ttf)$ { expires max; }

		location = /favicon.ico {
		  log_not_found off;
		}

	    # On interdit les dotfiles
	    location ~ /\. { deny all; }

	    include ssl_dh_headers_ocsp;

	    root /var/www/default-www/ ;
	    index index/ index.php;

	        location ~ \.php$ {
	           fastcgi_split_path_info ^(.+\.php)(/.+)$;
	           fastcgi_pass unix:/run/php/php7.4-fpm.sock;   # PHP7.4
	           fastcgi_index index.php;
	           include fastcgi_params;
	    	   fastcgi_param SCRIPT_FILENAME $request_filename;
	        }

	    include /etc/nginx/conf.d/rnmkcy.eu.d/*.conf;
	    access_log /var/log/nginx/rnmkcy.eu-access.log;
	    error_log /var/log/nginx/rnmkcy.eu-error.log;
	}
Vérifications et rechargement nginx
1
nginx -t
1
2
nginx: the configuration file /etc/nginx/nginx.conf syntax is ok
nginx: configuration file /etc/nginx/nginx.conf test is successful
1
systemctl reload nginx
Au premier accès sur le lien on obtient une erreur
Ce problème est lié à la mise en cache ocsp qui ne se fait qu’au premier accès après un rechargement du serveur nginx, on exécuter un script après rechargement pour la mise en cache OCSP
1
sudo nano /usr/local/bin/ocsp_cache
1
2
3
4
5
6
7
8
9
10
11
12
13
14
15
16
17
18
19
20
#! /bin/sh

# ocsp_cache

# $1 domaine passé en paramètre
echo "Premier passage"
for fichier in /etc/nginx/conf.d/*$1.conf
do
    echo $(basename $fichier .${fichier##*.})
    openssl s_client -connect $(basename $fichier .${fichier##*.}):443 -status < /dev/null |grep -i ocsp
done
# pause de 1 seconde
sleep 1
echo "Second passage"
for fichier in /etc/nginx/conf.d/*$1.conf
do
    echo $(basename $fichier .${fichier##*.})
    openssl s_client -connect $(basename $fichier .${fichier##*.}):443 -status < /dev/null |grep -i ocsp
done
echo "Fin mise en cache nginx OCSP..."
Le rendre exécutable
1
sudo chmod +x /usr/local/bin/ocsp_cache
Exécution en mode sans affichage
1
ocsp_cache > /dev/null 2>&1
Lien https://rnmkcy.eu
Go Node Docker
 Go
Go
Go installation (Debian) , installer la dernière version de Go → https://golang.org/dl/
1
2
3
4
5
cd ~
wget https://golang.org/dl/go1.15.2.linux-amd64.tar.gz
sudo tar -C /usr/local -xzf go1.15.2.linux-amd64.tar.gz
echo "export PATH=$PATH:/usr/local/go/bin"  >> ~/.bashrc
source ~/.bashrc
Version
1
go version
1
go version go1.15.2 linux/amd64
 Nodejs
Installer la version LTS de nodejs pour le frontend → https://github.com/nodesource/distributions#debinstall
Version Node.js v14.x au 11 octobre 2020
1
2
3
4
# Using Debian, as root
sudo -s
curl -sL https://deb.nodesource.com/setup_14.x | bash -
apt-get install -y nodejs
Version Node.js LTS (v12.x) au 11 octobre 2020
1
2
3
4
# Using Debian, as root
sudo -s
curl -sL https://deb.nodesource.com/setup_lts.x | bash -
apt-get install -y nodejs
Versions
1
2
3
4
node --version
    v14.13.1
npm --version
    6.14.8
 Docker (Facultatif)
Installer docker sur debian 10
Docker compose , version sur https://github.com/docker/compose/releases
1
2
3
sudo curl -L https://github.com/docker/compose/releases/download/1.26.0-rc4/docker-compose-`uname -s`-`uname -m` -o /usr/local/bin/docker-compose
sudo chmod +x /usr/local/bin/docker-compose
docker-compose --version
docker-compose version 1.26.0-rc4, build d279b7a8
 SSHFS fstab
Le dossier “musique” est distant (serveur xoyaz.xyz)
Il faut créer une liaison réseau sécurisée entre rnmkcy.eu ← → xoyaz.xyz
On va utiliser SSHFS (Secure shell file system (ou SSHFS) permet le partage d’un système de fichiers de manière sécurisée en utilisant le protocole SFTP de SSH)
Installation
1
sudo apt install sshfs
Autorisations
- Autorisations “utilisateur”
- Exécuter
sshfs(ou toute autre commande de montage FUSE) avec l’option-o allow_other
- Exécuter
- Autoriser l’accès “root” des supports fuse
- Ajouter
user_allow_otherau fichier /etc/fuse.conf - Exécuter
sshfs(ou toute autre commande de montage FUSE) avec l’option-o allow_root
- Ajouter
Clé privée OVZ-STORAGE-128 pour accéder au serveur xoyaz.xyz
1
chmod 600 /home/vpsrnm/.ssh/OVZ-STORAGE-128
Exécution manuelle pour authentifier la clé avec utilisateur “debian”
1
2
3
sudo -s
mkdir -p /opt/sshfs
sshfs -o allow_other usernl@xoyaz.xyz:/home/usernl/backup /opt/sshfs -C -p 55036 -oIdentityFile=/home/vpsrnm/.ssh/OVZ-STORAGE-128
1
2
3
The authenticity of host '[xoyaz.xyz]:55036 ([2a04:52c0:101:82::73db]:55036)' can't be established.
ECDSA key fingerprint is SHA256:NuFqR5id10fVzRLsSTqJ4vBpFnNYi+APGsvPYth6PHw.
Are you sure you want to continue connecting (yes/no)? yes
NOTE: Il faut mettre l’adresse IP du serveur , si les domaines peuvent ne pas être “résolus”
Après vérification , ls /opt/sshfs , déconnexion fusermount -u /opt/sshfs
Montage fstab
ajouter la ligne suivante au fichier /etc/fstab
1
usernl@xoyaz.xyz:/home/usernl/backup /opt/sshfs fuse.sshfs _netdev,identityfile=/home/vpsrnm/.ssh/OVZ-STORAGE-128,allow_other,port=55036 0 0
Montage pour authentifier la clé avec utilisateur “root”
1
sudo mount -a
Vérification
1
ls /opt/sshfs
1
CalibreTechnique  musique  yunohost.backup.cinay.xyz
Serveur Audio
 Gonic
Gonic
Gonic écrit en go est une alternative à Subsonic.org, accessible par un proxy nginx
La seule application qui accepte de fonctionner avec répertoires montés par FUSE.
Caractéristiques
- la navigation par dossier (en gardant votre arborescence complète intacte)
- la navigation par balises (à l’aide de taglib - supporte mp3, opus, flac, ape, m4a, wav, etc.)
- transcodage et mise en cache audio à la volée (nécessite ffmpeg) (merci spijet)
- balayage assez rapide (avec ma bibliothèque de ~27k pistes, le balayage initial prend environ 10m, et environ 5s après de manière incrémentielle)
- plusieurs utilisateurs, chacun ayant ses propres préférences de transcodage, ses listes de lecture, ses meilleures pistes, ses meilleurs artistes, etc.
- last.fm scrobbling
- similarités entre les artistes et biographies de la dernière api.fm
- une interface web pour la configuration (configurer last.fm, gérer les utilisateurs, lancer des analyses, etc.)
- un support pour le tag album-artist, pour ne pas encombrer votre liste d’artistes avec des apparitions d’albums de compilation
- écrit en go, donc léger et adapté à un pi framboise, etc.
- plus récent sel et token auth
- testé sur dsub, jamstash, musique sublime et ondes sonores
Installation gonic
dans le répertoire utilisateur $HOME
1
2
3
4
5
6
# les dépendances
sudo apt install build-essential git sqlite libtag1-dev ffmpeg libasound2-dev pkg-config # for debian like
cd $HOME/
# cloner
git clone https://gitea.cinay.eu/yann/golang-subsonic.git
cd golang-subsonic/
Construire l’exécutable “gonic” et le copier dans /usr/local/bin
1
2
./_do_build_server
sudo mv gonic /usr/local/bin/
Créer le dossier pour la base
1
sudo mkdir -p /opt/gonic
Créer le service gonic
Que fait le service ?
- Le dossier fuse est monté au démarrage par fstab
- lancer le serveur “gonic” en écoute local sur le port 4747 avec les options
-music-path,-db-pathet-proxy-prefix - A l’arrêt,tuer la tâche “gonic”
Tester le serveur
1
2
sudo -s
/usr/local/bin/gonic -music-path /opt/sshfs/musique -db-path /opt/gonic/gonic.db -proxy-prefix /
1
2
3
4
5
6
7
8
9
10
11
12
13
14
15
16
17
18
19
20
2020/10/11 15:26:37 starting gonic v0.11.0
2020/10/11 15:26:37 provided config
2020/10/11 15:26:37     cache-path      /tmp/gonic_cache
2020/10/11 15:26:37     config-path
2020/10/11 15:26:37     db-path         /opt/gonic/gonic.db
2020/10/11 15:26:37     jukebox-enabled false
2020/10/11 15:26:37     listen-addr     0.0.0.0:4747
2020/10/11 15:26:37     music-path      /opt/sshfs/musique
2020/10/11 15:26:37     proxy-prefix    /
2020/10/11 15:26:37     scan-interval   0
2020/10/11 15:26:37     version         false
2020/10/11 15:26:37 migration (1/7) '202002192100' finished
2020/10/11 15:26:37 migration (2/7) '202002192019' finished
2020/10/11 15:26:37 migration (3/7) '202002192222' finished
2020/10/11 15:26:37 migration (4/7) '202003111222' finished
2020/10/11 15:26:37 migration (5/7) '202003121330' finished
2020/10/11 15:26:37 migration (6/7) '202003241509' finished
2020/10/11 15:26:37 migration (7/7) '202004302006' finished
2020/10/11 15:26:37 starting job 'session clean'
2020/10/11 15:26:37 starting job 'http'
Arrêt par Ctrl+C
Chaque service généré par systemd est configuré par un fichier .service qui se trouve dans le répertoire /etc/systemd/system
1
sudo nano /etc/systemd/system/gonic.service
1
2
3
4
5
6
7
8
9
10
11
12
13
14
[Unit]
Description=Gonic audio server
After=network.target

[Service]
Type=simple

Restart=on-failure
RestartSec=10

ExecStart=/usr/local/bin/gonic -music-path /opt/sshfs/musique -db-path /opt/gonic/gonic.db -proxy-prefix /

[Install]
WantedBy=multi-user.target
Recharger systemd puis démarrer le service:
1
2
sudo systemctl daemon-reload
sudo systemctl start gonic.service
Visualiser le journal
1
sudo journalctl -t gonic
1
2
3
4
5
6
7
8
9
10
11
12
13
14
-- Logs begin at Sun 2020-10-11 14:19:55 CEST, end at Sun 2020-10-11 15:27:54 CEST. --
oct. 11 15:27:41 rnmkcy.eu gonic[6432]: 2020/10/11 15:27:41 starting gonic v0.11.0
oct. 11 15:27:41 rnmkcy.eu gonic[6432]: 2020/10/11 15:27:41 provided config
oct. 11 15:27:41 rnmkcy.eu gonic[6432]: 2020/10/11 15:27:41     cache-path      /tmp/gonic_cache
oct. 11 15:27:41 rnmkcy.eu gonic[6432]: 2020/10/11 15:27:41     config-path
oct. 11 15:27:41 rnmkcy.eu gonic[6432]: 2020/10/11 15:27:41     db-path         /opt/gonic/gonic.db
oct. 11 15:27:41 rnmkcy.eu gonic[6432]: 2020/10/11 15:27:41     jukebox-enabled false
oct. 11 15:27:41 rnmkcy.eu gonic[6432]: 2020/10/11 15:27:41     listen-addr     0.0.0.0:4747
oct. 11 15:27:41 rnmkcy.eu gonic[6432]: 2020/10/11 15:27:41     music-path      /opt/sshfs/musique
oct. 11 15:27:41 rnmkcy.eu gonic[6432]: 2020/10/11 15:27:41     proxy-prefix    /
oct. 11 15:27:41 rnmkcy.eu gonic[6432]: 2020/10/11 15:27:41     scan-interval   0
oct. 11 15:27:41 rnmkcy.eu gonic[6432]: 2020/10/11 15:27:41     version         false
oct. 11 15:27:42 rnmkcy.eu gonic[6432]: 2020/10/11 15:27:42 starting job 'session clean'
oct. 11 15:27:42 rnmkcy.eu gonic[6432]: 2020/10/11 15:27:42 starting job 'http'
Si tout est en ordre , on active le service
1
sudo systemctl enable gonic.service
dns OVH - CNAME zic
Il faut ajouter le CNAME zic au domaine rnmkcy.eu
1
zic        IN CNAME  rnmkcy.eu.
Proxy nginx zic.rnmkcy.eu
Gonic est un serveur local http sur le port 4747 et pour un accès externe il nous faut un proxy
Proxy nginx - configuration /etc/nginx/conf.d/zic.rnmkcy.eu.conf
1
2
3
4
5
6
7
8
9
10
11
12
13
14
15
16
17
18
19
20
21
22
23
24
25
26
27
28
29
30
31
32
33
34
35
36
37
38
39
40
# /etc/nginx/conf.d/zic.rnmkcy.eu.conf
##
# Virtual Host zic.rnmkcy.eu
##

server {
    listen 80;
    listen [::]:80;

    ## redirect http to https ##
    server_name zic.rnmkcy.eu;
    return  301 https://$server_name$request_uri;
}

server {
    listen 443 ssl http2;
    listen [::]:443 ssl http2;
    server_name zic.rnmkcy.eu;

    include ssl_dh_headers_ocsp;

    access_log            /var/log/nginx/zic.rnmkcy.eu.log;

    proxy_request_buffering off;
    proxy_buffering off;
    proxy_buffer_size 4k;

    # Proxy audio gonic server
    location / {

      proxy_set_header        Host $host;
      proxy_set_header        X-Real-IP $remote_addr;
      proxy_set_header        X-Forwarded-For $proxy_add_x_forwarded_for;
      proxy_set_header        X-Forwarded-Proto $scheme;

      proxy_pass          http://localhost:4747;
      proxy_read_timeout  120;
    }

}
On vérifie et on relance le serveur nginx
1
2
sudo nginx -t
sudo systemctl reload nginx
Accès https://zic.rnmkcy.eu
Navidrome
Créer les répertoires
1
2
sudo install -d -o debian -g debian /opt/navidrome
sudo install -d -o debian -g debian /var/lib/navidrome
1
2
3
wget https://github.com/deluan/navidrome/releases/download/v0.35.1/navidrome_0.35.1_Linux_x86_64.tar.gz -O Navidrome.tar.gz
sudo tar -xvzf Navidrome.tar.gz -C /opt/navidrome/
sudo chown -R debian:debian /opt/navidrome
Créer le fichier de configuration /var/lib/navidrome/navidrome.toml
1
MusicFolder = "/opt/sshfs/musique"
Créer un service /etc/systemd/system/navidrome.service
1
2
3
4
5
6
7
8
9
10
11
12
13
14
15
16
17
18
19
20
21
22
23
24
25
26
27
28
29
30
31
32
33
34
35
36
37
38
39
40
41
42
43
44
45
[Unit]
Description=Navidrome Music Server and Streamer compatible with Subsonic/Airsonic
After=remote-fs.target network.target
AssertPathExists=/var/lib/navidrome

[Install]
WantedBy=multi-user.target

[Service]
User=debian
Group=debian
Type=simple
ExecStart=/opt/navidrome/navidrome --configfile "/var/lib/navidrome/navidrome.toml"
WorkingDirectory=/var/lib/navidrome
TimeoutStopSec=20
KillMode=process
Restart=on-failure

# See https://www.freedesktop.org/software/systemd/man/systemd.exec/
DevicePolicy=closed
NoNewPrivileges=yes
PrivateTmp=yes
PrivateUsers=yes
ProtectControlGroups=yes
ProtectKernelModules=yes
ProtectKernelTunables=yes
RestrictAddressFamilies=AF_UNIX AF_INET AF_INET6
RestrictNamespaces=yes
RestrictRealtime=yes
SystemCallFilter=~@clock @debug @module @mount @obsolete @reboot @setuid @swap
ReadWritePaths=/var/lib/navidrome

# You can uncomment the following line if you're not using the jukebox This
# will prevent navidrome from accessing any real (physical) devices
#PrivateDevices=yes

# You can change the following line to `strict` instead of `full` if you don't
# want navidrome to be able to write anything on your filesystem outside of
# /var/lib/navidrome.
ProtectSystem=full

# You can comment the following line if you don't have any media in /home/*.
# This will prevent navidrome from ever reading/writing anything there.
#ProtectHome=true
Démarrer le service
1
2
sudo systemctl daemon-reload
sudo systemctl start navidrome.service
Le status
1
sudo systemctl status navidrome.service
1
2
3
4
5
6
7
8
9
10
11
12
13
14
15
16
17
18
19
● navidrome.service - Navidrome Music Server and Streamer compatible with Subsonic/Airsonic
   Loaded: loaded (/etc/systemd/system/navidrome.service; disabled; vendor preset: enabled)
   Active: active (running) since Sun 2020-10-11 16:19:57 CEST; 1s ago
 Main PID: 6676 (navidrome)
    Tasks: 5 (limit: 2312)
   Memory: 9.1M
   CGroup: /system.slice/navidrome.service
           └─6676 /opt/navidrome/navidrome --configfile /var/lib/navidrome/navidrome.toml

oct. 11 16:19:57 rnmkcy.eu navidrome[6676]: time="2020-10-11T16:19:57+02:00" level=info msg="Configuring Media Folder" name="Music Library" path=/opt/sshfs/musique
oct. 11 16:19:57 rnmkcy.eu navidrome[6676]: time="2020-10-11T16:19:57+02:00" level=info msg="Creating Image cache" maxSize="100 MB" path=cache/images
oct. 11 16:19:57 rnmkcy.eu navidrome[6676]: time="2020-10-11T16:19:57+02:00" level=info msg="Creating Transcoding cache" maxSize="100 MB" path=cache/transcoding
oct. 11 16:19:57 rnmkcy.eu navidrome[6676]: time="2020-10-11T16:19:57+02:00" level=warning msg="Running initial setup"
oct. 11 16:19:57 rnmkcy.eu navidrome[6676]: time="2020-10-11T16:19:57+02:00" level=warning msg="Creating JWT secret, used for encrypting UI sessions"
oct. 11 16:19:58 rnmkcy.eu navidrome[6676]: time="2020-10-11T16:19:58+02:00" level=info msg="Starting scanner" interval=1m0s
oct. 11 16:19:58 rnmkcy.eu navidrome[6676]: time="2020-10-11T16:19:58+02:00" level=info msg="Mounting routes" path=/rest
oct. 11 16:19:58 rnmkcy.eu navidrome[6676]: time="2020-10-11T16:19:58+02:00" level=info msg="Mounting routes" path=/app
oct. 11 16:19:58 rnmkcy.eu navidrome[6676]: time="2020-10-11T16:19:58+02:00" level=info msg="Login rate limit set" requestLimit=5 windowLength=20s
oct. 11 16:19:58 rnmkcy.eu navidrome[6676]: time="2020-10-11T16:19:58+02:00" level=info msg="Navidrome server is accepting requests" address="0.0.0.0:4533"
dns OVH - CNAME navi
Il faut ajouter le CNAME navi au domaine rnmkcy.eu
1
navi        IN CNAME  rnmkcy.eu.
Proxy nginx navi.rnmkcy.eu
Navidrome est un serveur local http sur le port 4533 et pour un accès externe il nous faut un proxy
Proxy nginx - configuration /etc/nginx/conf.d/navi.rnmkcy.eu.conf
1
2
3
4
5
6
7
8
9
10
11
12
13
14
15
16
17
18
19
20
21
22
23
24
25
26
27
28
29
30
31
32
33
34
35
36
37
38
39
40
# /etc/nginx/conf.d/navi.rnmkcy.eu.conf
##
# Virtual Host navi.rnmkcy.eu
##

server {
    listen 80;
    listen [::]:80;

    ## redirect http to https ##
    server_name navi.rnmkcy.eu;
    return  301 https://$server_name$request_uri;
}

server {
    listen 443 ssl http2;
    listen [::]:443 ssl http2;
    server_name navi.rnmkcy.eu;

    include ssl_dh_headers_ocsp;

    access_log            /var/log/nginx/navi.rnmkcy.eu.log;

    proxy_request_buffering off;
    proxy_buffering off;
    proxy_buffer_size 4k;

    # Proxy audio gonic server
    location / {

      proxy_set_header        Host $host;
      proxy_set_header        X-Real-IP $remote_addr;
      proxy_set_header        X-Forwarded-For $proxy_add_x_forwarded_for;
      proxy_set_header        X-Forwarded-Proto $scheme;

      proxy_pass          http://localhost:4533;
      proxy_read_timeout  120;
    }

}
On vérifie et on relance le serveur nginx
1
2
sudo nginx -t
sudo systemctl reload nginx
Accès https://navi.rnmkcy.eu

Wireguard
WireGuard est un serveur VPN à code source ouvert, gratuit, moderne et rapide, doté d’une cryptographie de pointe. Il est plus rapide et plus simple que l’IPSec et l’OpenVPN
Installer wireguard
Wireguard est dans le noyau 5.6+
1
apt install wireguard
Générer une paire de clés
On se positionne dans le dossier /etc/wireguard/
1
cd /etc/wireguard
WireGuard repose sur une authentification par clé publique/privée (cryptographie asymétrique), vous devez donc créer ces clés avec les sous-commandes wg genkey et wg pubkey
La création de la clé privée se fait avec wg genkey et la clé publique est générée en la canalisant dans wg pubkey
1
umask 077; wg genkey | tee vps785909-private.key | wg pubkey > vps785909-public.key
**Autoriser le serveur Wireguard à relayer les paquets **
Autoriser le serveur Wireguard à relayer les paquets venant de ces clients vers l’internet et de traiter les paquets retours (modifier /etc/sysctl.conf)
1
2
3
sed -i 's/^#net.ipv4.ip_forward=1/net.ipv4.ip_forward=1/' /etc/sysctl.conf
sed -i 's/^#net.ipv6.conf.all.forwarding=1/net.ipv6.conf.all.forwarding=1/' /etc/sysctl.conf
sysctl -p # prise en compte immédiate
Fichier de configuration /etc/wireguard/wg0.conf
Récupérer le nom de la carte réseau ip a , dans notre cas eth0
La première étape consiste à choisir une plage IPV4 privée qui sera utilisée par le serveur : 10.19.55.0/8
Pour une adresse IPV6 Local IPv6 Address Generator : fd51:6547:3aa2:3ab6::/64
| Prefix/L | fd |
|---|---|
| Global ID | 5165473aa2 |
| Subnet ID | 3ab6 |
| Combine/CID | fd51:6547:3aa2:3ab6::/64 |
| IPv6 addresses | fd51:6547:3aa2:3ab6::/64:XXXX:XXXX:XXXX:XXXX |
| Start Range | fd51:6547:3aa2:3ab6:0:0:0:0 |
| End Range | fd51:6547:3aa2:3ab6:ffff:ffff:ffff:ffff |
| No. of hosts | 18446744073709551616 |
Nous utiliserons 10.19.55.0/24 qui se trouve dans la plage 10.19.55.0/8 . Le serveur aura l’adresse IP suivante: 10.19.55.1 . Il est également nécessaire de choisir un port, qui sera exposé publiquement, pour que le serveur écoute.Le port de documentation standard est généralement 51820.
Créer le fichier /etc/wireguard/wg0.conf
1
nano /etc/wireguard/wg0.conf
1
2
3
4
5
6
7
8
9
10
[Interface]
Address = 10.19.55.1/24
Address = fd51:6547:3aa2:3ab6::1/64
ListenPort = 51820
PostUp = iptables -A FORWARD -i wg0 -j ACCEPT; iptables -t nat -A POSTROUTING -o eth0 -j MASQUERADE; ip6tables -A FORWARD -i wg0 -j ACCEPT; ip6tables -t nat -A POSTROUTING -o eth0 -j MASQUERADE
PostDown = iptables -D FORWARD -i wg0 -j ACCEPT; iptables -t nat -D POSTROUTING -o eth0 -j MASQUERADE; ip6tables -D FORWARD -i wg0 -j ACCEPT; ip6tables -t nat -D POSTROUTING -o eth0 -j MASQUERADE
PrivateKey = 5Zsr0jQXiuCpHFkye325Zsr0jMUKinVEOPmk=
DNS = 10.19.55.1
DNS = fd51:6547:3aa2:3ab6::1
SaveConfig = true
Address , fixer l’adresse IP privée du serveur à l’intérieur du VPN.Les adresses du réseau VPN de 10.19.55.0 à 10.19.55.255 sont fixées par le masque /24
PostUp , pour la mise en place des règles iptables de translation d’adresses à l’activation du VPN (autoriser le routage des paquets réseau venant des clients vers internet)
PostDown , pour la suppression des règles iptables de translation d’adresses à l’arrêt du VPN
PrivateKey , clé privée du serveur
Modification des droits (lecture uniquement par “root”)
1
chmod 600 /etc/wireguard/wg0.conf
DNS Unbound

Un problème majeur avec beaucoup de configurations VPN est que le DNS n’est pas suffisant. Cela finit par une fuite de connexion client et de détails d’emplacement. Un bon moyen de tester cela est à travers le site http://dnsleak.com/
Nous allons sécuriser le trafic DNS avec la solution unbound qui offre les caractéristiques suivantes
- Léger et rapide
- Facile à installer et à configurer
- Orienté sécurité
- Prise en charge DNSSEC
Nous allons le configurer de manière à contrer les fuites DNS, les attaques plus sophistiquées comme la fausse configuration de proxy, les routeurs escrocs et toutes sortes d’attaques MITM sur HTTPS et autres protocoles.
Nous installons unbound sur le serveur
Passage en mode super utilisateur
1
sudo -s # ou su
ATTENTION : Le programme resolvconf est en général seulement nécessaire quand un système a plusieurs programmes qui ont besoin de modifier de façon dynamique les informations sur les serveurs de noms de domaine. Sur un système simple où les serveurs de noms de domaine ne changent pas souvent ou bien ne sont modifiés que par un programme, le fichier de configuration **resolv.conf** est suffisant.
Il faut installer resolvconf, sinon on a une erreur unbound-resolvconf
Une fois le paquet « resolvconf » installé, il ne faut plus modifier le fichier « /etc/resolv.conf », car le contenu de celui-ci sera automatiquement géré et remplacé par « resolvconf ».
Installation des outils dns, des paquets Unbound et resolv :
1
apt install unbound unbound-host resolvconf -y
Téléchargement de la liste des serveurs DNS racines
1
2
curl -o /var/lib/unbound/root.hints https://www.internic.net/domain/named.cache
chown unbound:unbound /var/lib/unbound/root.hints
Ajout d’un fichier de configuration dns-vps785909.conf
1
/etc/unbound/unbound.conf.d/dns-vps785909.conf
1
2
3
4
5
6
7
8
9
10
11
12
13
14
15
16
17
18
19
20
21
22
23
24
25
26
27
28
29
30
31
32
33
34
35
36
37
38
39
40
41
42
43
44
45
46
47
48
49
50
51
server:
    num-threads: 4

    # enable logs
    verbosity: 0  # no verbosity,  only  errors

    # liste des serveurs DNS racine
    root-hints: "/var/lib/unbound/root.hints"

    # Répondre aux requêtes DNS sur toutes les interfaces
    interface: 0.0.0.0                          # 0.0.0.0 unbound sur plusieurs interfaces
    interface: ::0
    max-udp-size: 3072

    # IPs authorised to access the DNS Server
    access-control: 0.0.0.0/0                 refuse
    access-control: 127.0.0.0/8               allow
    access-control: 10.19.55.0/16             allow

    access-control: ::0/0                     refuse
    access-control: ::1                       allow
    access-control: ::ffff:127.0.0.1          allow
    access-control: fe80::/10                 allow
    access-control: fd51:6547:3aa2:3ab6::/48  allow

    local-zone: "19.10.in-addr.arpa." transparent

    #hide DNS Server info
    hide-identity: yes
    hide-version: yes

    # limit DNS fraud and use DNSSEC
    harden-glue: yes
    harden-dnssec-stripped: yes
    harden-referral-path: yes

    # add an unwanted reply threshold to clean the cache and avoid, when possible, DNS poisoning
    unwanted-reply-threshold: 10000000

    # have the validator print validation failures to the log
    val-log-level: 1

    # minimum lifetime of cache entries in seconds
    cache-min-ttl: 1800

    # maximum lifetime of cached entries in seconds
    cache-max-ttl: 14400
    prefetch: yes
    prefetch-key: yes

#include: /etc/unbound/unbound.conf.d/adslist.txt
Droits
1
chown -R unbound:unbound /var/lib/unbound
Pour vérifier si le fichier de configuration est valide
1
unbound-checkconf /etc/unbound/unbound.conf.d/dns-vps785909.conf
unbound-checkconf: no errors in /etc/unbound/unbound.conf.d/dns-vps785909.conf
Désactiver systemd-resolved (si utilisé)
1
2
systemctl stop systemd-resolved
systemctl disable systemd-resolved
Activer Unbound (ILS SONT ACTIFS DES LEUR INSTALLATION)
1
2
systemctl enable unbound-resolvconf
systemctl enable unbound
Redémarrer le serveur
1
systemctl reboot
Après redémarrage et connexion au serveur
1
systemctl status unbound unbound-resolvconf resolvconf
1
2
3
4
5
6
7
8
9
10
11
12
13
14
15
16
17
18
19
20
21
22
23
24
25
26
● unbound.service - Unbound DNS server
   Loaded: loaded (/lib/systemd/system/unbound.service; enabled; vendor preset: enabled)
   Active: active (running) since Sun 2020-05-10 12:10:30 CEST; 18s ago
     Docs: man:unbound(8)
  Process: 562 ExecStartPre=/usr/lib/unbound/package-helper chroot_setup (code=exited, status=0/SUCCESS)
  Process: 601 ExecStartPre=/usr/lib/unbound/package-helper root_trust_anchor_update (code=exited, status=0/SUCC
 Main PID: 609 (unbound)
    Tasks: 4 (limit: 2313)
   Memory: 27.2M
   CGroup: /system.slice/unbound.service
           └─609 /usr/sbin/unbound -d

● unbound-resolvconf.service - Unbound DNS server via resolvconf
   Loaded: loaded (/lib/systemd/system/unbound-resolvconf.service; enabled; vendor preset: enabled)
   Active: active (exited) since Sun 2020-05-10 12:10:30 CEST; 18s ago
  Process: 613 ExecStart=/usr/lib/unbound/package-helper resolvconf_start (code=exited, status=0/SUCCESS)
 Main PID: 613 (code=exited, status=0/SUCCESS)

● resolvconf.service - Nameserver information manager
   Loaded: loaded (/lib/systemd/system/resolvconf.service; enabled; vendor preset: enabled)
   Active: active (exited) since Sun 2020-05-10 12:10:25 CEST; 23s ago
     Docs: man:resolvconf(8)
  Process: 197 ExecStartPre=/bin/mkdir -p /run/resolvconf/interface (code=exited, status=0/SUCCESS)
  Process: 203 ExecStartPre=/bin/touch /run/resolvconf/postponed-update (code=exited, status=0/SUCCESS)
  Process: 205 ExecStart=/sbin/resolvconf --enable-updates (code=exited, status=0/SUCCESS)
 Main PID: 205 (code=exited, status=0/SUCCESS)
Vérifications
Les commandes suivantes ne fonctionneront que si le paquet “dnsutils” est installé sur votre système Debian!
On teste en utilisant les serveurs DNS locaux
1
dig @127.0.0.1 afnic.fr +short +dnssec
1
2
192.134.5.37
A 13 2 600 20200608204052 20200509084949 30435 afnic.fr. eVchVAseJD5n8W7U8okAz546Ix33hOCqRF7wLrhUV+sOTkwyXo7EwAut k/rN8wsPVpTnTpFyQLKdBTuOpx2UxA==
Mise à jour des serveurs DNS racines
Télécharger le script
1
curl -o /etc/unbound/dnsunbound-update-root-dns.sh https://yann.cinay.eu/files/dnsunbound-update-root-dns.sh
Droits en exécution pour le bash dnsunbound-update-root-dns.sh
1
chmod +x /etc/unbound/dnsunbound-update-root-dns.sh
Planification journalière
1
crontab -e
Ajouter en fin de fichier
1
2
# Mise à jour automatique des serveurs DNS de la racine
10 02 * * * /etc/unbound/dnsunbound-update-root-dns.sh > /dev/null
Wireguard UI
Gestion web wireguard
Création dossier application wev
1
sudo mkdir -p /opt/appwg
Copier le git wg-gen-web
1
2
cd ~
git clone https://gitea.cinay.eu/yann/wg-gen-web.git
Construction du site
1
2
3
4
5
6
7
8
cd /home/vpsrnm/wg-gen-web/cmd/wg-gen-web/
go build -o deb-wg-gen-web
cd ../../ui
npm install
npm run build
sudo cp /home/vpsrnm/wg-gen-web/cmd/wg-gen-web/deb-wg-gen-web /opt/appwg
sudo mkdir -p /opt/appwg/ui
sudo cp -r /home/vpsrnm/wg-gen-web/ui/dist /opt/appwg/ui/
Proxy nginx - wg.rnmkcy.eu
configuration /etc/nginx/conf.d/wg.rnmkcy.eu.conf
1
2
3
4
5
6
7
8
9
10
11
12
13
14
15
16
17
18
19
20
21
22
23
24
25
26
27
# /etc/nginx/conf.d/wg.rnmkcy.eu.conf
##
# Virtual Host wg.rnmkcy.eu (wireguard UI)
##

server {
    listen 80;
    listen [::]:80;

    ## redirect http to https ##
    server_name wg.rnmkcy.eu;
    return  301 https://$server_name$request_uri;
}

server {
    listen 443 ssl http2;
    listen [::]:443 ssl http2;
    server_name wg.rnmkcy.eu;

    include ssl_dh_headers_ocsp;

    # Proxy deb-wg-gen-web
    location / {
      proxy_pass http://localhost:8080;
    }

}
On vérifie et on relance le serveur nginx
1
2
3
sudo nginx -t
sudo systemctl reload nginx
ocsp_cache
Configuration .env
Créer le fichier de configuration .env (pas de oath et messagerie) à partir du modèle
1
2
3
4
5
6
7
8
9
10
11
12
13
14
15
16
17
18
19
20
21
22
23
24
25
26
27
28
29
30
31
32
33
34
35
36
37
38
39
40
41
# IP address to listen to
SERVER=0.0.0.0
# port to bind
PORT=8080
# Gin framework release mode
GIN_MODE=release
# where to write all generated config files
WG_CONF_DIR=./wireguard
# WireGuard main config file name, generally <interface name>.conf
WG_INTERFACE_NAME=wg0.conf

# SMTP settings to send email to clients
SMTP_HOST=smtp.gmail.com
SMTP_PORT=587
SMTP_USERNAME=account@gmail.com
SMTP_PASSWORD=*************
SMTP_FROM=Wg Gen Web <account@gmail.com>

# example with gitlab, which is RFC implementation and no need any custom stuff
OAUTH2_PROVIDER_NAME=oauth2oidc
OAUTH2_PROVIDER=https://gitlab.com
OAUTH2_CLIENT_ID=
OAUTH2_CLIENT_SECRET=
OAUTH2_REDIRECT_URL=https://wg-gen-web-demo.127-0-0-1.fr

# example with google
OAUTH2_PROVIDER_NAME=google
OAUTH2_PROVIDER=
OAUTH2_CLIENT_ID=
OAUTH2_CLIENT_SECRET=
OAUTH2_REDIRECT_URL=

# example with github
OAUTH2_PROVIDER_NAME=github
OAUTH2_PROVIDER=https://github.com
OAUTH2_CLIENT_ID=
OAUTH2_CLIENT_SECRET=
OAUTH2_REDIRECT_URL=https://wg-gen-web-demo.127-0-0-1.fr

# set provider name to fake to disable auth, also the default
OAUTH2_PROVIDER_NAME=fake
Dans le cas ou l’autorisation à 2 facteurs n’est pas utilisée, le fichier /opt/appwg/.env se résume à remplir la zone correspondante SMTP de la messagerie et désactiver l’autorisation
1
/opt/appwg/.env
1
2
3
4
5
6
7
8
9
10
11
12
13
14
15
16
17
18
19
20
# IP address to listen to
SERVER=0.0.0.0
# port to bind
PORT=8080
# Gin framework release mode
GIN_MODE=release
# where to write all generated config files
WG_CONF_DIR=./wireguard
# WireGuard main config file name, generally <interface name>.conf
WG_INTERFACE_NAME=wg0.conf

# SMTP settings to send email to clients
SMTP_HOST=smtp.gmail.com
SMTP_PORT=587
SMTP_USERNAME=account@gmail.com
SMTP_PASSWORD=*************
SMTP_FROM=Wg Gen Web <account@gmail.com>

# set provider name to fake to disable auth, also the default
OAUTH2_PROVIDER_NAME=fake
Créer le service wgweb.service
Tester manuellement le fonctionnement
Ouvrir un terminal
1
2
3
sudo -s
cd /opt/appwg/
./deb-wg-gen-web    # arrêt par Ctrl C
Ouvrir le lien https://wg.rnmkcy.eu
Les échanges sont affichés dans la fenêtre du terminal

Créer un service systemd wgweb qui lance le serveur avec journalisation
1
sudo nano /etc/systemd/system/wgweb.service
1
2
3
4
5
6
7
8
9
10
11
12
13
14
15
16
[Unit]
Description=Gestion web wg
After=network.target

[Service]

Type=simple

Restart=on-failure
RestartSec=10

WorkingDirectory=/opt/appwg
ExecStart=/opt/appwg/deb-wg-gen-web

[Install]
WantedBy=multi-user.target
Recharger systemd puis démarrer le service:
1
2
3
sudo systemctl daemon-reload
sudo systemctl start wgweb.service
sudo systemctl status wgweb.service
1
2
3
4
5
6
7
8
9
10
11
12
● wgweb.service - Gestion web wg
   Loaded: loaded (/etc/systemd/system/wgweb.service; enabled; vendor preset: enabled)
   Active: active (running) since Sun 2020-05-10 19:36:04 CEST; 8s ago
 Main PID: 30363 (deb-wg-gen-web)
    Tasks: 5 (limit: 2313)
   Memory: 8.7M
   CGroup: /system.slice/wgweb.service
           └─30363 /opt/appwg/deb-wg-gen-web

mai 10 18:01:13 rnmkcy.eu systemd[1]: Started Gestion web wg.
mai 10 18:01:15 rnmkcy.eu deb-wg-gen-web[30004]: time="2020-05-10T18:01:15+02:00" level=info msg="Lancement de la version Web de Wg Gen : yann"
mai 10 18:01:15 rnmkcy.eu deb-wg-gen-web[30004]: time="2020-05-10T18:01:15+02:00" level=warning msg="Oauth n'est pas utilisé, aucune authentification réelle ne sera effectuée"
Vérifier sur le lien https://wg.rnmkcy.eu
Activer le service si tout fonctionne
1
sudo systemctl enable wgweb.service
Pour suivre dans le journal
1
sudo journalctl -f -t deb-wg-gen-web
1
2
3
4
5
6
7
8
-- Logs begin at Sun 2020-05-10 12:10:25 CEST. --
mai 10 20:02:09 rnmkcy.eu deb-wg-gen-web[30457]: [GIN] 2020/05/10 - 20:02:09 | 200 |    27.49257ms |       127.0.0.1 | PATCH    "/api/v1.0/server"
mai 10 20:03:22 rnmkcy.eu deb-wg-gen-web[30457]: [GIN] 2020/05/10 - 20:03:22 | 200 |      243.07µs |             ::1 | GET      "/api/v1.0/client"
mai 10 20:03:22 rnmkcy.eu deb-wg-gen-web[30457]: [GIN] 2020/05/10 - 20:03:22 | 200 |     253.995µs |       127.0.0.1 | GET      "/api/v1.0/server"
mai 10 20:03:22 rnmkcy.eu deb-wg-gen-web[30457]: [GIN] 2020/05/10 - 20:03:22 | 200 |     860.702µs |             ::1 | GET      "/api/v1.0/server/config"
mai 10 20:05:19 rnmkcy.eu deb-wg-gen-web[30457]: [GIN] 2020/05/10 - 20:05:19 | 200 |     197.038µs |       127.0.0.1 | GET      "/api/v1.0/server"
mai 10 20:05:19 rnmkcy.eu deb-wg-gen-web[30457]: [GIN] 2020/05/10 - 20:05:19 | 200 |    2.758656ms |             ::1 | GET      "/api/v1.0/server/config"
mai 10 20:06:17 rnmkcy.eu deb-wg-gen-web[30457]: [GIN] 2020/05/10 - 20:06:17 | 200 |    1.287984ms |       127.0.0.1 | PATCH    "/api/v1.0/server"
Paramètres wireguard du serveur (wg0.conf et server.json)
Arrêt du service
1
sudo systemctl stop wgweb.service
Modifier les fichiers existants pour être identique au paramétrage de wireguard wg0.conf situé sous /etc/wireguard
1
/opt/appwg/wireguard/server.json
1
2
3
4
5
6
7
8
9
10
11
12
13
14
15
16
17
18
19
20
21
22
23
24
25
26
{
  "address": [
    "fd9f:6666::10:6:6:1/64",
    "10.6.6.1/24"
  ],
  "listenPort": 51820,
  "mtu": 0,
  "privateKey": "UEQCgh/6a2RQbF9+qqylVjqLCK/mRwqRPc/4vjRsYXg=",
  "publicKey": "0s1wsNpuU1RlKgj6AmoN0aKUeb+aESByhO3yTSnfTyE=",
  "endpoint": "wireguard.example.com:123",
  "persistentKeepalive": 16,
  "dns": [
    "fd9f::10:0:0:2",
    "10.0.0.2"
  ],
  "allowedips": [
    "0.0.0.0/0",
    "::/0"
  ],
  "preUp": "echo WireGuard PreUp",
  "postUp": "echo WireGuard PostUp",
  "preDown": "echo WireGuard PreDown",
  "postDown": "echo WireGuard PostDown",
  "updatedBy": "",
  "created": "2020-05-10T17:31:50.589913433Z",
  "updated": "2020-05-10T17:31:50.589913433Z"
1
cat /opt/appwg/wireguard/wg0.conf
1
2
3
4
5
6
7
8
9
10
# Updated: 2020-05-10 17:31:50.589913433 +0000 UTC / Created: 2020-05-10 17:31:50.589913433 +0000 UTC
[Interface]
Address = fd9f:6666::10:6:6:1/64
Address = 10.6.6.1/24
ListenPort = 51820
PrivateKey = UEQCgh/6a2RQbF9+qqylVjqLCK/mRwqRPc/4vjRsYXg=

PreUp = echo WireGuard PreUp
PostUp = echo WireGuard PostUp
PreDown = echo WireGuard PreDown
Après modifications, les 2 fichiers sont déplacés vers le dossier **/et/wireguard**
On modifie dans /opt/appwg/.env ,le paramètre WG_CONF_DIR=./wireguard → WG_CONF_DIR=/etc/wireguard
On relance le service
1
sudo systemctl start wgweb
Activation service wireguard wg-quick@wg0.service
Le gestionnaire web est à jour , on peut lancer le serveur wireguard
1
sudo systemctl start wg-quick@wg0.service
Vérifier
1
systemctl status wg-quick@wg0.service
1
2
3
4
5
6
7
8
9
10
11
12
13
14
15
16
17
18
19
20
21
● wg-quick@wg0.service - WireGuard via wg-quick(8) for wg0
   Loaded: loaded (/lib/systemd/system/wg-quick@.service; disabled; vendor preset: enabled)
   Active: active (exited) since Sun 2020-05-10 20:10:08 CEST; 10s ago
     Docs: man:wg-quick(8)
           man:wg(8)
           https://www.wireguard.com/
           https://www.wireguard.com/quickstart/
           https://git.zx2c4.com/wireguard-tools/about/src/man/wg-quick.8
           https://git.zx2c4.com/wireguard-tools/about/src/man/wg.8
  Process: 30521 ExecStart=/usr/bin/wg-quick up wg0 (code=exited, status=0/SUCCESS)
 Main PID: 30521 (code=exited, status=0/SUCCESS)

mai 10 20:10:07 rnmkcy.eu systemd[1]: Starting WireGuard via wg-quick(8) for wg0...
mai 10 20:10:07 rnmkcy.eu wg-quick[30521]: [#]
mai 10 20:10:07 rnmkcy.eu wg-quick[30521]: [#] ip link add wg0 type wireguard
mai 10 20:10:07 rnmkcy.eu wg-quick[30521]: [#] wg setconf wg0 /dev/fd/63
mai 10 20:10:07 rnmkcy.eu wg-quick[30521]: [#] ip -6 address add fd51:6547:3aa2:3ab6::1/64 dev wg0
mai 10 20:10:07 rnmkcy.eu wg-quick[30521]: [#] ip -4 address add 10.19.55.1/24 dev wg0
mai 10 20:10:07 rnmkcy.eu wg-quick[30521]: [#] ip link set mtu 1420 up dev wg0
mai 10 20:10:07 rnmkcy.eu wg-quick[30521]: [#] iptables -A FORWARD -i wg0 -j ACCEPT; iptables -t nat -A POSTROUT
mai 10 20:10:08 rnmkcy.eu systemd[1]: Started WireGuard via wg-quick(8) for wg0.
Appliquer automatiquement les modifications apportées à WireGuard
Utilisation de systemd.path monitor pour les changements dans le répertoire, voir systemd doc
1
/etc/systemd/system/wg-gen-web.path
[Unit]
Description=Surveiller /etc/wireguard pour les changements

[Path]
PathModified=/etc/wireguard

[Install]
WantedBy=multi-user.target
Ce wg-gen-web.path activera le fichier de l’unité avec le même nom, wg-gen-web.service
1
/etc/systemd/system/wg-gen-web.service
1
2
3
4
5
6
7
8
9
10
[Unit]
Description=Relancer WireGuard si changements
After=network.target

[Service]
Type=oneshot
ExecStart=/usr/bin/systemctl restart wg-quick@wg0.service

[Install]
WantedBy=multi-user.target
Ce qui permettra de relancer le service WireGuard
1
2
sudo systemctl start wg-gen-web.path
sudo systemctl status wg-gen-web.path
1
2
3
4
5
● wg-gen-web.path - Surveiller /etc/wireguard pour les changements
   Loaded: loaded (/etc/systemd/system/wg-gen-web.path; disabled; vendor preset: enabled)
   Active: active (waiting) since Sun 2020-05-10 21:04:50 CEST; 13s ago

mai 10 21:04:50 rnmkcy.eu systemd[1]: Started Surveiller /etc/wireguard pour les changements.
Activation
1
sudo systemctl enable wg-gen-web.path
Pour suivre dans le journal
1
sudo journalctl -f -t wg-quick
1
2
3
4
5
6
7
8
9
10
11
-- Logs begin at Sun 2020-05-10 12:10:25 CEST. --
mai 10 20:25:41 rnmkcy.eu wg-quick[31291]: [#]
mai 10 20:25:41 rnmkcy.eu wg-quick[31291]: [#] ip link delete dev wg0
mai 10 20:25:42 rnmkcy.eu wg-quick[31291]: [#] iptables -D FORWARD -i wg0 -j ACCEPT; iptables -t nat -D POSTROUTING -o eth0 -j MASQUERADE; ip6tables -D FORWARD -i wg0 -j ACCEPT; ip6tables -t nat -D POSTROUTING -o eth0 -j MASQUERADE
mai 10 20:25:43 rnmkcy.eu wg-quick[31326]: [#]
mai 10 20:25:43 rnmkcy.eu wg-quick[31326]: [#] ip link add wg0 type wireguard
mai 10 20:25:43 rnmkcy.eu wg-quick[31326]: [#] wg setconf wg0 /dev/fd/63
mai 10 20:25:44 rnmkcy.eu wg-quick[31326]: [#] ip -6 address add fd51:6547:3aa2:3ab6::1/64 dev wg0
mai 10 20:25:44 rnmkcy.eu wg-quick[31326]: [#] ip -4 address add 10.19.55.1/24 dev wg0
mai 10 20:25:44 rnmkcy.eu wg-quick[31326]: [#] ip link set mtu 1420 up dev wg0
mai 10 20:25:44 rnmkcy.eu wg-quick[31326]: [#] iptables -A FORWARD -i wg0 -j ACCEPT; iptables -t nat -A POSTROUTING -o eth0 -j MASQUERADE; ip6tables -A FORWARD -i wg0 -j ACCEPT; ip6tables -t nat -A POSTROUTING -o eth0 -j MASQUERADE
Authentification 2FA (facultatif)
Authentification à 2 facteurs pour créer un accès protégé au générateur web wireguard
On passe en mode su
Le dossier web par défaut : /var/www/default-www/
Installation, création de la base utilisateurs et ajout utlisateur
Cloner le dépot “twofactorauth” dans /var/www/default-www/ et établir les droits
1
2
git clone https://gitea.cinay.eu/yann/twofactorauth.git /var/www/default-www/twofactorauth
chown www-data.www-data -R /var/www/default-www/twofactorauth
Vérifier si sqlit3 est installé en fonction de la version php utilisée
1
2
3
php --version                   # PHP 7.4.5 dans le cas présent
dpkg -l | grep php7.4 |grep sql # sqlite3 ?
apt install php7.4-sqlite3      # installer sqlite3 si pas présent
Moddifier à votre convenance le fichier config.php
1
2
3
define('QRCODE_TITLE','rnmkcy.eu');
define('AUTH_SUCCEED_REDIRECT_URL','https://rnmkcy.eu/');
define('SESSION_NAME','2farnm');
Installer l’authentification : https://rnmkcy.eu/twofactorauth/install/install.php , création de la base utilisateurs, ajout utlisateur
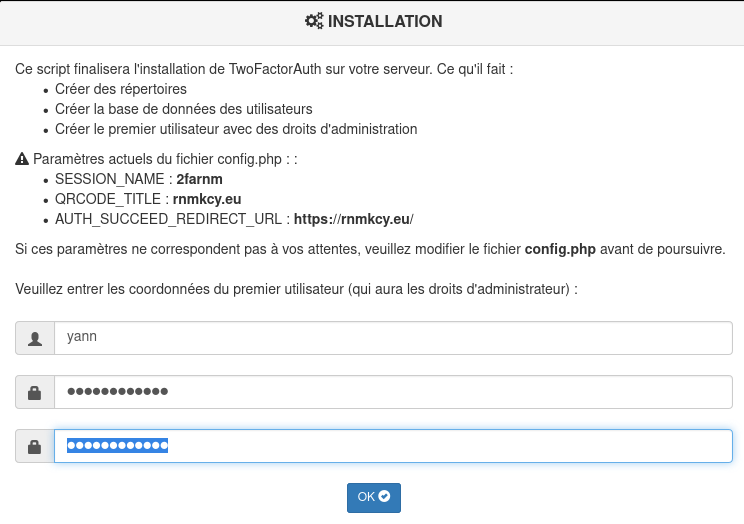
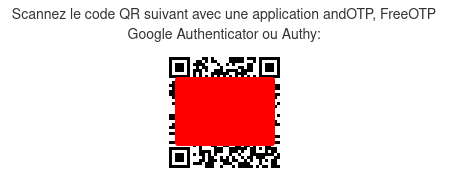
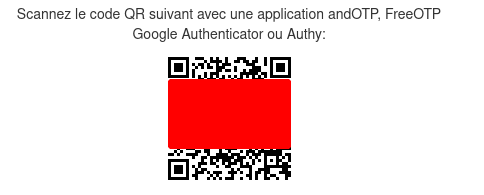
Scanner le code QR sur application android andOTP , puis fermer

Cliquer sur le lien
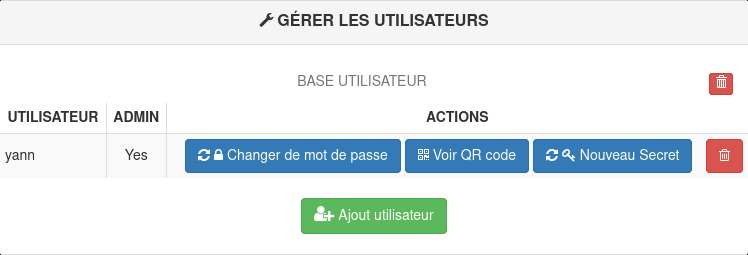
Ajouter un utilisateur

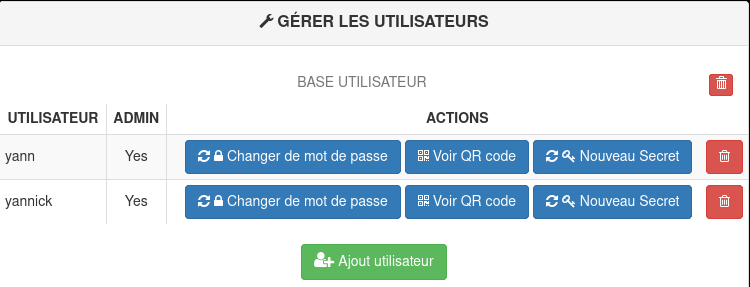
Liste des utilisateurs, fermer la page
Paramétrage nginx auth_request
Modifier la configuration existante /etc/nginx/conf.d/rnmkcy.eu.conf
1
2
3
4
5
6
7
8
9
10
11
12
13
14
15
16
17
18
19
20
21
22
23
24
25
26
27
28
29
30
31
32
33
34
35
36
37
38
39
40
41
42
43
44
45
46
47
48
49
50
51
52
53
54
55
56
57
58
59
60
61
62
63
64
65
66
67
68
69
70
71
72
73
74
75
76
77
78
79
80
81
82
map $request_uri $loggable {
    /submit/api/submit 1;
    default 0;
}

 log_format phpcookie '$remote_addr - $remote_user [$time_local]  '
 '"$request" $status $body_bytes_sent '
 '"$http_referer" "$http_user_agent" - "$http_cookie"';


# /etc/nginx/conf.d/rnmkcy.eu.conf
##
# Virtual Host rnmkcy.eu
##

server {
    listen 80;
    listen [::]:80;

    ## redirect http to https ##
    server_name rnmkcy.eu;
    return  301 https://$server_name$request_uri;
}

server {
    listen 443 ssl http2;
    listen [::]:443 ssl http2;
    server_name rnmkcy.eu;


    include ssl_dh_headers_ocsp;

    root /var/www/default-www/ ;
    index index.php;

	error_page 401 = @error401;

	location @error401 {
	    return 302 $scheme://$host/twofactorauth/login/login.php?from=$uri;
	}

	location = /twofactorauth/nginx/auth.php {
	    include /etc/nginx/fastcgi.conf;
	    fastcgi_param  CONTENT_LENGTH "";
	    fastcgi_pass unix:/run/php/php7.4-fpm.sock;
	}

	location /twofactorauth/ {
	index index.php;
	}

	location /twofactorauth/db/ {
	    deny all;
	}

	location = /twofactorauth/login/login.php {
	    allow all;
	    auth_request off;
	include /etc/nginx/fastcgi.conf;
	    fastcgi_pass unix:/run/php/php7.4-fpm.sock;
	}

	location ~ \.php {

	    include /etc/nginx/fastcgi.conf;
	    fastcgi_pass unix:/run/php/php7.4-fpm.sock;
	}


	location /static/ {
		alias /var/www//static/;
	}

	location / {
		#access_log /var/log/nginx/yann.log phpcookie if=$loggable;
		proxy_pass       https://rnmkcy.eu;
		auth_request /twofactorauth/nginx/auth.php;
		proxy_buffering off;
	}


}
Vérifier et relancer nginx
Aller sur le site https://rnmkcy.eu , vous serez invité à saisir un utilisateur , un mot de passe at le jeton correspondant
Sauvegarde BorgBackup
![]()
Préparation de la machine à sauvegarder
On se connecte sur la machine et on passe en mode su
1
2
sudo -s
apt update
Installer borgbackup
1
apt install borgbackup
Créer un jeu de clé sur machine à sauvegarder (rnmkcy.eu)
Créer un utilisateur borg (sans home) dédié aux sauvegardes par BorgBackup :
1
useradd -M borg
Générer un jeu de clé sur /root/.ssh
1
2
mkdir -p /root/.ssh
ssh-keygen -t ed25519 -o -a 100 -f /root/.ssh/rnmkcy_eu_ed25519
Le jeu de clé
1
2
ls /root/.ssh
    rnmkcy_eu_ed25519  rnmkcy_eu_ed25519.pub
Autoriser utilisateur borg à exécuter /usr/bin/borg uniquement
1
echo "borg ALL=NOPASSWD: /usr/bin/borg" >> /etc/sudoers
Ajout clé publique au serveur backup xoyaz.xyz
Pour une connexion via ssh vous devez ajouter la clé publique rnmkcy_eu_ed25519.pub du serveur client rnmkcy.eu au fichier ~/.ssh/authorized_keys du serveur backup xoyaz.xyz
Se connecter au serveur backup xoyaz.xyz depuis un terminal autorisé
1
2
3
ssh usernl@5.2.79.107 -p 55036 -i /home/yannick/.ssh/OVZ-STORAGE-128 # connexion SSH serveur backup depuis PC1
sudo -s # passer en super utilisateur
cat >> /srv/data/borg-backups/.ssh/authorized_keys
Copier/coller le contenu du fichier du fichier de clef publique (fichier /root/.ssh/rnmkcy_eu_ed25519.pub de la machine à sauvegarder rnmkcy.eu ) dans ce terminal, et presser [Ctrl]+[D] pour valider.
Test depuis le serveur client rnmkcy.eu (c’est lui qui possède la clé privée).
Si parefeu avec les sorties bloquées sur rnmkcy.eu , il faut ouvrir en sortie le port TCP 55036.
AU PREMIER passage une question est posée , saisir oui ou yes
1
2
sudo -s
ssh -p 55036 -i /root/.ssh/rnmkcy_eu_ed25519 borg@xoyaz.xyz
1
2
3
4
5
6
7
8
9
10
11
12
13
14
15
The authenticity of host '[xoyaz.xyz]:55036 ([2a04:52c0:101:7ae::7a5e]:55036)' can't be established.
ECDSA key fingerprint is SHA256:PDXQBhTh4oj0cSzgnjCun+J60JDUEk7VeLH2YHZbwMc.
Are you sure you want to continue connecting (yes/no)? yes
hosts.
Linux backup 2.6.32-042stab140.1 #1 SMP Thu Aug 15 13:32:22 MSK 2019 x86_64
  _               _
 | |__  __ _  __ | |__ _  _  _ __
 | '_ \/ _` |/ _|| / /| || || '_ \
 |_.__/\__,_|\__||_\_\ \_,_|| .__/
 __ __ ___  _  _  __ _  ___ |_|_ __ _  _  ___
 \ \ // _ \| || |/ _` ||_ / _ \ \ /| || ||_ /
 /_\_\\___/ \_, |\__,_|/__|(_)/_\_\ \_, |/__|
            |__/                    |__/
Last login: Sun Apr 12 19:33:05 2020 from 2001:41d0:404:200::1cf
$
saisir exit pour sortir
NOTE : /srv/data/borg-backups est le home de l’utilisateur borg sur le serveur backup xoyaz.xyz
Création dépôt et lancement des sauvegardes depuis la machine à sauvegarder
machine cliente rnmkcy.eu
On se connecte sur la machine et on passe en mode su
1
sudo -s
Création du dépôt distant sur le serveur backup xoyaz.xyz (A FAIRE UNE SEULE FOIS)
1
2
export BORG_RSH='ssh -i /root/.ssh/rnmkcy_eu_ed25519' # ce n'est pas la clé par défaut id_rsa
borg init --encryption=repokey-blake2 ssh://borg@xoyaz.xyz:55036/srv/data/borg-backups/rnmkcy.eu
1
2
3
4
5
6
7
8
9
10
11
12
13
14
15
Enter new passphrase:
Enter same passphrase again:
Do you want your passphrase to be displayed for verification? [yN]:

By default repositories initialized with this version will produce security
errors if written to with an older version (up to and including Borg 1.0.8).

If you want to use these older versions, you can disable the check by running:
borg upgrade --disable-tam ssh://borg@xoyaz.xyz:55036/srv/data/borg-backups/rnmkcy.eu

See https://borgbackup.readthedocs.io/en/stable/changes/#pre-1-0-9-manifest-spoofing-vulnerability for details about the security implications.

IMPORTANT: you will need both KEY AND PASSPHRASE to access this repo!
Use "borg key export" to export the key, optionally in printable format.
Write down the passphrase. Store both at safe place(s).
Sauvegarder la “passphrase” dans un fichier pour une procédure automatique
1
2
mkdir -p /root/.borg
nano /root/.borg/passphrase
Générer une sauvegarde d’un dossier local vers le dépôt distant pour test (facultatif)
1
borg create ssh://borg@xoyize.xyz:55029/srv/ssd-two/borg-backups/rnmkcy.eu::2019-01-11 /home/yanfi
1
Enter passphrase for key ssh://borg@xoyize.xyz:55029/srv/ssd-two/borg-backups/rnmkcy.eu:
Automatiser la procédure de sauvegarde pour le client rnmkcy.eu
script de sauvegarde (notez l’usage de borg prune pour supprimer les archives trop anciennes)
1
nano /root/.borg/borg-backup
1
2
3
4
5
6
7
8
9
10
11
12
13
14
15
16
17
18
19
20
21
22
23
24
25
26
27
28
29
30
31
32
33
34
35
#!/bin/sh
#
# Script de sauvegarde.
#
# Envoie les sauvegardes sur un serveur distant, via le programme Borg.
# Les sauvegardes sont chiffrées
#

set -e

BACKUP_DATE=`date +%Y-%m-%d-%Hh%M`
LOG_PATH=/var/log/borg-backup.log

export BORG_PASSPHRASE="`cat ~root/.borg/passphrase`"
export BORG_RSH='ssh -i /root/.ssh/rnmkcy_eu_ed25519'
BORG_REPOSITORY=ssh://borg@xoyaz.xyz:55036/srv/data/borg-backups/rnmkcy.eu
BORG_ARCHIVE=${BORG_REPOSITORY}::${BACKUP_DATE}

borg create \
-v --progress --stats --compression lzma,9 \
--exclude-from /root/.borg/exclusions --exclude-caches \
$BORG_ARCHIVE \
/bin /boot /etc /home /lib /lib64 /opt /root /sbin /srv /usr /var \
>> ${LOG_PATH} 2>&1

# Nettoyage des anciens backups
# On conserve
# - une archive par jour les 7 derniers jours,
# - une archive par semaine pour les 4 dernières semaines,
# - une archive par mois pour les 6 derniers mois.

borg prune \
-v --list --stats --keep-daily=7 --keep-weekly=4 --keep-monthly=6 \
$BORG_REPOSITORY \
>> ${LOG_PATH} 2>&1
Le rendre exécutable
1
chmod +x /root/.borg/borg-backup
Fichier /root/.borg/exclusions pour ne pas sauvegarder, entre autre,le point de montage ssfs “music” (si existant)
1
2
3
4
5
6
7
8
9
/dev
/proc
/sys
/tmp
/run
/mnt
/media
/home/vpsrnm/music
lost+found
Programmer la tâche à 2h50 du matin
1
crontab -e
1
2
# Sauvegarde sur distant avec BorgBackup
50 02 * * * /root/.borg/borg-backup > /dev/null
SSL Labs
https://www.ssllabs.com/ssltest/analyze/?d=rnmkcy.eu