Qemu/KVM - Virtuel Yunohost ouestyan.xyz (debian 11 image cloud Qcow2)
![]()
![]()

installer une image virtuelle cloud debian 11 puis yunohost
KVM debian bullseyes virtuel

Si vous exploitez un nuage privé ou une plateforme de virtualisation fonctionnant avec KVM, comme OpenStack et oVirt. La manière la plus idéale de faire tourner une machine virtuelle Debian 11 est d’utiliser une image de nuage. Dans ce blog, nous vous montrons comment télécharger l’image officielle du nuage Debian 11 et créer une instance de machine virtuelle à partir de celle-ci sur l’hyperviseur KVM. Article original Create Debian 11 (Bullseye) KVM Guest From Cloud Image
Image Cloud Debian 11
Toutes les images de Debian 11 Cloud sont disponibles sur la page officielle de téléchargement des images d’OS. Dans ce guide, nous allons télécharger l’image nocloud qcow2 :
1
2
mkdir -p ~/virtuel/KVM/ && cd ~/virtuel/KVM/
wget https://cloud.debian.org/images/cloud/bullseye/latest/debian-11-nocloud-amd64.qcow2
Vous pouvez vérifier plus de détails sur le fichier en utilisant la commande file :
1
file debian-11-nocloud-amd64.qcow2
debian-11-nocloud-amd64.qcow2: QEMU QCOW2 Image (v3), 2147483648 bytes
Créer machine virtuelle Debian 11
Ensuite, nous créons une machine virtuelle Debian 11 (bullseyes) à partir de notre image du nuage.
Définir la variable
1
export VM_NAME="yunobulls"
Une fois la variable exportée, créer l’image du disque racine de l’OS à partir de l’image du cloud téléchargée précédemment :
1
2
3
4
5
qemu-img convert \
  -f qcow2 \
  -O qcow2 \
  ~/virtuel/KVM/debian-11-nocloud-amd64.qcow2 \
  ~/virtuel/KVM/$VM_NAME.qcow2
Vérifiez la création du fichier si elle est réussie
1
file  ~/virtuel/KVM/$VM_NAME.qcow2
/home/yann/virtuel/KVM/yunobulls.qcow2: QEMU QCOW2 Image (v3), 2147483648 bytes
1
sudo du -sh ~/virtuel/KVM/$VM_NAME.qcow2
912M /home/yann/virtuel/KVM/yunobulls.qcow2
Supprimer l’image cloud (FACULTATIF)
1
rm ~/virtuel/KVM/debian-11-nocloud-amd64.qcow2
Redimensionner le disque à la taille souhaitée.
Notez que le disque racine que nous avons créé a une petite capacité de disque comme défini dans l’image de nuage par défaut.
Redimensionnons à la taille souhaitée pour le disque racine.
1
2
3
4
5
6
7
# 20 GB de disque
export VM_ROOT_DISK_SIZE=20G

# Resize Debian 11 VM disk
qemu-img resize \
  ~/virtuel/KVM/$VM_NAME.qcow2 \
  $VM_ROOT_DISK_SIZE
Image resized.
Confirmez la taille actuelle avec la commande qemu-img info :
1
qemu-img  info ~/virtuel/KVM/$VM_NAME.qcow2
1
2
3
4
5
6
7
8
9
10
11
file format: qcow2
virtual size: 20 GiB (21474836480 bytes)
disk size: 912 MiB
cluster_size: 65536
Format specific information:
    compat: 1.1
    compression type: zlib
    lazy refcounts: false
    refcount bits: 16
    corrupt: false
    extended l2: false
Créez une nouvelle machine virtuelle Debian 11 à l’aide de la commande virt-install.
Nous utilisons le réseau en pont , remplacer network=default par bridge=br0
1
2
3
4
5
6
7
8
9
10
11
sudo virt-install \
    --memory 2048 \
    --vcpus 1 \
    --name $VM_NAME \
    --disk ~/virtuel/KVM/$VM_NAME.qcow2,device=disk,bus=virtio,format=qcow2 \
    --os-type Linux \
    --os-variant debian11 \
    --network bridge=br0,model=virtio \
    --virt-type kvm \
    --graphics none \
    --import
A la fin de l’installation, on arrive sur le login (en mode console) : “root” sans mot de passe
1
2
3
4
5
6
[...]
[  OK  ] Finished Update UTMP about System Runlevel Changes.

Debian GNU/Linux 11 debian ttyS0

debian login:
Mise à jour
1
2
apt update && apt upgrade
reboot
Box IPV6 et DMZ
Pour le nexthop IPV6 FreeBox
1
ip a |grep "inet6 fe80"
inet6 fe80::5054:ff:fe37:2d1b/64 scope link
Paramètres de la Freebox, Configuration IPV6 → Délégation de préfixe
Préfixe : 2a01:e34:eebf:5663::/64
Next Hop : fe80::5054:ff:fe37:2d1b
L’accès local sur ip 192.168.0.135
Modifier l’accès DMZ de la box (FreeBox)
Freebox : Paramètres avancés → Gestion des ports → DMZ IP DMZ : 192.168.0.135

Reverse DNS freebox (Freebox Espace Abonné) : ouestyan.xyz
Debian Ip V4 V6 statiques
Passage en ip statique 192.168.0.135 et 2a01:e34:eebf:5663::1 (nexthop fe80::5054:ff:fe37:2d1b)
1
nano /etc/network/interfaces.d/staticv4v6
1
2
3
4
5
6
7
8
9
10
11
12
13
14
# The primary network interface
allow-hotplug enp1s0
#iface enp1s0 inet dhcp
iface enp1s0 inet static
 address 192.168.0.135
 netmask 255.255.255.0
 gateway 192.168.0.254
# This is an autoconfigured IPv6 interface
#iface enp1s0 inet6 auto
iface enp1s0 inet6 static
 address 2a01:e34:eebf:5663::1
 netmask 64
 post-up ip -6 route add default via fe80::8e97:eaff:fe39:66d6 dev enp1s0
Pour éviter l’erreur ICMPv6: RA: ndisc_router_discovery failed to add default route
Correction, désactiver l’annonce des routes (accept_ra) :
1
nano /etc/sysctl.conf
1
2
3
4
5
6
7
8
# Uncomment the next line to enable packet forwarding for IPv6
#  Enabling this option disables Stateless Address Autoconfiguration
#  based on Router Advertisements for this host
net.ipv6.conf.all.forwarding=1

# Accept Router Advertisements
net.ipv6.conf.all.accept_ra=0
Activer net.ipv6.conf.all.forwarding=1 et ajouter net.ipv6.conf.all.accept_ra=0
Puis sysctl -p pour une validation immédiate
reboot : reboot
Vérifier Adressage IP statique
1
ip a
1
2
3
4
5
6
7
8
9
10
11
12
13
14
15
1: lo: <LOOPBACK,UP,LOWER_UP> mtu 65536 qdisc noqueue state UNKNOWN group default qlen 1000
    link/loopback 00:00:00:00:00:00 brd 00:00:00:00:00:00
    inet 127.0.0.1/8 scope host lo
       valid_lft forever preferred_lft forever
    inet6 ::1/128 scope host
       valid_lft forever preferred_lft forever
2: enp1s0: <BROADCAST,MULTICAST,UP,LOWER_UP> mtu 1500 qdisc pfifo_fast state UP group default qlen 1000
    link/ether 52:54:00:37:2d:1b brd ff:ff:ff:ff:ff:ff
    inet 192.168.0.135/24 brd 192.168.0.255 scope global enp1s0
       valid_lft forever preferred_lft forever
    inet6 2a01:e34:eebf:5663::1/64 scope global
       valid_lft forever preferred_lft forever
    inet6 fe80::5054:ff:fe37:2d1b/64 scope link
       valid_lft forever preferred_lft forever
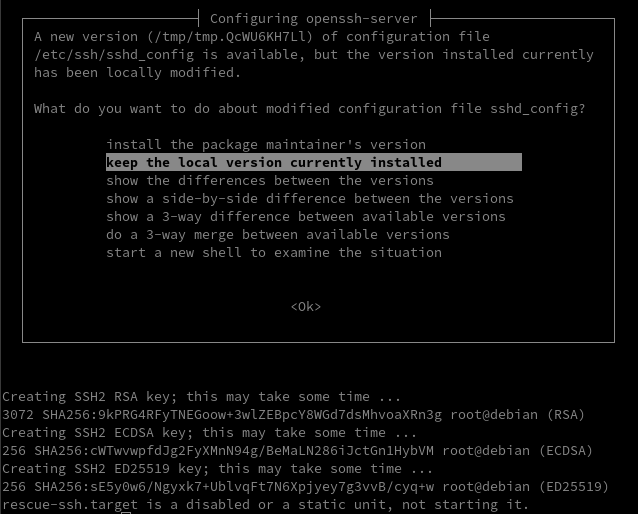
Reconfigurer les clés SSH
Par défaut openssh ne fonctionne pas
1
2
    [FAILED] Failed to start OpenBSD Secure Shell server.
    sshd: no hostkeys available -- exiting.
Il faut regénérer les clés
1
dpkg-reconfigure openssh-server
Yunohost
Installer yunohost
Installation d’un nouveau YunoHost sur un Debian 11/Bullseye
1
2
wget https://install.yunohost.org/bullseye -O install_script
bash install_script -d testing
Patienter …
1
2
3
4
5
6
7
8
9
10
11
12
13
14
15
16
17
18
19
20
21
22
23
24
25
26
27
28
29
30
31
32
33
34
35
36

 ┌───────────────────────────┤ SSH Configuration ├────────────────────────────┐
 │                                                                            │
 │ To improve the security of your server, it is recommended to let YunoHost  │
 │ manage the SSH configuration.                                              │
 │ Your current SSH configuration differs from the recommended configuration. │
 │ If you let YunoHost reconfigure it, the way you connect to your server     │
 │ through SSH will change in the following way:                              │
 │ - you will not be able to connect as root through SSH. Instead you should  │
 │ use the admin user ;                                                       │
 │                                                                            │
 │ Do you agree to let YunoHost apply those changes to your configuration and │
 │ therefore affect the way you connect through SSH ?                         │
 │                                                                            │
 │                     <Yes>                        <No>                      │
 │                                                                            │
 └────────────────────────────────────────────────────────────────────────────┘
Choix Yes

===============================================================================
You should now proceed with Yunohost post-installation. This is where you will
be asked for :
  - the main domain of your server ;
  - the administration password.

You can perform this step :
  - from the command line, by running 'yunohost tools postinstall' as root
  - or from your web browser, by accessing :
    - https://192.168.0.135/ (local IP, if self-hosting at home)
    - https://78.235.245.102/ (global IP, if you're on a VPS)

If this is your first time with YunoHost, it is strongly recommended to take
time to read the administator documentation and in particular the sections
'Finalizing your setup' and 'Getting to know YunoHost'. It is available at
the following URL : https://yunohost.org/admindoc
===============================================================================
Post-installation
admin mot de passe
domaine ouestyan.xyz
1
yunohost tools postinstall

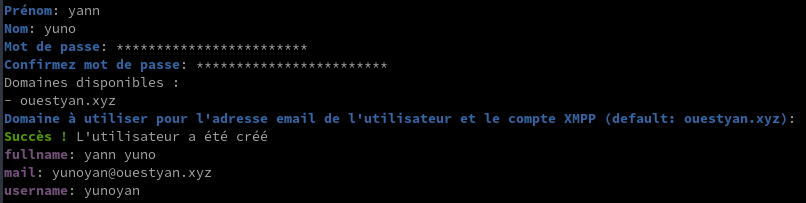
Utilisateur
Création utilisateur
1
yunohost user create yunoyan
DNS - ouestyan.xyz
![]()
![]()
Domaine ouestyan.xyz IPV6 ONLY
1
yunohost domain dns-conf ouestyan.xyz
1
2
3
4
5
6
7
8
9
10
11
12
13
14
15
16
17
18
19
20
21
22
23
; Basic ipv4/ipv6 records
@ 3600 IN AAAA 2a01:e34:eebf:5663::1

; Mail
@ 3600 IN MX 10 ouestyan.xyz.
@ 3600 IN TXT "v=spf1 a mx -all"
mail._domainkey 3600 IN TXT "v=DKIM1; h=sha256; k=rsa; p=MIGfMA0GCSqGSIb3DQEBAQUAA4GNADCBiQKBgQDFBpBoQJ17v9UlR4fGIgBfRPwxEsxFi5PoPSgLK6ae/uokOgc0w7iZf6ZeYSoTi+b9MZXHJwNxcVHX+cMm6pyJwg0
uRPITv2ys/NiSYl6qQESXzU41B5zjzUEL+hVNjRzgFAWQIQMpqco4YdfhClFG08x8JBRNjUc8VoQd0maZUwIDAQAB"
_dmarc 3600 IN TXT "v=DMARC1; p=none"


; XMPP
_xmpp-client._tcp 3600 IN SRV 0 5 5222 ouestyan.xyz.
_xmpp-server._tcp 3600 IN SRV 0 5 5269 ouestyan.xyz.
muc 3600 IN CNAME @
pubsub 3600 IN CNAME @
vjud 3600 IN CNAME @
xmpp-upload 3600 IN CNAME @

; Extra
* 3600 IN AAAA 2a01:e34:eebf:5663::1
@ 3600 IN CAA 128 issue "letsencrypt.org"
Copier le texte ci dessus
Se connecter sur OVH dans le domaine ouestyan.xyz
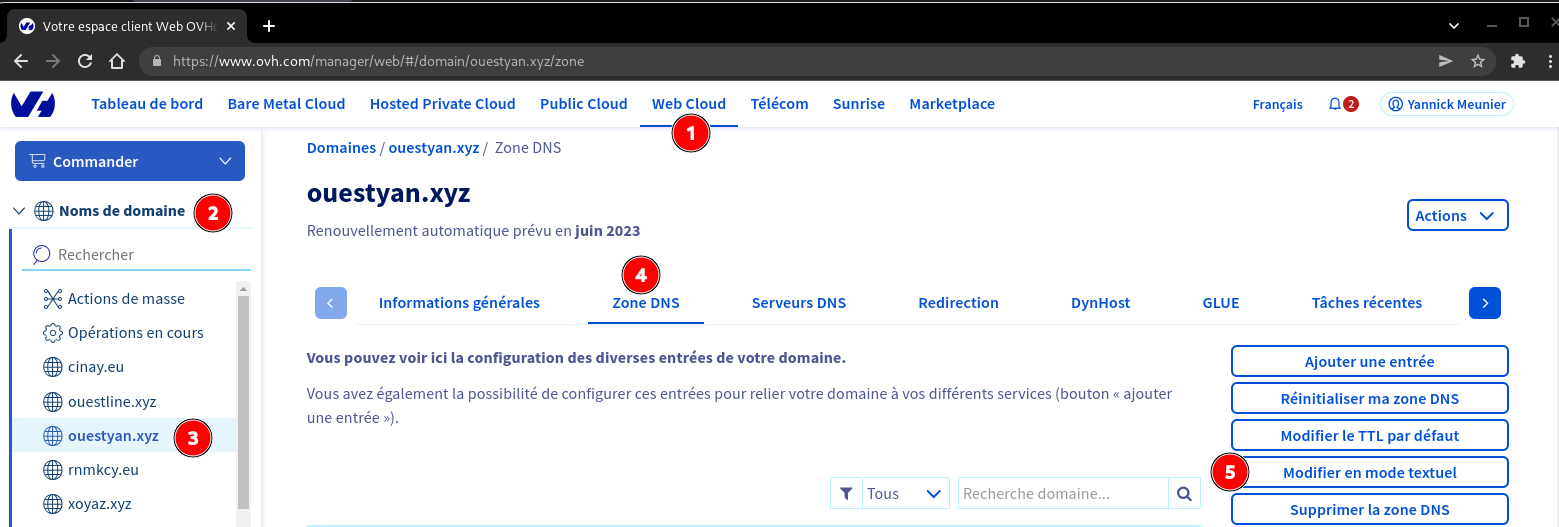
Coller le texte après la 4 ième ligne
1
2
3
4
5
$TTL 3600
@	IN SOA dns106.ovh.net. tech.ovh.net. (2022060600 86400 3600 3600000 60)
                         IN NS     dns106.ovh.net.
                         IN NS     ns106.ovh.net.
< Coller le texte ICI>
Cliquer sur suivant
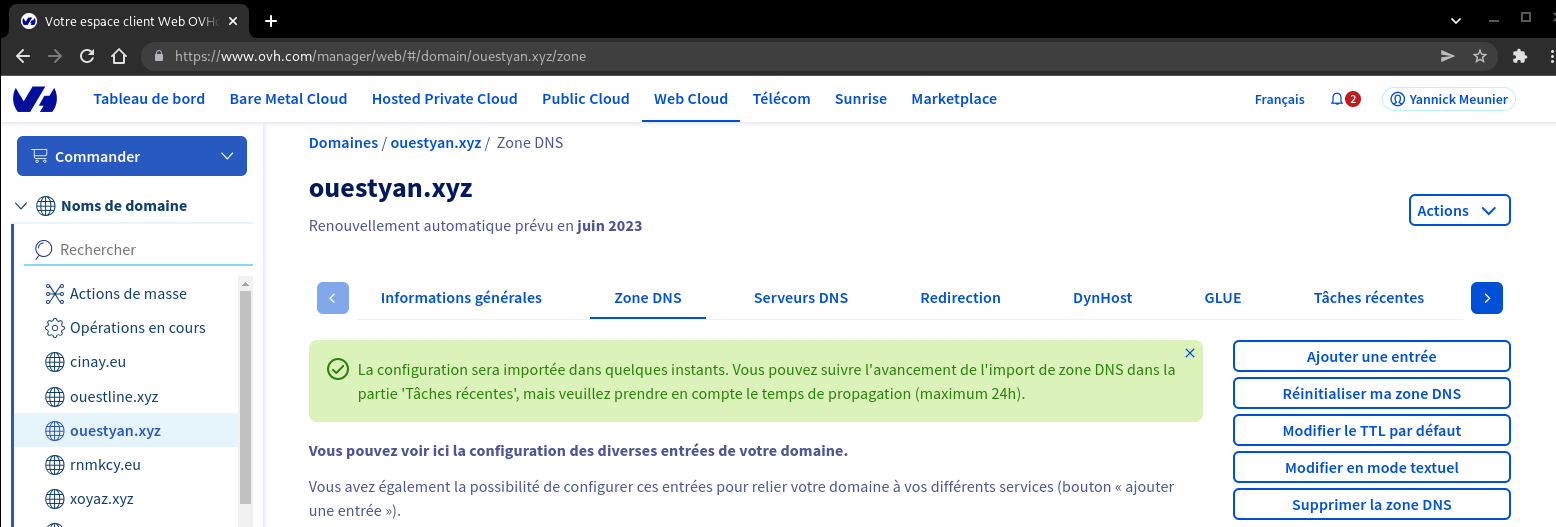
La configuration DNS OVH
1
2
3
4
5
6
7
8
9
10
11
12
13
14
15
16
17
18
19
$TTL 3600
@	IN SOA dns106.ovh.net. tech.ovh.net. (2022081401 86400 3600 3600000 60)
                         IN NS     ns106.ovh.net.
                         IN NS     dns106.ovh.net.
                         IN MX     10 ouestyan.xyz.
                         IN A      78.235.245.102
                         IN AAAA   2a01:e34:eebf:5663::1
                         IN CAA    128 issue "letsencrypt.org"
                         IN TXT    "v=spf1 a mx -all"
*                        IN A      78.235.245.102
*                        IN AAAA   2a01:e34:eebf:5663::1
_dmarc                   IN TXT    "v=DMARC1; p=none"
_xmpp-client._tcp        IN SRV    0 5 5222 ouestyan.xyz.
_xmpp-server._tcp        IN SRV    0 5 5269 ouestyan.xyz.
mail._domainkey          IN TXT    ( "v=DKIM1; h=sha256; k=rsa; p=MIGfMA0GCSqGSIb3DQEBAQUAA4GNADCBiQKBgQDVlYdbqqxjWskDN0a5FDBoaZg+TnZHefonMWDKSifzZkEWDd/ApGkQYl0iaVqrbiUOqZl1Hv580CbGrYdrTrSi8zFDPLAT2H5Xog8/ZiDK0AYtP5zzna/Nf7ybpQIXtLk/k3fHY5DI2rg6P/KHl5M5juhjk5vxGn/bhk1H600EjQIDAQAB" )
muc                      IN CNAME  ouestyan.xyz.
pubsub                   IN CNAME  ouestyan.xyz.
vjud                     IN CNAME  ouestyan.xyz.
xmpp-upload              IN CNAME  ouestyan.xyz.
Certificats SSL Let’s Encrypt

On active les certificats SSL pour le domaine
1
yunohost domain cert-install ouestyan.xyz --no-checks
Vérifier validité
1
yunohost domain cert status
1
2
3
4
5
certificates:
  ouestyan.xyz:
    CA_type: Let's Encrypt
    summary: Great!
    validity: 39
Renouvellement manuel
1
yunohost domain cert renew
Diagnostic et corrections
Lancer un diagnostic en mode su
1
2
yunohost diagnosis run
yunohost diagnosis run --force  # 14/08/2022
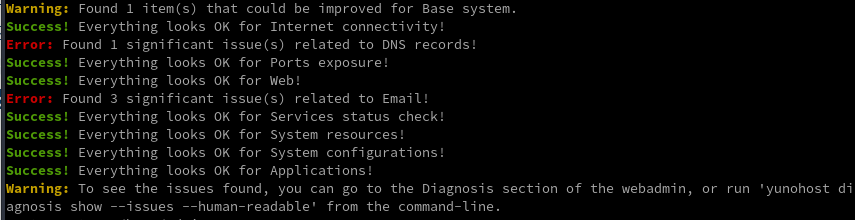
Il y a des erreurs liés au dns reverse IPV4 IPV6 qui n’est pas modifiable facilement chez free.fr
Toutes les adresses IPV4 free.fr sont “blacklistées” chez SPAMHAUS
Pour la lecture des erreurs
1
yunohost diagnosis show --issues --human-readable
Les erreurs et corrections
No reverse DNS is defined in IPv6
1
2
3
[ERROR] No reverse DNS is defined in IPv6. Some emails may fail to get delivered or may get flagged as spam.
  - You should first try to configure the reverse DNS with ouestyan.xyz in your internet router interface or your hosting provider interface. (Some hosting provider may require you to send them a support ticket for this).
  - Some providers won't let you configure your reverse DNS (or their feature might be broken...). If your reverse DNS is correctly configured for IPv4, you can try disabling the use of IPv6 when sending emails by running 'yunohost settings set smtp.allow_ipv6 -v off'. Note: this last solution means that you won't be able to send or receive emails from the few IPv6-only servers out there.
Ne pas utiliser le smtp v6
1
yunohost settings set smtp.allow_ipv6 -v off
Your IP or domain 78.235.245.102 is blacklisted on Spamhaus ZEN
1
2
3
4
[ERROR] Your IP or domain 78.235.245.102 is blacklisted on Spamhaus ZEN
  - The blacklist reason is: "https://www.spamhaus.org/query/ip/78.235.245.102"
  - After identifying why you are listed and fixed it, feel free to ask for your IP or domaine to be removed on https://www.spamhaus.org/zen/
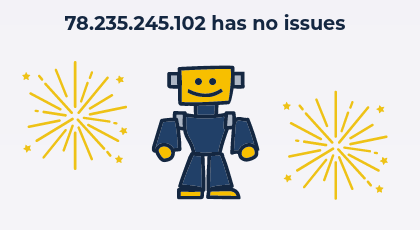
Suivre la procédure sur le lien https://www.spamhaus.org/zen/
Vérifier ensuite l’ip 78.235.245.102 sur le lien https://check.spamhaus.org/
Test envoi message
Si blocage spamhauss, aucun envoi de message est possible
Sur terminal 1 exécuter la commande : echo "Un mail de test" | mail -s "test envoi" vps@cinay.eu
Sur terminal 2 exécuter la commande : tail -f /var/log/mail.log
Message d’erreur dans le fichier /var/log/mail.log
1
2
3
4
5
6
7
Aug 14 07:14:06 ouestyan postfix/smtp[3238]: Trusted TLS connection established to cinay.eu[195.181.242.156]:25: TLSv1.3 with cipher TLS_AES_256_GCM_SHA384 (256/256 bits) key-exchange X25519 server-signature RSA-PSS (3072 bits) server-digest SHA256
Aug 14 07:14:06 ouestyan postfix/smtp[3238]: A6B77608D0: to=<vps@cinay.eu>, relay=cinay.eu[195.181.242.156]:25, delay=1.2, delays=0.03/0.04/0.81/0.34, dsn=5.7.1, status=bounced (host cinay.eu[195.181.242.156] said: 554 5.7.1 Service unavailable; Client host [78.235.245.102] blocked using zen.spamhaus.org (in reply to RCPT TO command))
Aug 14 07:14:06 ouestyan postsrsd[3225]: srs_forward: <""> not rewritten: No at sign in sender address
Aug 14 07:14:06 ouestyan postfix/cleanup[3224]: EAF4A608D2: message-id=<20220814071406.EAF4A608D2@ouestyan.xyz>
Aug 14 07:14:06 ouestyan postfix/qmgr[3006]: EAF4A608D2: from=<>, size=2288, nrcpt=1 (queue active)
Aug 14 07:14:06 ouestyan postfix/bounce[3239]: A6B77608D0: sender non-delivery notification: EAF4A608D2
Aug 14 07:14:06 ouestyan postfix/qmgr[3006]: A6B77608D0: removed
Pour vérifier qu’il n’y a plus de blocage
Sur terminal 1 exécuter la commande : echo "Un mail de test" | mail -s "test envoi" vps@cinay.eu
Sur terminal 2 exécuter la commande : tail -f /var/log/mail.log
1
2
3
4
Aug 14 07:44:39 ouestyan postfix/qmgr[3006]: 03298608D2: from=<admin@ouestyan.xyz>, size=340, nrcpt=1 (queue active)
Aug 14 07:44:39 ouestyan postfix/smtp[3338]: Trusted TLS connection established to cinay.eu[195.181.242.156]:25: TLSv1.3 with cipher TLS_AES_256_GCM_SHA384 (256/256 bits) key-exchange X25519 server-signature RSA-PSS (3072 bits)
Aug 14 07:44:40 ouestyan postfix/smtp[3338]: 03298608D2: to=<vps@cinay.eu>, relay=cinay.eu[195.181.242.156]:25, delay=1.8, delays=0.09/0.02/0.65/1, dsn=2.0.0, status=sent (250 2.0.0 Ok: queued as 1D31741E41)
Aug 14 07:44:40 ouestyan postfix/qmgr[3006]: 03298608D2: removed
OpenSSH, clé et script
![]() {height=”70”}
{height=”70”}
sur l'ordinateur de bureau
Générer une paire de clé curve25519-sha256 (ECDH avec Curve25519 et SHA2) nommé yunokvm pour une liaison SSH avec le serveur KVM.
1
ssh-keygen -t ed25519 -o -a 100 -f ~/.ssh/yunobulls
Envoyer les clés publiques sur le serveur KVM
1
ssh-copy-id -i ~/.ssh/yunobulls.pub admin@192.168.0.135
sur le serveur Yunohost On se connecte
1
ssh admin@192.168.0.135
Sur votre serveur, la modification du fichier de configuration SSH pour désactiver l’authentification par mot de passe est gérée par un paramètre système
1
sudo yunohost settings set security.ssh.password_authentication -v no
Modifier le port SSH
Pour empêcher les tentatives de connexion SSH par des robots qui analysent Internet à la recherche de tout serveur sur lequel SSH est activé, vous pouvez modifier le port SSH. Ceci est géré par un paramètre système, qui prend en charge la mise à jour de la configuration SSH et Fail2Ban.
1
sudo yunohost settings set security.ssh.port -v 55135
Accès depuis le poste distant avec la clé privée
1
ssh -p 55135 -i ~/.ssh/yunobulls admin@192.168.0.135
Partage disque freebox
Partage disque externe USB sur Freebox
Installation paquet cifs-utils
1
sudo apt install cifs-utils  # Debian
Création répertoire de montage
1
sudo mkdir /mnt/freebox/
Edition fichier caché nommé .smbcredentials
1
nano /home/$USER/.smbcredentials
Dans le fichier, ajoutez les lignes suivantes (remplacez les XXXX par votre login et mot de passe)
1
2
username=yannfreebox
password=xxxxxxxxxxxxxxx
Donnez les droits adéquats au fichier
1
2
sudo chown -R $USER:root /home/$USER/.smbcredentials
sudo chmod -R 775 /home/$USER/.smbcredentials
partage au démarrage, montage fstab
1
sudo nano /etc/fstab
Ajouter les lignes suivantes au fichier
1
2
#mount freebox
//192.168.0.254/Disque\0401/ /mnt/freebox cifs credentials=/home/admin/.smbcredentials,iocharset=utf8,uid=1000,sec=ntlmv2,file_mode=0770,dir_mode=0775,vers=2.0
Montage immédiat : sudo mount -a
Si aucune erreur, tester l’accès : touch /mnt/freebox/test et ls /mnt/freebox/
Applications
Nextcloud 25+
Créer le domaine cloud.ouestyan.xyz et les certificats
1
2
yunohost domain add cloud.ouestyan.xyz
yunohost domain cert-install cloud.ouestyan.xyz --no-checks
Installer la version nextcloud testing
1
2
git clone -b testing https://github.com/YunoHost-Apps/nextcloud_ynh
sudo yunohost app install nextcloud_ynh
Répondre aux différentes questions
1
2
3
4
5
6
7
8
9
DANGER! This app is not part of YunoHost's app catalog. Installing third-party apps may compromise the integrity and security of your system. You should probably NOT install it unless yo
u know what you are doing. NO SUPPORT will be provided if this app doesn't work or breaks your system... If you are willing to take that risk anyway, type 'Yes, I understand': Yes, I und
erstand
Choose the domain where this app should be installed [ouestyan.xyz | cloud.ouestyan.xyz]: cloud.ouestyan.xyz
Choose the URL path (after the domain) where this app should be installed: /
Choose an administrator user for this app [yunoyan]: yunoyan
Should this app be exposed to anonymous visitors? [yes | no]: yes
Access the users home folder from Nextcloud? [yes | no]: yes
Keycloak
Ajouter domaine keycloak.ouestyan.xyz
Installer yunohost redirect pour le proxy nginx
1
sudo yunohost app install https://github.com/YunoHost-Apps/redirect_ynh
1
2
3
4
5
Choose the domain where this app should be installed [ouestyan.xyz | cloud.ouestyan.xyz | keycloak.oues
tyan.xyz]: keycloak.ouestyan.xyz
Choose the URL path (after the domain) where this app should be installed: /
Redirect destination path: http://127.0.0.1:8080
Redirect type [public_302 | public_301 | public_proxy | private_proxy]: public_proxy
Lien https://keycloak.ouestyan.xyz/auth/
Hébergeur machines virtuelles (Hôte PC1)
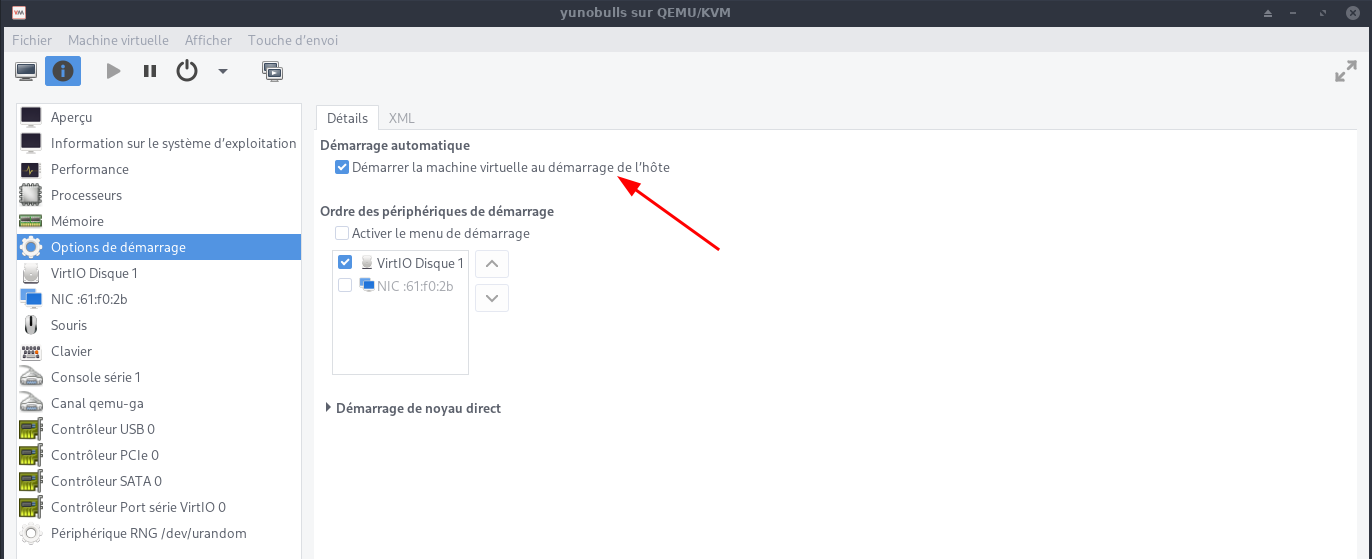
Lancer VM Yunohost au boot hôte
En ligne de commande et su sur l’hôte
1
2
virsh autostart yunobulls            # activer autostart
virsh autostart yunobulls --disable  # désactiver autostart
Gestionnaire machine virtuelle “yunobulls” sur l’hôte
Démarrage automatique
Instantané (snapshot)
Créer un instantané (snapshot)
Sur des hyperviseurs basés sur KVM, nous pouvons prendre des machines virtuelles ou un instantané de domaine à l’aide de la commande virsh.
Toutes les commandes seront exécutées en mode su
Nous ne pouvons prendre l’instantané que des machines virtuelles dont le format de disque est Qcow2 et le format de disque brut n’est pas pris en charge par la commande kvm virsh, utilisez la commande ci-dessous pour convertir le format de disque brut en qcow2
qemu-img convert -f raw -O qcow2 image-name.img image-name.qcow2
On se rend dans le répertoire
1
cd ~/virtuel/KVM/
Répertorier toutes les machines virtuelles sur l’hyperviseur
1
virsh list --all

Créer un instantané de la machine virtuelle KVM (yunobulls)
1
virsh snapshot-create-as --domain yunobulls --name yunobulls_20220625 --description "snap yunohost 25-06-2022"
Une fois l’instantané créé, répertorier les instantanés liés à la machine virtuelle
1
virsh snapshot-list yunobulls

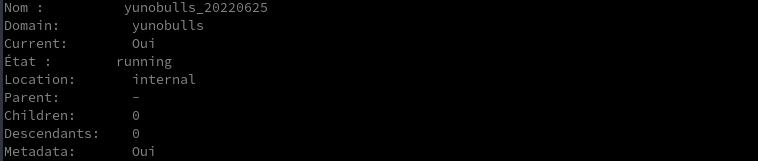
Pour répertorier les informations détaillées de l’instantané de la VM
1
virsh snapshot-info --domain yunobulls --snapshotname yunobulls_20220625
Rétablir/Restaurer la machine virtuelle KVM
Supposons que nous voulions rétablir ou restaurer la machine virtuelle yunohost sur l’instantané yunobulls_20220625
1
virsh snapshot-revert yunobulls yunobulls_20220625
Supprimer les instantanés
Pour supprimer des instantanés de machine virtuelle KVM, obtenez d’abord les détails de l’instantané de la machine virtuelle à l’aide de la commande virsh snapshot-list, puis utilisez la commande virsh snapshot-delete pour supprimer l’instantané.
1
virsh snapshot-list yunobulls
1
virsh snapshot-delete --domain yunobulls --snapshotname yunobulls_20220625