HETZNER VPS CX11 debian 11 (ttrss)
 CX11 (1 vCore/2GoRam/20Go Nvme) Debian Buster
Datacenter : fsn1-dc14
City : Falkenstein
Country : Germany
Network zone : eu-central
Debian 11
![]()
debian-2gb-fsn1-1 –> cx11deb11
IPv4 23.88.115.30
IPv6 2a01:4f8:c012:de47::/64
Connexion SSH en “root” sans mot de passe
1
ssh root@23.88.115.30
Le mot de passe “root” est regénérer à la première connexion
Réseau
1
ip a
1
2
3
4
5
6
7
8
9
10
11
12
13
14
15
16
1: lo: <LOOPBACK,UP,LOWER_UP> mtu 65536 qdisc noqueue state UNKNOWN group default qlen 1000
    link/loopback 00:00:00:00:00:00 brd 00:00:00:00:00:00
    inet 127.0.0.1/8 scope host lo
       valid_lft forever preferred_lft forever
    inet6 ::1/128 scope host
       valid_lft forever preferred_lft forever
2: eth0: <BROADCAST,MULTICAST,UP,LOWER_UP> mtu 1500 qdisc pfifo_fast state UP group default qlen 1000
    link/ether 96:00:01:47:75:f9 brd ff:ff:ff:ff:ff:ff
    altname enp0s3
    altname ens3
    inet 23.88.115.30/32 brd 23.88.115.30 scope global dynamic eth0
       valid_lft 84756sec preferred_lft 84756sec
    inet6 2a01:4f8:c012:de47::1/64 scope global
       valid_lft forever preferred_lft forever
    inet6 fe80::9400:1ff:fe47:75f9/64 scope link
       valid_lft forever preferred_lft forever
Noyau et OS : uname -a
1
Linux debian-2gb-fsn1-1 5.10.0-14-amd64 #1 SMP Debian 5.10.113-1 (2022-04-29) x86_64 GNU/Linux
Paramétrage fuseau Europe/Paris : dpkg-reconfigure tzdata
1
2
3
Current default time zone: 'Europe/Paris'
Local time is now:      Thu May 12 21:37:49 CEST 2022.
Universal Time is now:  Thu May 12 19:37:49 UTC 2022.
Création utilisateur
Utilisateur xoyan
1
useradd -m -d /home/xoyan/ -s /bin/bash xoyan
Mot de passe xoyan
1
passwd xoyan
Visudo pour les accès root via utilisateur xoyan
1
echo "xoyan     ALL=(ALL) NOPASSWD: ALL" >> /etc/sudoers
OpenSSH, clé et script
![]()
sur l'ordinateur de bureau
Générer une paire de clé curve25519-sha256 (ECDH avec Curve25519 et SHA2) nommé cx11_ed25519 pour une liaison SSH avec le serveur KVM.
1
ssh-keygen -t ed25519 -o -a 100 -f ~/.ssh/cx11_ed25519
Envoyer les clés publiques sur le serveur KVM
1
ssh-copy-id -i ~/.ssh/xoyize-ed25519.pub debian@141.94.77.162
ssh-copy-id -i ~/.ssh/cx11_ed25519.pub xoyan@23.88.115.30
sur le serveur CX11 On se connecte
1
ssh xoyan@23.88.115.30
Modifier la configuration serveur SSH
1
sudo nano /etc/ssh/sshd_config
Modifier
1
2
3
Port 55030
PermitRootLogin no
PasswordAuthentication no
Relancer openSSH
1
sudo systemctl restart sshd
Accès depuis le poste distant avec la clé privée
1
ssh -p 55030 -i ~/.ssh/cx11_ed25519 xoyan@23.88.115.30
Mise à jour dépôts
1
sudo apt update
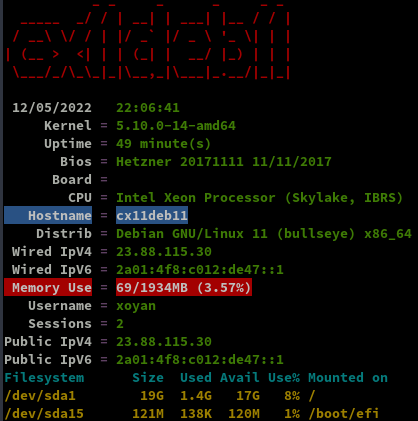
Hostname
1
2
sudo hostnamectl set-hostname cx11deb11
sudo nano /etc/hosts
1
127.0.1.1 cx11deb11
Vérification
1
hostnamectl
1
2
3
4
5
6
7
8
9
   Static hostname: cx11deb11
         Icon name: computer-vm
           Chassis: vm
        Machine ID: b039bedec059425c85145aff7d63dad5
           Boot ID: f7f88437545a4d3fb1b3ff4f65707ba9
    Virtualization: kvm
  Operating System: Debian GNU/Linux 11 (bullseye)
            Kernel: Linux 5.10.0-14-amd64
      Architecture: x86-64
Outils, scripts motd et ssh_rc_bash
![]()
Installer utilitaires
1
sudo apt install rsync curl tmux jq figlet git
Motd
1
sudo rm /etc/motd && sudo nano /etc/motd
1
2
3
4
5
6
7
8
9
10
              _  _       _        _      _                 _  _
   ___ __  __/ |/ |   __| |  ___ | |__  (_)  __ _  _ __   / |/ |
  / __|\ \/ /| || |  / _` | / _ \| '_ \ | | / _` || '_ \  | || |
 | (__  >  < | || | | (_| ||  __/| |_) || || (_| || | | | | || |
  \___|/_/\_\|_||_|  \__,_| \___||_.__/ |_| \__,_||_| |_| |_||_|
  ____   _____    ___    ___     _  _  ____     _____   ___
 |___ \ |___ /   ( _ )  ( _ )   / |/ || ___|   |___ /  / _ \
   __) |  |_ \   / _ \  / _ \   | || ||___ \     |_ \ | | | |
  / __/  ___) |_| (_) || (_) |_ | || | ___) |_  ___) || |_| |
 |_____||____/(_)\___/  \___/(_)|_||_||____/(_)|____/  \___/
Script ssh_rc_bash
ATTENTION!!! Les scripts sur connexion peuvent poser des problèmes pour des appels externes autres que ssh
1
2
3
wget https://static.xoyaz.xyz/files/ssh_rc_bash
chmod +x ssh_rc_bash # rendre le bash exécutable
./ssh_rc_bash        # exécution
Zone DNS OVH
![]()
$TTL 3600
@	IN SOA dns106.ovh.net. tech.ovh.net. (2022041500 86400 3600 3600000 300)
              IN NS     ns106.ovh.net.
              IN NS     dns106.ovh.net.
              IN A      23.88.115.30
              IN AAAA   2a01:4f8:c012:de47::1
              IN CAA    128 issue "letsencrypt.org"
*             IN A      23.88.115.30
*             IN AAAA   2a01:4f8:c012:de47::1
Parefeu UFW
![]()
UFW, ou pare - feu simple , est une interface pour gérer les règles de pare-feu dans Arch Linux, Debian ou Ubuntu. UFW est utilisé via la ligne de commande (bien qu’il dispose d’interfaces graphiques disponibles), et vise à rendre la configuration du pare-feu facile.
Installation Debian / Ubuntu
1
sudo apt install ufw
Par défaut, les jeux de règles d’UFW sont vides, de sorte qu’il n’applique aucune règle de pare-feu, même lorsque le démon est en cours d’exécution.
Les règles
1
2
3
4
sudo ufw allow 55030/tcp  # port SSH
sudo ufw allow http       # port 80
sudo ufw allow https      # port 443
sudo ufw allow DNS        # port 53
Activer le parefeu
1
sudo ufw enable
1
2
Command may disrupt existing ssh connections. Proceed with operation (y|n)? y
Firewall is active and enabled on system startup
Status
1
 sudo ufw status verbose
1
2
3
4
5
6
7
8
9
10
11
12
13
14
15
Status: active
Logging: on (low)
Default: deny (incoming), allow (outgoing), disabled (routed)
New profiles: skip

To                         Action      From
--                         ------      ----
80/tcp                     ALLOW IN    Anywhere
443                        ALLOW IN    Anywhere
53 (DNS)                   ALLOW IN    Anywhere
55030/tcp                  ALLOW IN    Anywhere
80/tcp (v6)                ALLOW IN    Anywhere (v6)
443 (v6)                   ALLOW IN    Anywhere (v6)
53 (DNS (v6))              ALLOW IN    Anywhere (v6)
55030/tcp (v6)             ALLOW IN    Anywhere (v6)
Nginx compilation, PHP8, MariaDB
Nginx compilé
![]()
Utilisateur avec droits sudo
Télécharger le bash
1
2
3
wget https://static.xoyaz.xyz/files/compilation-nginx-tls1.3.sh
chmod +x compilation-nginx-tls1.3.sh # rendre le bash exécutable
./compilation-nginx-tls1.3.sh        # exécution
A la fin de la compilation
1
2
3
Versions Nginx OpenSSL
nginx version: nginx/1.20.2
OpenSSL 1.1.1n  15 Mar 2022
PHP8 et composer
![]()
Ajout du dépôt sury.org
1
sudo -s
Pour installer la version de 8 de php, ajouter le dépôt sury.
1
2
3
apt install -y lsb-release apt-transport-https ca-certificates wget
wget -O /etc/apt/trusted.gpg.d/php.gpg https://packages.sury.org/php/apt.gpg
echo "deb https://packages.sury.org/php/ $(lsb_release -sc) main" |tee /etc/apt/sources.list.d/php.list
Mise à jour des dépôts :
1
apt update && apt upgrade -y
Installation de php8.1, php8.1-fpm, php8.1-sqlite3 et les paquets PHP nécessaires à nextcloud
1
apt -y install php8.1 php8.1-fpm php8.1-sqlite3 php8.1-cli php8.1-gd php8.1-imap php8.1-mysql php8.1-soap php8.1-apcu php8.1-common php8.1-gmp  php8.1-intl php8.1-opcache php8.1-xml php8.1-curl php8.1-igbinary php8.1-readline  php8.1-zip php8.1-bcmath php8.1-imagick php8.1-mbstring php8.1-redis imagemagick
Nextcloud n’accepte pas les versions PHP > 8.0
Composer
1
2
3
wget https://getcomposer.org/download/latest-stable/composer.phar
chmod +x composer.phar
mv composer.phar /usr/local/bin/composer

MariaDB
![]()
installer les paquets de MariaDB
1
sudo apt install mariadb-server
Une fois que l’installation des composants est terminée, tapez la commande suivante pour finaliser la configuration.
1
sudo mysql_secure_installation
Tapez Enter directement à la première question car le mot de passe de l’utilisateur root de MariaDB est vide par défaut après l’installation.
Puis répondez Y à la question suivante pour spécifier le mot de passe de l’utilisateur root de MariaDB qui, une fois de plus, est différent de l’utilisateur root de votre Debian.
Cet utilisateur root de la base de données aura tous les droits d’accès. Pour des raisons évidentes de sécurité, je vous recommande d’utiliser un mot de passe complexe !
Et vous pouvez répondre Y à toutes les questions suivantes: les connexions anonymes seront désactivées, ainsi que les connexions root qui se font depuis un serveur autre que le votre…
Certificats Let’s Encrypt
![]()
Installation gestionnaire des certificats Let’s Encrypt
1
2
3
4
5
cd ~
sudo apt install socat # installé par défaut sur debian 11
git clone https://github.com/acmesh-official/acme.sh.git
cd acme.sh
./acme.sh --install
Se déconnecter puis se reconnecter utilisateur
Les clés OVH API
1
2
export OVH_AK="xxxxxxxxxxxxxxxxxx"
export OVH_AS="yyyyyyyyyyyyyyyyyyyyyyyyyyyy"
Génération des certificats
1
acme.sh --dns dns_ovh --server letsencrypt --issue --keylength ec-384 -d 'xoyize.xyz' -d '*.xoyize.xyz'
1
2
3
[...]
[mar. 22 févr. 2022 15:23:38 CET] Please open this link to do authentication: https://eu.api.ovh.com/auth/?credentialToken=vIuaavkgBGdip2UEPjSev9WhruI2REfzawQy31tV7mkOAVnj5NQUwD0XKUFKbaI1
[...]
Après authentification relancer la commande
Résultat de l’installation
1
2
3
4
[Thu 12 May 2022 10:34:09 PM CEST] Your cert is in: /home/xoyan//.acme.sh/xoyize.xyz_ecc/xoyize.xyz.cer
[Thu 12 May 2022 10:34:09 PM CEST] Your cert key is in: /home/xoyan//.acme.sh/xoyize.xyz_ecc/xoyize.xyz.key
[Thu 12 May 2022 10:34:09 PM CEST] The intermediate CA cert is in: /home/xoyan//.acme.sh/xoyize.xyz_ecc/ca.cer
[Thu 12 May 2022 10:34:09 PM CEST] And the full chain certs is there: /home/xoyan//.acme.sh/xoyize.xyz_ecc/fullchain.cer
Installation des certificats
1
2
3
sudo mkdir -p /etc/ssl/private/
sudo chown $USER -R /etc/ssl/private/
acme.sh --ecc --install-cert -d 'xoyize.xyz' -d '*.xoyize.xyz' --key-file /etc/ssl/private/xoyize.xyz-key.pem --fullchain-file /etc/ssl/private/xoyize.xyz-fullchain.pem  --reloadcmd 'sudo systemctl reload nginx.service'
Résultat
1
2
3
4
[Thu 12 May 2022 10:34:47 PM CEST] Installing key to: /etc/ssl/private/xoyize.xyz-key.pem
[Thu 12 May 2022 10:34:47 PM CEST] Installing full chain to: /etc/ssl/private/xoyize.xyz-fullchain.pem
[Thu 12 May 2022 10:34:47 PM CEST] Run reload cmd: sudo systemctl reload nginx.service
[Thu 12 May 2022 10:34:47 PM CEST] Reload success
Supprimer ` –reloadcmd ‘sudo systemctl reload nginx.service’` à la ligne précédente si Nginx n’est pas installé
Editer le crontab, supprimer la ligne existante et ajouter ce qui suit
1
crontab -e
1
2 0 * * * "/home/xoyan/.acme.sh"/acme.sh --cron --home "/home/xoyan/.acme.sh" --renew-hook "/home/xoyan/.acme.sh/acme.sh --ecc --install-cert -d 'xoyize.xyz' -d '*.xoyize.xyz' --key-file /etc/ssl/private/xoyize.xyz-key.pem --fullchain-file /etc/ssl/private/xoyize.xyz-fullchain.pem  --reloadcmd 'sudo systemctl reload nginx.service'" > /dev/null
Configuration nginx
On va regrouper TLS/SSL, HSTS et OCSP dans le fichier de configuration global /etc/nginx/tls-hsts-ocsp.conf
1
2
3
4
5
6
7
8
9
10
11
12
13
14
15
16
17
18
19
20
    # Certificats Let's Encrypt
    ssl_certificate /etc/ssl/private/xoyize.xyz-fullchain.pem;
    ssl_certificate_key /etc/ssl/private/xoyize.xyz-key.pem;

    # TLS 1.3 only
    ssl_protocols TLSv1.3;
    ssl_prefer_server_ciphers off;

    # HSTS (ngx_http_headers_module is required) (63072000 seconds)
    add_header Strict-Transport-Security "max-age=63072000" always;

    # OCSP stapling
    ssl_stapling on;
    ssl_stapling_verify on;

    # verify chain of trust of OCSP response using Root CA and Intermediate certs
    ssl_trusted_certificate /etc/ssl/private/xoyize.xyz-fullchain.pem;

    # replace with the IP address of your resolver
    resolver 1.1.1.1;
xoyize.xyz.conf
Créer le fichier /etc/nginx/conf.d/xoyize.xyz.conf
1
2
3
4
5
6
7
8
9
10
11
12
13
14
15
16
17
18
19
20
21
22
23
24
25
26
27
28
29
30
31
server {
    listen 80;
    listen [::]:80;
    server_name xoyize.xyz;
    return 301 https://$host$request_uri;
}
server {
    listen 443 ssl http2;
    listen [::]:443 ssl http2;
    server_name xoyize.xyz;

    root /var/www/default-www;
    index index/ index.php;

    # Certificats Let's Encrypt
    # TLS 1.3 only
    # HSTS (ngx_http_headers_module is required) (63072000 seconds)
    # OCSP stapling
    # replace with the IP address of your resolver
    include /etc/nginx/tls-hsts-ocsp.conf;

    # fichiers de configuration
    include /etc/nginx/conf.d/xoyize.xyz.d/*.conf;

    location ~ \.php$ {
        include php_fastcgi.conf;
        fastcgi_pass unix:/run/php/php8.1-fpm.sock;
    }


}
Créer le sous-dossier
1
sudo mkdir -p /etc/nginx/conf.d/xoyize.xyz.d/
Vérifier
1
sudo nginx -t
1
2
nginx: the configuration file /etc/nginx/nginx.conf syntax is ok
nginx: configuration file /etc/nginx/nginx.conf test is successful
Recharger nginx
1
sudo systemctl reload nginx
Page d’accueil xoyize.xyz
Déposer une image wallpaper.jpg dans le dossier /var/www/default-www
Créer un fichier /var/www/default-www/index/
``/ <!DOCTYPE/> />
Serveur xoyize.xyz
</>
1
2
3
4
5
6
7
8
9
10
11
12
13
14
15
16
17
18
19
20
Lien <https://xoyize.xyz>
{:width="500"}
## Fail2Ban

Installation
sudo apt install fail2ban
Le fichier de configuration principal est le jail.conf mais nous n’allons pas l’utiliser directement car ce fichier est souvent altéré après les mises à niveau. Pour cela nous allons faire une copie de ce fichier et le nommer jail.local avec la commande ci-après: cp jail.conf jail.local (en étant dans le répertoire /etc/fail2ban)
sudo cp /etc/fail2ban/jail.conf /etc/fail2ban/jail.local
Nous allons à présent définir nos options dans le fichier jail.local
Les options à définir sont en dessous de la section `[DEFAULT]` (la section qui vient après `[INCLUDES]` )
sudo nano /etc/fail2ban/jail.local
“bantime” is the number of seconds that a host is banned.
bantime = 10m
A host is banned if it has generated “maxretry” during the last “findtime”
seconds.
findtime = 10m
“maxretry” is the number of failures before a host get banned.
maxretry = 5
1
2
3

Et ajouter les lignes suivantes en fin de fichier
[ssh] enabled = true port = 55030 filter = sshd logpath = /var/log/auth.log
[ssh-ddos] enabled = true port = 55030 filter = sshd-ddos logpath = /var/log/auth.log
#
HTTP servers
#
[nginx-auth] enabled = true filter = nginx-auth action = iptables-multiport[name=NoAuthFailures, port=”http,https”] logpath = /var/log/nginx/error.log
[nginx-login] enabled = false filter = nginx-login action = iptables-multiport[name=NoLoginFailures, port=”http,https”] logpath = /var/log/nginx/access.log
[nginx-badbots] enabled = true filter = apache-badbots action = iptables-multiport[name=BadBots, port=”http,https”] logpath = /var/log/nginx/access.log maxretry = 1
[nginx-proxy] enabled = true action = iptables-multiport[name=NoProxy, port=”http,https”] filter = nginx-proxy logpath = /var/log/nginx/access.log maxretry = 0
[nginx-dos] enabled = true port = http filter = nginx-dos logpath = /var/log/nginx/access.log findtime = 120 maxretry = 200
1
2
3
4
5
6
7
8
9
10
11
12
13
14
15
16
17
18
19
20
21
22
23
24
25
26
27
28
29
30
31
32
33
34
35
36
37
38
39
40
41
42
43
44
45
46
47
48
49
50
51
52
53
54
55
56
57
58
59
60
61
62
63
64
65
66
67
68
69
70
71
72
73
74
75
76
77
78
79
80
81
82
83
84
85
86
87
88
89
90
91
92
93
94
95
96
97
98

Configuration des filtres en mode sudo

Les fichiers de configuration de filtre sont stockés dans `/etc/fail2ban/filter.d/`

```bash
cat > /etc/fail2ban/filter.d/nginx-auth.conf << EOF
#
# Auth filter /etc/fail2ban/filter.d/nginx-auth.conf:
#
# Blocks IPs that makes too much accesses to the server
#
[Definition]

failregex = ^<HOST> -.*"(GET|POST).*HTTP.*"

ignoreregex =
EOF

cat > /etc/fail2ban/filter.d/nginx-dos.conf << EOF
#
# Ddos filter /etc/fail2ban/filter.d/nginx-dos.conf:
#
# Block IPs trying to ddos the server.
#
#
[Definition]

failregex = ^<HOST> -.*"(GET|POST).*HTTP.*"

ignoreregex =
EOF

cat > /etc/fail2ban/filter.d/nginx-login.conf << EOF
#
# Login filter /etc/fail2ban/filter.d/nginx-login.conf:
#
# Blocks IPs that fail to authenticate using web application's log in page
#
# Scan access log for HTTP 200 + POST /sessions => failed log in
#
[Definition]

failregex = ^<HOST> -.*POST /wp-login.php.* HTTP/1\.." 200

ignoreregex =
EOF

cat > /etc/fail2ban/filter.d/nginx-noscript.conf << EOF
#
# Noscript filter /etc/fail2ban/filter.d/nginx-noscript.conf:
#
# Block IPs trying to execute scripts such as .php, .pl, .exe and other funny scripts.
#
# Matches e.g.
# 192.168.1.1 - - "GET /something.php
#
[Definition]

failregex = ^<HOST> -.*GET.*(\.php|\.asp|\.exe|\.pl|\.cgi|\scgi)

ignoreregex =
EOF

cat > /etc/fail2ban/filter.d/nginx-proxy.conf << EOF
#
# Proxy filter /etc/fail2ban/filter.d/nginx-proxy.conf:
#
# Block IPs trying to use server as proxy.
#
# Matches e.g.
# 192.168.1.1 - - "GET http://www.something.com/
#
[Definition]

failregex = ^<HOST> -.*GET http.*

ignoreregex =
EOF

cat > /etc/fail2ban/filter.d/sshd-ddos.conf << EOF
[Definition]

# Option:  failregex
# Notes.:  regex to match the password failures messages in the logfile. The
#          host must be matched by a group named "host". The tag "<HOST>" can
#          be used for standard IP/hostname matching and is only an alias for
#          (?:::f{4,6}:)?(?P<host>[\w\-.^_]+)
# Values:  TEXT
#
failregex = sshd(?:\[\d+\])?: Did not receive identification string from <HOST>$

# Option:  ignoreregex
# Notes.:  regex to ignore. If this regex matches, the line is ignored.
# Values:  TEXT
#
ignoreregex =
EOF
Après les modifications, relancer fail2ban
1
systemctl restart fail2ban
Tester les règles fail2ban
1
fail2ban-client -d
Statut
1
systemctl status fail2ban
1
2
3
4
5
6
7
8
9
10
11
12
13
14
15
● fail2ban.service - Fail2Ban Service
     Loaded: loaded (/lib/systemd/system/fail2ban.service; enabled; vendor preset: enabled)
     Active: active (running) since Thu 2022-05-12 22:55:57 CEST; 22s ago
       Docs: man:fail2ban(1)
    Process: 34350 ExecStartPre=/bin/mkdir -p /run/fail2ban (code=exited, status=0/SUCCESS)
   Main PID: 34351 (fail2ban-server)
      Tasks: 17 (limit: 2276)
     Memory: 16.8M
        CPU: 288ms
     CGroup: /system.slice/fail2ban.service
             └─34351 /usr/bin/python3 /usr/bin/fail2ban-server -xf start

May 12 22:55:57 cx11deb11 systemd[1]: Starting Fail2Ban Service...
May 12 22:55:57 cx11deb11 systemd[1]: Started Fail2Ban Service.
May 12 22:55:58 cx11deb11 fail2ban-server[34351]: Server ready
Tiny Tiny RSS
![]()
Flux RSS - Tiny Tiny RSS Nginx PHP-FPM MariaDB
Côté client, seul un navigateur est nécessaire, côté serveur, Tiny Tiny RSS a besoin d’un serveur web (Nginx), de PHP, d’une interface permettant la communication entre le serveur web et PHP (PHP-FPM) et d’une base de données (MariaDB). Amélioration des performances de tt-rss grâce à OPCache ,sécurisation des échanges grâce à un certificat SSL/TLS.
PHP8.0 pour Tiny Tiny RSS
1
sudo apt-get install php8.0-fpm php8.0-cli php8.0-mysql php8.0-xml php8.0-mbstring php8.0-curl php8.0-gd php8.0-intl
Télécharger les sources de tt-rss dans le root du site web :
1
2
3
sudo -s
# git clone https://git-gitea.tt-rss.org/schafdog/tt-rss /var/www/ttrss
git clone https://gitea.cinay.eu/yann/ttrss /var/www/ttrss
Modifier le propriétaire du répertoire /var/www/ttrss et l’attribuer à un nouvel utilisateur dédié ttrss Nginx est lancé sous l’utilisateur www-data et doit avoir accès en lecture au répertoire /var/www/ttrss pour lire les ressources statiques (HTML, CSS, JS, etc.). Attribuer le répertoire /var/www/ttrss au groupe www-data.
1
2
useradd ttrss                            # création utilisateur dédié ttrss
chown -R ttrss:www-data /var/www/ttrss   # changement de propriétaire par ttrss et groupe par www-data
Retirer toutes les permissions de ce répertoire aux autres utilisateurs.
1
chmod -R o-rwx /var/www/ttrss
Création des répertoires spécifiques
1
2
3
4
5
mkdir -p /var/www/ttrss/cache
mkdir -p /var/www/ttrss/cache/{export,feeds,images,upload}
chmod 777 -R /var/www/ttrss/cache # droits complets
mkdir -p /var/www/ttrss/{lock,feed-icons}
chmod 777 -R /var/www/ttrss/{lock,feed-icons}
Création du pool php-fpm dédié à Tiny Tiny RSS
1
nano /etc/php/8.0/fpm/pool.d/ttrss.conf
1
2
3
4
5
6
7
8
9
10
11
12
13
[ttrss]
listen = /run/php/php8.0-fpm-ttrss.sock

listen.owner = ttrss
listen.group = www-data

user = ttrss
group = www-data

pm = ondemand
pm.max_children = 6
pm.process_idle_timeout = 60s
pm.max_requests = 500
PHP - OPcache
Vérifier et/ou activer option opcache
1
nano /etc/php/8.0/fpm/php.ini
1
2
3
4
5
6
7
8
[opcache]
opcache.enable=1
opcache.enable_cli=1
opcache.interned_strings_buffer=8
opcache.max_accelerated_files=10000
opcache.memory_consumption=128
opcache.save_comments=1
opcache.revalidate_freq=1
Redémarrer le service php-fpm
1
systemctl restart php8.0-fpm.service
Connexion mariadb et créer la base de données ttrss
1
mysql -uroot -e "CREATE DATABASE ttrss;"
à partir d’une sauvegarde
1
mysql -uroot < ttrss.sql
Créer un utilisateur MySQL ttrss dédié à la base de données ttrss, renseigner un mot de passe et ensuite lui donner les droits sur cette base de données :
1
mysql -uroot -e "CREATE USER 'ttrss'@'localhost'; SET password FOR 'ttrss'@'localhost' = password('mon_password_base_ttrss'); GRANT ALL PRIVILEGES ON ttrss.* TO 'ttrss'@'localhost' IDENTIFIED BY 'mon_password_base_ttrss'; FLUSH PRIVILEGES;"
Si pas sauvegarde , importer le schéma
1
mysql -uttrss -pmon_password_base_ttrss ttrss < /var/www/ttrss/sql/mysql/schema.sql
Update
1
2
3
4
sudo -s
su ttrss
$ php update.php --update-schema
exit
Configuration ttrss
1
/var/www/ttrss/config.php
1
2
3
4
5
6
7
8
9
10
11
12
13
14
15
16
17
18
19
20
21
22
23
24
25
26
27
28
29
30
31
32
33
34
35
36
37
38
39
40
41
42
43
44
45
46
47
48
49
50
51
52
53
54
55
56
57
58
59
60
61
62
63
64
65
66
67
68
69
70
71
72
73
74
75
76
77
78
79
80
81
82
83
84
85
86
87
88
89
90
91
92
93
94
95
96
97
98
99
100
101
102
103
104
105
106
107
108
109
110
111
112
113
114
115
116
117
118
119
120
121
122
123
124
125
126
127
128
129
130
131
132
133
134
135
136
137
138
139
140
141
142
143
144
145
146
147
148
149
150
151
152
153
154
155
156
157
158
159
160
161
162
163
164
165
166
167
168
169
170
171
172
173
174
175
176
177
178
179
180
181
182
183
184
185
186
187
188
189
190
191
192
193
194
<?php

	// *******************************************
	// *** Database configuration (important!) ***
	// *******************************************

	putenv('TTRSS_DB_TYPE=mysql'); // or mysql
	putenv('TTRSS_DB_HOST=localhost');
	putenv('TTRSS_DB_USER=ttrss');
	putenv('TTRSS_DB_NAME=ttrss');
	putenv('TTRSS_DB_PASS=mon_password_base_ttrss');
	putenv('TTRSS_DB_PORT=3306'); // usually 5432 for PostgreSQL, 3306 for MySQL

	putenv('TTRSS_MYSQL_CHARSET=UTF8');
	// Connection charset for MySQL. If you have a legacy database and/or experience
	// garbage unicode characters with this option, try setting it to a blank string.

	// ***********************************
	// *** Basic settings (important!) ***
	// ***********************************

	putenv('TTRSS_SELF_URL_PATH=https://rss.xoyize.xyz');
	// Full URL of your tt-rss installation. This should be set to the
	// location of tt-rss directory, e.g. http://example.org/tt-rss/
	// You need to set this option correctly otherwise several features
	// including PUSH, bookmarklets and browser integration will not work properly.

	putenv('TTRSS_SINGLE_USER_MODE=false');
	// Operate in single user mode, disables all functionality related to
	// multiple users and authentication. Enabling this assumes you have
	// your tt-rss directory protected by other means (e.g. http auth).

	putenv('TTRSS_SIMPLE_UPDATE_MODE=false');
	// Enables fallback update mode where tt-rss tries to update feeds in
	// background while tt-rss is open in your browser.
	// If you don't have a lot of feeds and don't want to or can't run
	// background processes while not running tt-rss, this method is generally
	// viable to keep your feeds up to date.
	// Still, there are more robust (and recommended) updating methods
	// available, you can read about them here: http://tt-rss.org/wiki/UpdatingFeeds

	// *****************************
	// *** Files and directories ***
	// *****************************

	putenv('TTRSS_PHP_EXECUTABLE=/usr/bin/php');
	// Path to PHP *COMMAND LINE* executable, used for various command-line tt-rss
	// programs and update daemon. Do not try to use CGI binary here, it won't work.
	// If you see HTTP headers being displayed while running tt-rss scripts,
	// then most probably you are using the CGI binary. If you are unsure what to
	// put in here, ask your hosting provider.

	putenv('TTRSS_LOCK_DIRECTORY=lock');
	// Directory for lockfiles, must be writable to the user you run
	// daemon process or cronjobs under.

	putenv('TTRSS_CACHE_DIR=cache');
	// Local cache directory for RSS feed content.

	putenv('TTRSS_ICONS_DIR=feed-icons');
	putenv('TTRSS_ICONS_URL=feed-icons');
	// Local and URL path to the directory, where feed favicons are stored.
	// Unless you really know what you're doing, please keep those relative
	// to tt-rss main directory.

	//putenv('TTRSS_SIMPLE_UPDATE_MODE=true');

	// **********************
	// *** Authentication ***
	// **********************

	// Please see PLUGINS below to configure various authentication modules.

	putenv('TTRSS_AUTH_AUTO_CREATE=true');
	// Allow authentication modules to auto-create users in tt-rss internal
	// database when authenticated successfully.

	putenv('TTRSS_AUTH_AUTO_LOGIN=true');
	// Automatically login user on remote or other kind of externally supplied
	// authentication, otherwise redirect to login form as normal.
	// If set to true, users won't be able to set application language
	// and settings profile.

	// *********************
	// *** Feed settings ***
	// *********************

	putenv('TTRSS_FORCE_ARTICLE_PURGE=0');
	// When this option is not 0, users ability to control feed purging
	// intervals is disabled and all articles (which are not starred)
	// older than this amount of days are purged.

	// *** PubSubHubbub settings ***

	putenv('TTRSS_PUBSUBHUBBUB_ENABLED=false');
	// Enable client PubSubHubbub support in tt-rss. When disabled, tt-rss
	// won't try to subscribe to PUSH feed updates.

	// ****************************
	// *** Sphinx search plugin ***
	// ****************************

	putenv('TTRSS_SPHINX_SERVER=localhost:9312');
	// Hostname:port combination for the Sphinx server.

	putenv('TTRSS_SPHINX_INDEX=ttrss, delta');
	// Index name in Sphinx configuration. You can specify multiple indexes
	// as a comma-separated string.
	// Example configuration files are available on tt-rss wiki.

	// ***********************************
	// *** Self-registrations by users ***
	// ***********************************

	putenv('TTRSS_ENABLE_REGISTRATION=false');
	// Allow users to register themselves. Please be aware that allowing
	// random people to access your tt-rss installation is a security risk
	// and potentially might lead to data loss or server exploit. Disabled
	// by default.

	putenv('TTRSS_REG_NOTIFY_ADDRESS=user@cinay.eu');
	// Email address to send new user notifications to.

	putenv('TTRSS_REG_MAX_USERS=10');
	// Maximum amount of users which will be allowed to register on this
	// system. 0 - no limit.

	// **********************************
	// *** Cookies and login sessions ***
	// **********************************

	putenv('TTRSS_SESSION_COOKIE_LIFETIME='.(86400*30));
	// Default lifetime of a session (e.g. login) cookie. In seconds,
	// 0 means cookie will be deleted when browser closes.

	// *********************************
	// *** Email and digest settings ***
	// *********************************

	putenv('TTRSS_SMTP_FROM_NAME=Tiny Tiny RSS');
	putenv('TTRSS_SMTP_FROM_ADDRESS=noreply@your.domain.dom');
	// Name, address and subject for sending outgoing mail. This applies
	// to password reset notifications, digest emails and any other mail.

	putenv('TTRSS_DIGEST_SUBJECT=[tt-rss] New headlines for last 24 hours');
	// Subject line for email digests

	putenv('TTRSS_SMTP_SERVER=localhost:25');
	// Hostname:port combination to send outgoing mail (i.e. localhost:25).
	// Blank - use system MTA.

	putenv('TTRSS_SMTP_LOGIN=');
	putenv('TTRSS_SMTP_PASSWORD=');
	// These two options enable SMTP authentication when sending
	// outgoing mail. Only used with SMTP_SERVER.

	putenv('TTRSS_SMTP_SECURE=');
	// Used to select a secure SMTP connection. Allowed values: ssl, tls,
	// or empty.

	// ***************************************
	// *** Other settings (less important) ***
	// ***************************************

	putenv('TTRSS_CHECK_FOR_UPDATES=true');
	// Check for updates automatically if running Git version

	putenv('TTRSS_ENABLE_GZIP_OUTPUT=false');
	// Selectively gzip output to improve wire performance. This requires
	// PHP Zlib extension on the server.
	// Enabling this can break tt-rss in several httpd/php configurations,
	// if you experience weird errors and tt-rss failing to start, blank pages
	// after login, or content encoding errors, disable it.

	putenv('TTRSS_PLUGINS=auth_internal, auth_remote, note');
	// Comma-separated list of plugins to load automatically for all users.
	// System plugins have to be specified here. Please enable at least one
	// authentication plugin here (auth_*).
	// Users may enable other user plugins from Preferences/Plugins but may not
	// disable plugins specified in this list.
	// Disabling auth_internal in this list would automatically disable
	// reset password link on the login form.

	putenv('TTRSS_LOG_DESTINATION=sql');
	// Log destination to use. Possible values: sql (uses internal logging
	// you can read in Preferences -> System), syslog - logs to system log.
	// Setting this to blank uses PHP logging (usually to http server
	// error.log).

	putenv('TTRSS_CONFIG_VERSION=26');
	// Expected config version. Please update this option in config.php
	// if necessary (after migrating all new options from this file).

	// vim:ft=php
rss.xoyize.xyz
Créer fichier de configuration nginx /etc/nginx/conf.d/rss.xoyize.xyz.conf
1
2
3
4
5
6
7
8
9
10
11
12
13
14
15
16
17
18
19
20
21
22
23
24
25
26
27
28
29
30
31
32
33
server {
    listen 80;
    listen [::]:80;
    server_name rss.xoyize.xyz;
    return 301 https://$host$request_uri;
}
server {
    listen 443 ssl http2;
    listen [::]:443 ssl http2;
    server_name rss.xoyize.xyz;

    # Certificats Let's Encrypt
    # TLS 1.3 only
    # HSTS (ngx_http_headers_module is required) (63072000 seconds)
    # OCSP stapling
    # replace with the IP address of your resolver
    include /etc/nginx/tls-hsts-ocsp.conf;

    root /var/www/ttrss/ ;
    index index.php;
        location ~ \.php$ {
           fastcgi_split_path_info ^(.+\.php)(/.+)$;
           fastcgi_pass unix:/run/php/php8.0-fpm-ttrss.sock;
           fastcgi_index index.php;
           include fastcgi_params;
	   fastcgi_param SCRIPT_FILENAME $request_filename;
        }


    access_log /var/log/nginx/ttrss-access.log;
    error_log /var/log/nginx/ttrss-error.log;

}
Vérifier et recharger nginx
1
2
nginx -t
systemctl reload nginx
Ouvrir le lien https://rss.xoyize.xyz
Connexion : admin/password
Créer un nouvel administrateur et son mot de passe
Mise à jour automatique des flux
Processus en arrière plan, créer un service qui mettra automatiquement à jour les flux. Créer le service /etc/systemd/system/ttrss-backend.service :
1
nano /etc/systemd/system/ttrss-backend.service
1
2
3
4
5
6
7
8
9
10
11
12
13
14
15
[Unit]
Description=News feed reader and aggregator
After=network.target mysql.service

[Service]
Type=simple
User=ttrss
Group=ttrss
WorkingDirectory=/var/www/ttrss/
ExecStart=/usr/bin/php8.0 /var/www/ttrss/update_daemon2.php
Restart=always
RestartSec=10

[Install]
WantedBy=multi-user.target
Activer et lancer le service ttrss-backend
1
2
3
systemctl daemon-reload
systemctl enable ttrss-backend
systemctl start ttrss-backend
Authentification par certificat client
configurer une autorité de certification (AC)
Comment mettre en place et configurer une autorité de certification (AC) avec Easy-RSA
Sur un serveur Debian :
- Il faut ajouter copier l’autorité de certification dans le fichier
/usr/local/share/ca-certificates/Easy-RSA_CA.crt - Mettre à jour les certificats ,
update-ca-certificatesqui génére le fichier/etc/ssl/certs/Easy-RSA_CA.pem
Créer un certificat client
On utilise les fichiers ca.crt (Easy-RSA_CA.crt) et ca.key (Easy-RSA_CA.key) de l’autorité de certification
Exemple, créer un certificat client “yannick”
1
2
3
4
5
# clé RSA avec pass phrase
openssl genrsa -des3 -out yannick.key 4096
openssl req -new -key yannick.key -out yannick.csr
# demande signature certificat (CSR)
openssl req -new -key yannick.key -out yannick.csr
1
2
3
4
5
6
7
8
9
10
11
12
13
14
15
16
17
18
19
20
Enter pass phrase for yannick.key:
You are about to be asked to enter information that will be incorporated
into your certificate request.
What you are about to enter is what is called a Distinguished Name or a DN.
There are quite a few fields but you can leave some blank
For some fields there will be a default value,
If you enter '.', the field will be left blank.
-----
Country Name (2 letter code) [AU]:FR
State or Province Name (full name) [Some-State]:
Locality Name (eg, city) []:
Organization Name (eg, company) [Internet Widgits Pty Ltd]:
Organizational Unit Name (eg, section) []:
Common Name (e.g. server FQDN or YOUR name) []:Yannick
Email Address []:

Please enter the following 'extra' attributes
to be sent with your certificate request
A challenge password []:
An optional company name []:
1
2
3
4
# Le CSR doit maintenant être signé par le CA
openssl x509 -req -days 365 -in yannick.csr -CA ca.crt -CAkey private/ca.key -set_serial 01 -out yannick.crt
# Créer un fichier pfx pour l'importation dans les naviagateurs firefox et chrome , un "Export Password" est exigé
openssl pkcs12 -export -out yannick.pfx -inkey yannick.key -in yannick.crt -certfile ca.crt
Le fichier pfx sera utilisé pour l’importation dans firefox et chrome

configuration nginx certificat client
Modifier le fichier de configuration nginx /etc/nginx/conf.d/rss.xoyize.xyz.conf pour la prise en compte du certificat client
Remplacer
1
2
3
4
5
6
7
        location ~ \.php$ {
           fastcgi_split_path_info ^(.+\.php)(/.+)$;
           fastcgi_pass unix:/run/php/php8.0-fpm-ttrss.sock;
           fastcgi_index index.php;
           include fastcgi_params;
	   fastcgi_param SCRIPT_FILENAME $request_filename;
        }
par
1
2
3
4
5
6
7
8
9
10
11
12
13
14
15
16
17
18
19
20
    # Authentification par certificat client
    ssl_client_certificate /etc/ssl/certs/Easy-RSA_CA.pem;
    # Authentification uniquement par certificat
    # ssl_verify_client on;
    # Authentification par certificat ou par mot de passe
    ssl_verify_client optional;

        location ~ \.php$ {
           fastcgi_split_path_info ^(.+\.php)(/.+)$;
           fastcgi_pass unix:/run/php/php8.0-fpm-ttrss.sock;
           fastcgi_index index.php;
           include fastcgi_params;
           fastcgi_param SCRIPT_FILENAME $request_filename;
            # Authentification par certificat client
            fastcgi_param  SSL_CLIENT_M_SERIAL  $ssl_client_serial;
            fastcgi_param  SSL_CLIENT_S_DN      $ssl_client_s_dn;
            fastcgi_param  SSL_CLIENT_V_START   $ssl_client_v_start;
            fastcgi_param  SSL_CLIENT_V_END     $ssl_client_v_end;

        }
Recharger nginx
1
sudo systemctl reload nginx
Mettre à jour le fichier de configuration de TT-RSS /var/www/ttrss/config.php pour ajouter auth_remote à la constante PLUGINS (vers la fin du fichier) :
1
putenv('TTRSS_PLUGINS=auth_internal, auth_remote, note');
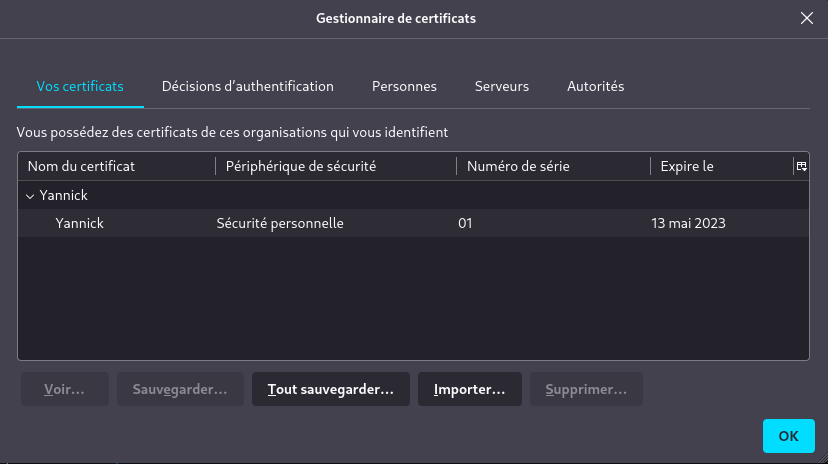
Il faut ajouter le certificat client aux navigateurs sinon

Au premier passage, une authentification login mot de passe est demandée
Ensuite ouvrir Configuration et descendre vers le bas
Cliquer sur s’inscrire dans la rubrique Certificat SSL client
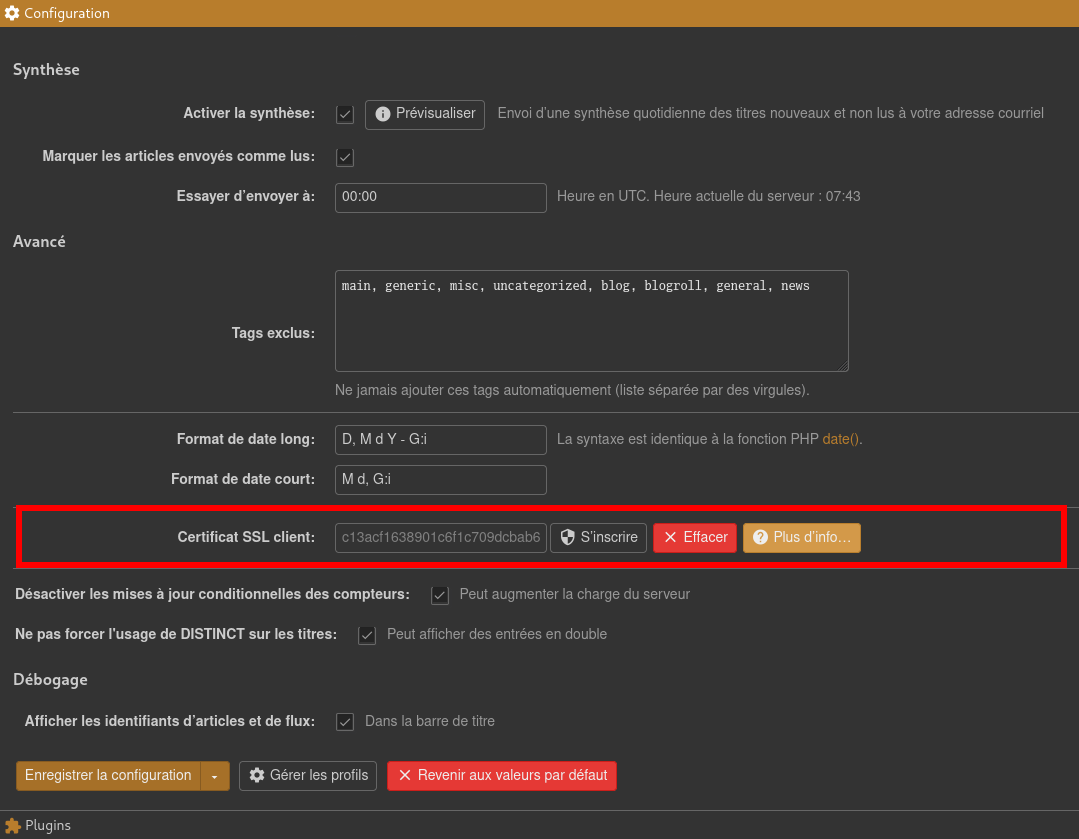
Valider par “Enregistrer la configuration”