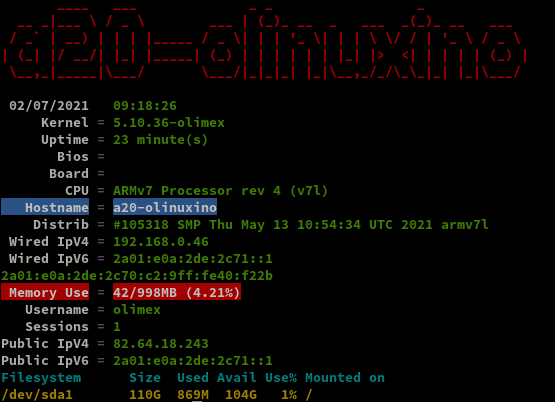
Serveur Debian A20-OLinuXino-buster-minimal Yunohost xoyize.xyz
Olimex A20-olinuxino-Micro


Installation A20-OLinuXino-buster-minimal
![]()
Matériel
- Carte olimex A20-olinuxino-Micro
- Bloc Alimentation 10V 1A
- Dongle Wifi/USB RT5370
- Carte micro SD 4GO
- SSD 128GO
- Batterie Li-ion 3.7v 5000mAh
SDcard
SDcard créer avec les paquets debian armhf
Index of /release/a20
- Télécharger A20-OLinuXino-buster-minimal-20201105-143953.img.7z (image du 06/11/2020) puis se rendre dans le répertoire contenant les fichiers
- Décompresser le fichier
- Insérer le lecteur USB/SDcard, relever le périphérique par
dmesg, ex /dev/sde - Ecriture image sur la SDcard :
sudo dd if=A20-OLinuXino-buster-minimal-20201105-143953.img of=/dev/sde bs=4M
Connexion liaison série
Utilisation module USB/Série /dev/ttyUSB0 et lancer minicom en root
Insertion carte SD et mise sous tension A20-olinuxino-Micro
L’image “debian” est prête à l’emploi sur la carte SD
La connexion “root/olimex”
1
2
3
4
5
6
7
8
Linux a20-olinuxino 5.8.18-olimex #140443 SMP Thu Nov 5 14:05:55 UTC 2020 armv7l

The programs included with the Debian GNU/Linux system are free software;
the exact distribution terms for each program are described in the
individual files in /usr/share/doc/*/copyright.

Debian GNU/Linux comes with ABSOLUTELY NO WARRANTY, to the extent
permitted by applicable law.
Relever l’ adresse mac eth0 : ip link eth0
Activer la DMZ de la Box internet sur IP 192.168.0.46
Ajout dans les baux statique de la box : A20-olinuxino-micro avec l’adresse IP 192.168.0.46 avec l’adresse mac 02:c2:09:40:f2:2b
Préparer disque /dev/sda
1
fdisk /dev/sda
Effacer les partitions existantes ,option “d”
Créer une nouvelle partition primaire en tapant « n » puis « p ». Laisser par défaut la taille maximale. Sauvegarder les modifications en tapant « w ».
formater la partition du SSD sous le format .ext4
1
mkfs.ext4 /dev/sda1
Transfert des données
Le disque est formaté, on va copier les données de la carte SD sur le SSD
1
2
3
mkdir /tmp/ssd
mount /dev/sda1 /tmp/ssd
rsync -av --exclude 'tmp/*' --exclude 'boot' --exclude 'proc/*' --exclude 'sys/*' --exclude 'mnt/*'--exclude 'run/*' / /tmp/ssd/
Patienter plusieurs minutes…
Après transfert
1
ls /tmp/ssd/
1
2
bin  etc   lib         media  opt   root  sbin  sys  uboot.env  var
dev  home  lost+found  mnt    proc  run   srv   tmp  usr
Démpontage /tmp/ssd/
1
umount /tmp/ssd/
Modifier le boot
boot à rediriger sur le disque /dev/sda1
- Ajouter
root=/dev/sda1en fin du fichier/boot/uEnv.txt→echo "root=/dev/sda1" >> /boot/uEnv.txt - Remplacer
root=PARTUUID=${partuuid}parroot=${root}dans le fichier/boot/boot.cmd→sed -i s/root=PARTUUID=\$\{partuuid\}/root=\$\{root\}/g /boot/boot.cmd
Compilation boot.cmd en boot.scr
u-boot-tools installé par défaut sinon : apt install u-boot-tools
1
mkimage -C none -A arm -T script -d /boot/boot.cmd /boot/boot.scr
1
2
3
4
5
6
7
8
Image Name:
Created:      Wed Nov 11 13:27:51 2020
Image Type:   ARM Linux Script (uncompressed)
Data Size:    2210 Bytes = 2.16 KiB = 0.00 MiB
Load Address: 00000000
Entry Point:  00000000
Contents:
   Image 0: 2202 Bytes = 2.15 KiB = 0.00 MiB
Redémarrer : reboot
Se connecter et vérifier avec df-h que sda1 est bien la partition principale
1
2
3
4
5
6
7
8
Filesystem      Size  Used Avail Use% Mounted on
udev            448M     0  448M   0% /dev
tmpfs           100M  5.1M   95M   6% /run
/dev/sda1       117G  606M  111G   1% /
tmpfs           499M     0  499M   0% /dev/shm
tmpfs           5.0M     0  5.0M   0% /run/lock
tmpfs           499M     0  499M   0% /sys/fs/cgroup
tmpfs           100M     0  100M   0% /run/user/0
Mise à jour : apt update
Problème lors de l’utilisation de curl
curl https://curl.haxx.se/ca/cacert.pem curl: (60) SSL certificate problem: unable to get local issuer certificate More details here: https://curl.haxx.se/docs/sslcerts.html
Correction issue du forum IBM curl: (60) SSL certificate problem
1
2
3
4
5
6
7
8
9
10
11
12
13
14
15
16
17
18
19
20
21
22
23
24
This is the type of error you will get if your trusted CA list is out of date. Consult your operating system vendor and see if they have a solution like a CA updating utility. If you cannot find this information or if you really just want to do things the long manual way, do the following:
Find your new SSL

The commands below will output the SSL version that is found in your $PATH and report the version and the configuration directory.

openssl version
   OpenSSL 1.1.1d  10 Sep 2019
openssl version -d
   OPENSSLDIR: "/usr/lib/ssl"

Update the trusted certificate directoryDownload the certificate pem file

 https://curl.haxx.se/ca/cacert.pem

Copy the file or the contents of the file to the certificate directory directory.

cd /usr/lib/ssl/certs
cp /tmp/cacert.pem .

Update the certificates directory so OpenSSL can use them

c_rehash /usr/lib/ssl/certs

That's it now it should be working as expected. If you have two ssl installations and you're not sure which certificate directory is in use you might want to do this to both of them.
Adressage ipv4/ipv6

NextHop Freebox permet d’attribuer une adresse IPV6
Prefixe : 2a01:e0a:2de:2c71::/64
Next Hop: fe80::c2:9ff:fe40:f22b (fe80::7285:c2ff:fe53:cb80 carte ASRock QC5000M)
Passerelle IPV6 Box : fe80::224:d4ff:fea6:aa20
Modifier interface réseau debian pour l’adressage ip static sur IP V4 et V6
1
nano /etc/network/interfaces.d/eth0
1
2
3
4
5
6
allow-hotplug eth0
iface eth0 inet dhcp

iface eth0 inet6 static
  address 2a01:e0a:2de:2c71::1
  netmask 64
Configurer la zone Europe/Paris
1
timedatectl set-timezone Europe/Paris
Vérifier l’heure
1
timedatectl status
1
2
3
4
5
6
7
               Local time: Wed 2020-11-11 18:36:43 CET
           Universal time: Wed 2020-11-11 17:36:43 UTC
                 RTC time: Wed 2020-11-11 17:36:44
                Time zone: Europe/Paris (CET, +0100)
System clock synchronized: yes
              NTP service: active
          RTC in local TZ: no
sudo est installé par défaut sinon : apt install sudo
Dans la configuration ssh /etc/ssh/sshd_config , en fin de fichier on ajoute la directive PermitRootLogin yes
1
echo "PermitRootLogin yes" >> /etc/ssh/sshd_config
Redémarrer : reboot , se connecter via SSH en root
Vérifier les adresses IP : ip a
1
2
3
4
5
6
7
8
9
10
11
12
13
14
15
16
17
18
1: lo: <LOOPBACK,UP,LOWER_UP> mtu 65536 qdisc noqueue state UNKNOWN group default qlen 1000
    link/loopback 00:00:00:00:00:00 brd 00:00:00:00:00:00
    inet 127.0.0.1/8 scope host lo
       valid_lft forever preferred_lft forever
    inet6 ::1/128 scope host
       valid_lft forever preferred_lft forever
2: dummy0: <BROADCAST,NOARP> mtu 1500 qdisc noop state DOWN group default qlen 1000
    link/ether 0e:75:b6:b0:86:dc brd ff:ff:ff:ff:ff:ff
3: eth0: <BROADCAST,MULTICAST,UP,LOWER_UP> mtu 1500 qdisc mq state UP group default qlen 1000
    link/ether 02:c2:09:40:f2:2b brd ff:ff:ff:ff:ff:ff
    inet 192.168.0.46/24 brd 192.168.0.255 scope global dynamic eth0
       valid_lft 43160sec preferred_lft 43160sec
    inet6 2a01:e0a:2de:2c71::1/64 scope global
       valid_lft forever preferred_lft forever
    inet6 2a01:e34:eebf:df0:c2:9ff:fe40:f22b/64 scope global dynamic mngtmpaddr
       valid_lft 86356sec preferred_lft 86356sec
    inet6 fe80::c2:9ff:fe40:f22b/64 scope link
       valid_lft forever preferred_lft forever
Version linux et debian: uname -a
Linux a20-olinuxino 5.8.18-olimex #140443 SMP Thu Nov 5 14:05:55 UTC 2020 armv7l GNU/Linux
Version debian : cat /etc/debian_version
10.6
Afficher les erreurs, le journal des logs
1
journalctl -p err
1
2
3
4
-- Logs begin at Wed 2020-11-11 15:05:43 CET, end at Wed 2020-11-11 15:07:02 CET. --
Nov 11 15:05:43 a20-olinuxino kernel: /cpus/cpu@0 missing clock-frequency property
Nov 11 15:05:43 a20-olinuxino kernel: /cpus/cpu@1 missing clock-frequency property
Nov 11 15:05:43 a20-olinuxino kernel: sun4i-usb-phy 1c13400.phy: Couldn't request ID GPIO
Les erreurs ne sont pas critiques (pas de solution)
Utilisateur olimex
Par défaut , dans l’image debian buster minimal, il y a un utilisateur nommé “olimex”
Changer le mot de passe : passwd olimex
Yunohost 4.0

Installation
Une fois que vous avez accès à votre serveur (directement ou par SSH)
vous pouvez installer YunoHost en exécutant cette commande en tant que root :
1
2
3
apt update
apt install curl
curl https://install.yunohost.org | bash
1
2
3
4
5
6
7
8
9
10
11
12
13
14
15
16
17
[...]
===============================================================================
You should now proceed with Yunohost post-installation. This is where you will
be asked for :
  - the main domain of your server ;
  - the administration password.

You can perform this step :
  - from the command line, by running 'yunohost tools postinstall' as root
  - or from your web browser, by accessing :
    - https://192.168.0.46/ (local IP, if self-hosting at home)

If this is your first time with YunoHost, it is strongly recommended to take
time to read the administator documentation and in particular the sections
'Finalizing your setup' and 'Getting to know YunoHost'. It is available at
the following URL : https://yunohost.org/admindoc
===============================================================================
Post-installation
1
yunohost tools postinstall
1
2
3
4
5
6
7
8
9
10
11
12
13
Main domain: xoyize.xyz
You are now about to define a new administration password. The password should be at least 8 characters long—though it is good practice to use a longer password (i.e. a passphrase) and/or to use a variation of characters (uppercase, lowercase, digits and special characters).
New administration password:
Confirm new administration password:
Info: Installing YunoHost...

[...]
Warning: The ssh configuration has been manually modified, but you need to explicitly specify category 'ssh' with --force to actually apply the changes.
Success! YunoHost is now configured
Warning: The post-install completed! To finalize your setup, please consider:
    - adding a first user through the 'Users' section of the webadmin (or 'yunohost user create <username>' in command-line);
    - diagnose potential issues through the 'Diagnosis' section of the webadmin (or 'yunohost diagnosis run' in command-line);
    - reading the 'Finalizing your setup' and 'Getting to know Yunohost' parts in the admin documentation: https://yunohost.org/admindoc.
Le mot de passe root remplacé par celui de l’admin yunohost
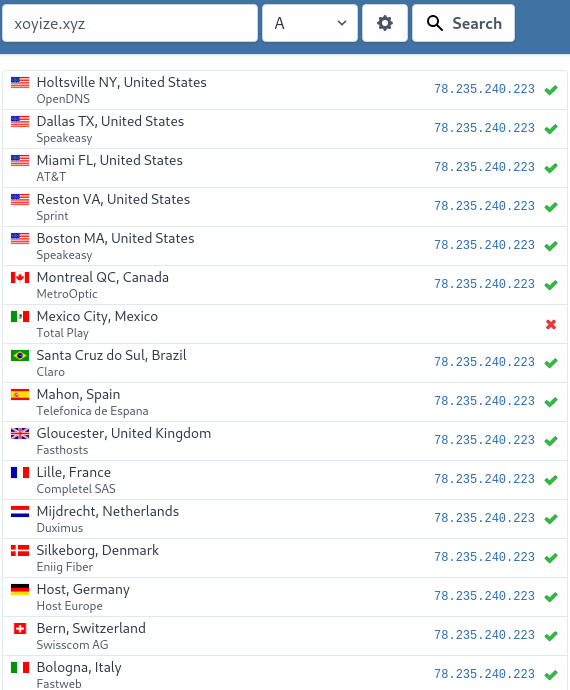
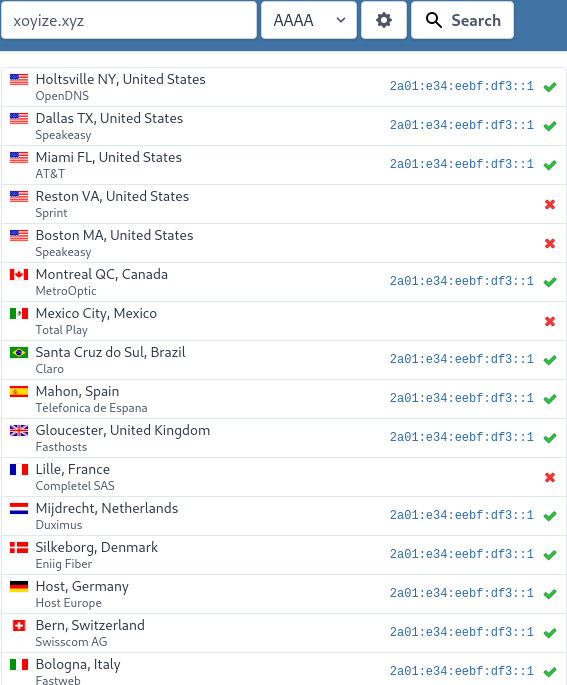
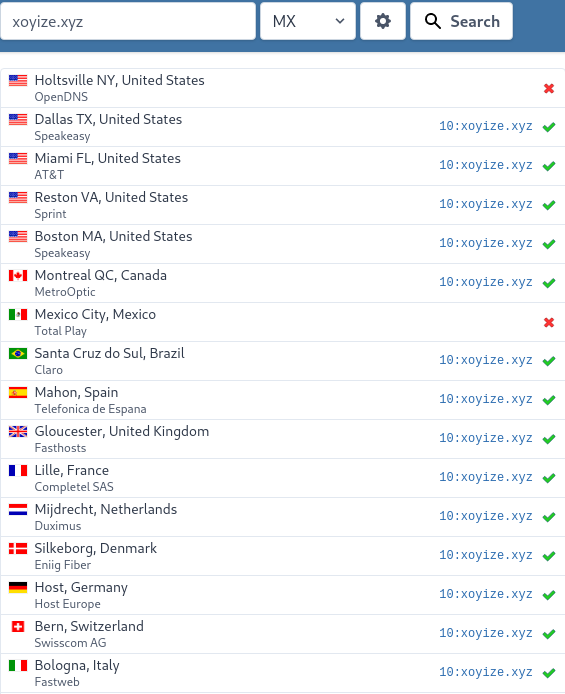
DNS OVH
![]()
![]()
Configuration de base yunohost
1
yunohost domain dns-conf xoyize.xyz
1
2
3
4
5
6
7
8
9
10
11
12
13
14
15
16
17
18
19
20
21
22
; Basic ipv4/ipv6 records
@ 3600 IN A 78.235.240.223
@ 3600 IN AAAA 2a01:e0a:2de:2c71::1

; XMPP
_xmpp-client._tcp 3600 IN SRV 0 5 5222 xoyize.xyz.
_xmpp-server._tcp 3600 IN SRV 0 5 5269 xoyize.xyz.
muc 3600 IN CNAME @
pubsub 3600 IN CNAME @
vjud 3600 IN CNAME @
xmpp-upload 3600 IN CNAME @

; Mail
@ 3600 IN MX 10 xoyize.xyz.
@ 3600 IN TXT "v=spf1 a mx -all"
mail._domainkey 3600 IN TXT "v=DKIM1; h=sha256; k=rsa; p=MIGfMA0GCSqGSIb3DQEBAQUAA4GNADCBiQKBgQDTW80bz/xSlfwExhOVlTdSHjuhTCVfYW9/cHkVZEtKAWIOl/zPcvRJFGhMUy/HkJWqiDeoVTBJQxjqG5FJSIgqWU31r70vZkb0dKuat+ve8LVciahDenE7qTw5Qpwz7OLQWAzasrV8j1eG6DvUrM7eCZoSy++PZpiq4iUUlzeQuwIDAQAB"
_dmarc 3600 IN TXT "v=DMARC1; p=none"

; Extra
* 3600 IN A 78.235.240.223
* 3600 IN AAAA 2a01:e0a:2de:2c71::1
@ 3600 IN CAA 128 issue "letsencrypt.org"
Se connecter à l’espace client du site OVH : Web cloud → Domaines → xoyize.xyz → Zone DNS
Cliquer sur “Modifier en mode textuel”, garder les 4 premières lignes :

puis effacer tout ce qu’il y a en-dessous, et le remplacer par la configuration donnée par votre serveur ( yunohost domain dns-conf)
Certificats SSL
Installer un certificat Let’s Encrypt en ligne de commande
1
yunohost domain cert-install --no-checks
1
2
3
4
5
6
7
8
[...]
Success! Configuration updated for 'dnsmasq'
Warning: No diagnosis cache yet for category 'dnsrecords'
Warning: Subdomain 'xmpp-upload.xoyize.xyz' does not resolve to the same IP address as 'xoyize.xyz'. Some features will not be available until you fix this and regenerate the certificate.
[...]
Info: Certificate signed!
Success! Configuration updated for 'nginx'
Success! Let's Encrypt certificate now installed for the domain 'xoyize.xyz'
Créer un utilisateur (yunohost)
Accès administration web https://xoyize.xyz/yunohost/admin/#/login avec message de sécurité (certificats SSL auto signés)
En ligne de commande
1
yunohost user create yak
1
2
3
4
5
6
7
8
9
10
First name: yak
Last name: xoyi
E-mail address: yak@xoyize.xyz
You are now about to define a new user password. The password should be at least 8 characters long—though it is good practice to use a longer password (i.e. a passphrase) and/or to a variation of characters (uppercase, lowercase, digits and special characters).
Password:
Confirm password:
Success! User created
fullname: yak xoyi
mail: yak@xoyize.xyz
username: yak
Déconnexion puis connexion en admin via ssh
OpenSSH - clés
![]()
On va utiliser admin pour les connexions SSH
connexion avec clé
sur l'ordinateur de bureau
Générer une paire de clé curve25519-sha256 (ECDH avec Curve25519 et SHA2) nommé xoyize-ed25519 pour une liaison SSH avec le serveur KVM.
1
ssh-keygen -t ed25519 -o -a 100 -f ~/.ssh/xoyize-ed25519
Envoyer la clé publique sur le serveur KVM
1
scp ~/.ssh/xoyize-ed25519.pub admin@192.168.0.46:/home/admin/
sur le serveur KVM On se connecte
1
ssh admin@192.168.0.46
Copier le contenu de la clé publique dans /home/$USER/.ssh/authorized_keys
1
cd ~
Sur le KVM ,créer un dossier .ssh
1
2
mkdir -p .ssh
cat $HOME/xoyize-ed25519.pub >> $HOME/.ssh/authorized_keys
et donner les droits
1
chmod 600 $HOME/.ssh/authorized_keys
effacer le fichier de la clé
1
rm $HOME/xoyize-ed25519.pub
Modifier la configuration serveur SSH /etc/ssh/sshd_config
Port = 55035 # changement numéro port , facultatif
PermitRootLogin no
PasswordAuthentication no # Utilise la clé comme authentification
Relancer openSSH
1
sudo systemctl restart sshd
Modifier le parefeu, ouvrir le port 55035 et fermer le port 22
1
2
sudo yunohost firewall allow TCP 55035
sudo yunohost firewall disallow TCP 22
Accès depuis le poste distant avec la clé privée
1
ssh -p 55035 -i ~/.ssh/xoyize-ed25519 admin@192.168.0.46
Outils, motd, ssh_rc_bash , journalctl
![]()
Installer utilitaires
1
sudo apt install tmux figlet dnsutils net-tools tree -y
Motd
1
sudo rm /etc/motd && sudo nano /etc/motd
1
2
3
4
5
6
7
8
       _  _
  ___ | |(_) _ __   ___ __ __  __ _  _ _  _ __
 / _ \| || || '  \ / -_)\ \ / / _` || '_|| '  \
 \___/|_||_||_|_|_|\___|/_\_\ \__,_||_|  |_|_|_|
 __ __ ___  _  _ (_) ___ ___    __ __ _  _  ___
 \ \ // _ \| || || ||_ // -_) _ \ \ /| || ||_ /
 /_\_\\___/ \_, ||_|/__|\___|(_)/_\_\ \_, |/__|
            |__/                      |__/
Script ssh_rc_bash
ATTENTION!!! Les scripts sur connexion peuvent poser des problèmes pour des appels externes autres que ssh
1
2
3
wget https://static.xoyaz.xyz/files/ssh_rc_bash
chmod +x ssh_rc_bash # rendre le bash exécutable
./ssh_rc_bash        # exécution
journalctl : Ajout utilisateur courant au groupe systemd-journal et adm
1
2
sudo gpasswd -a $USER systemd-journal
sudo gpasswd -a $USER adm
Lignes non tronquées ,ajouter au fichier ~/.bashrc
echo “export SYSTEMD_LESS=FRXMK journalctl” » $HOME/.bashrc
Historique de la ligne de commande
Ajoutez la recherche d’historique de la ligne de commande au terminal.
Tapez un début de commande précédent, puis utilisez shift + up (flèche haut) pour rechercher l’historique filtré avec le début de la commande.
1
2
3
# Global, tout utilisateur
echo '"\e[1;2A": history-search-backward' | sudo tee -a /etc/inputrc
echo '"\e[1;2B": history-search-forward' | sudo tee -a /etc/inputrc
Prise en compte après déconnexion/reconnexion
NFS
![]()
NFS (Network File System) est un protocole qui permet d’accéder à des fichiers via le réseau. Il est basé sur le protocole RPC (Remote Procedure Call). Les clients montent la partition de la machine distante comme si c’était un disque local.
En mode su
Serveur
Installation serveur NFS
1
2
sudo -s
apt install nfs-kernel-server
Vérification de l’installation
Exécuter rpcinfo pour confirmer que le serveur est lancé, et accepte les requêtes sur le port 2049 (UDP et TCP).
1
rpcinfo -p | grep nfs
1
2
3
    100003    3   tcp   2049  nfs
    100003    4   tcp   2049  nfs
    100003    3   udp   2049  nfs
Vérifier que le système supporte effectivement NFS:
1
cat /proc/filesystems | grep nfs
1
nodev	nfs
Si la commande précédente ne renvoie rien, il se peut que le module NFS ne soit pas chargé, auquel cas, il faut le charger modprobe nfs
Enfin, vérifions que portmap attend les instructions sur le port 111
1
rpcinfo -p | grep portmap
1
2
3
4
5
6
    100000    4   tcp    111  portmapper
    100000    3   tcp    111  portmapper
    100000    2   tcp    111  portmapper
    100000    4   udp    111  portmapper
    100000    3   udp    111  portmapper
    100000    2   udp    111  portmapper
Sécurisation NFS
![]()
Le protocole RPC n’a pas la réputation d’être bien sécurisé, mais la version 4 de NFS entend corriger ce problème, elle est donc à privilégier. Il est déconseillé d’effectuer un partage NFS via internet, ou bien dans ce cas, opter pour un tunnel crypté.
- S’assurer que les partages sont réservés à certaines IP dans /etc/exports
- S’appuyer sur rpcbind (/etc/hosts.deny et /etc/hosts.allow) pour sécuriser l’accès au serveur NFS
- Configurer convenablement iptables
hosts.deny , hosts.allow
Tout le monde est interdit, puis le LAN est autorisé:
1
2
echo "rpcbind mountd nfsd statd lockd rquotad : ALL" >> /etc/hosts.deny
echo "rpcbind mountd nfsd statd lockd rquotad: 192.168.0." >> /etc/hosts.allow
iptables (NFS)
Par défaut, les différents services NFS (lockd, statd, mountd, etc.) demandent des assignations de ports aléatoires à partir du portmapper (portmap/rpcbind), ce qui signifie que la plupart des administrateurs doivent ouvrir une gamme de ports dans leur base de règles de pare-feu pour que NFS fonctionne.
Il va donc falloir fixer les ports de ces services afin de créer les règles iptables.
1
2
3
echo 'STATDOPTS="--port 32765 --outgoing-port 32766"' >> /etc/default/nfs-common
echo 'RPCMOUNTDOPTS="-p 32767"' >> /etc/default/nfs-kernel-server
echo 'RPCRQUOTADOPTS="-p 32769"' >> /etc/default/quota
Relance sysctl
1
sysctl --system
1
2
3
4
5
* Applying /etc/sysctl.d/99-sysctl.conf ...
* Applying /etc/sysctl.d/protect-links.conf ...
fs.protected_hardlinks = 1
fs.protected_symlinks = 1
* Applying /etc/sysctl.conf ...
Relancer le service
1
systemctl restart nfs-kernel-server
NFS - iptables
Ajout des règles firewall en utilisant le “hook” yunohost post_iptable_rules
1
2
3
mkdir -p /etc/yunohost/hooks.d/post_iptable_rules
touch /etc/yunohost/hooks.d/post_iptable_rules/95-nfs-iptables
chmod +x /etc/yunohost/hooks.d/post_iptable_rules/95-nfs-iptables
Bash pour ajout des régles iptables
1
nano /etc/yunohost/hooks.d/post_iptable_rules/95-nfs-iptables
Voici les règles à fixer dans le parefeu
1
2
3
4
#!/bin/bash
iptables -A INPUT -s 192.168.0.0/24 -p tcp -m multiport --ports 111,2049,32764:32769 -j ACCEPT -m comment --comment "NFS Server"
iptables -A INPUT -s 192.168.0.0/24 -p udp -m multiport --ports 111,2049,32764:32769 -j ACCEPT -m comment --comment "NFS Server"
exit 0
Vérifier la création du hook
1
yunohost hook list post_iptable_rules
1
hooks: nfs-iptables
Droits
1
chmod +x /etc/yunohost/hooks.d/post_iptable_rules/95-nfs-iptables
Exécution manuelle du hook et vérification
1
2
/etc/yunohost/hooks.d/post_iptable_rules/95-nfs-iptables
iptables -L
1
2
3
4
[...]
ACCEPT     tcp  --  192.168.0.0/24       anywhere             multiport ports sunrpc,nfs,32764:32769 /* NFS Server */
ACCEPT     udp  --  192.168.0.0/24       anywhere             multiport ports sunrpc,nfs,32764:32769 /* NFS Server */
[...]
Autofs
En mode su
Installer autofs pour un accès aux dossiers de la machine yannick-pc
1
apt install autofs
Déclarer yannick-pc dans /etc/hosts , en ajoutant au fichier
1
192.168.0.28	yannick-pc
Les partages disponibles
1
showmount -e yannick-pc
1
2
3
4
Export list for yannick-pc:
/srv/hdd2g/data/devel        192.168.0.0/24
/srv/hdd2g/data/borg-backups 192.168.0.0/24
/home/yannick/Partage        192.168.0.0/24
Déclaration des répertoires parents de montages et de leur types
1
nano /etc/auto.master
Oter le commentaire de la ligne suivante
1
/net    -hosts
Redémarrer le service
1
systemctl restart autofs
Créer un groupe utilisateurs avec id 985 (équivalent au groupe users sous archlinux)
1
sudo groupadd --gid 985 utilisateurs
Visualiser, par exemple, le dossier partage de yannick-pc
1
ls /net/yannick-pc/home/yannick/Partage
SetGID partage
Configurer le partage NFS avec SetGID
Créer un dossier qui sera partagé sur le réseau local :
1
sudo mkdir -p /xoyipart
Nous devons configurer SetGID dans ce répertoire, comme indiqué ci-dessous.
1
sudo chmod 2775 /xoyipart
Cela a également défini les autorisations 775 sur le répertoire, de sorte que l’utilisateur racine et le groupe défini disposent d’autorisations complètes. Le 2 permet setgid.
Ensuite, nous créons un groupe appelé ‘local’ et modifions le répertoire /xoyipart afin que le propriétaire du groupe soit ce groupe ‘local’.
Nous spécifions également manuellement le GID qui sera utilisé pour le groupe en tant que 9999; il doit s’agir d’un numéro libre sur votre client et votre serveur.
Exécuter groupadd sur le client et sur le serveur, et ajouter un (ou plusieurs) utilisateur à ce groupe.
1
2
3
4
sudo groupadd -g 9999 local      # sur client et serveur
# ajout utilisateur au groupe
sudo usermod -a -G local $USER   # sur client et serveur
sudo chgrp local /xoyipart           # serveur uniquement
Droits ACL
Donner les droits ACL en lecture,écriture et exécution à l’utilisateur admin et au groupe local
1
setfacl -Rm u:admin:rwx,g:local:rwx /xoyipart/
Désormais, tous les fichiers ou répertoires créés dans /xoyipart se verront automatiquement attribuer le propriétaire du groupe ‘local, ce qui permettra essentiellement la collaboration de groupe, car tout utilisateur appartenant au groupe local pourra désormais accéder aux fichiers créés par d’autres utilisateurs du même groupe dans le répertoire /xoyipart
NE PAS OUBLIER DE SE DECONNECTER/CONNECTER
Nous pouvons confirmer que setgid est en place, comme indiqué ci-dessous, où le bit d’exécution pour les autorisations de groupe est une minuscule. Cela passera à une majuscule S si le groupe ne dispose pas de l’autorisation d’exécution et que seul setgid est en place.
1
ls -la /xoyipart/  # signe + pour les acl
1
2
3
[...]
drwxrwsr-x+  2 root   local 4096 Nov 12 10:09 .
[...]
Partager /xoyipart/
indiquer au serveur les répertoires qui seront partagés, les machines qui y auront accès et les conditions de ce partage.
1
sudo nano /etc/exports
Ajouter en fin de fichier /etc/exports
1
/xoyipart                                   192.168.0.0/24(rw,sync,no_subtree_check,no_root_squash)
Exporter
1
sudo exportfs -ar
Pour vérifier que l’export a bien eu lieu, taper sur le serveur NFS la commande :
1
sudo showmount -e
1
2
Export list for xoyize.xyz:
/xoyipart 192.168.0.0/24
Batterie
La carte dispose d’une batterie LiIon en cas de coupure de l’alimentation secteur
Pour voir les détails
1
find /sys/class/power_supply/axp20x-battery/ -type f | xargs -tn1 cat
Pour résumer
1
cat /sys/class/power_supply/axp20x-battery/uevent
Batterie en charge
1
2
3
4
5
6
7
8
9
10
11
12
POWER_SUPPLY_NAME=axp20x-battery
POWER_SUPPLY_PRESENT=1
POWER_SUPPLY_ONLINE=1
POWER_SUPPLY_STATUS=Charging
POWER_SUPPLY_VOLTAGE_NOW=4202000
POWER_SUPPLY_CURRENT_NOW=209000
POWER_SUPPLY_CONSTANT_CHARGE_CURRENT=1200000
POWER_SUPPLY_CONSTANT_CHARGE_CURRENT_MAX=1200000
POWER_SUPPLY_HEALTH=Good
POWER_SUPPLY_VOLTAGE_MAX_DESIGN=4200000
POWER_SUPPLY_VOLTAGE_MIN_DESIGN=2900000
POWER_SUPPLY_CAPACITY=99
Batterie chargée
1
2
3
4
5
6
7
8
9
10
11
12
POWER_SUPPLY_NAME=axp20x-battery
POWER_SUPPLY_PRESENT=1
POWER_SUPPLY_ONLINE=1
POWER_SUPPLY_STATUS=Not charging
POWER_SUPPLY_VOLTAGE_NOW=4141000
POWER_SUPPLY_CURRENT_NOW=0
POWER_SUPPLY_CONSTANT_CHARGE_CURRENT=1200000
POWER_SUPPLY_CONSTANT_CHARGE_CURRENT_MAX=1200000
POWER_SUPPLY_HEALTH=Good
POWER_SUPPLY_VOLTAGE_MAX_DESIGN=4200000
POWER_SUPPLY_VOLTAGE_MIN_DESIGN=2900000
POWER_SUPPLY_CAPACITY=98
En cas de coupure
Batterie en décharge
1
cat /sys/class/power_supply/axp20x-battery/uevent
1
2
3
4
5
6
7
8
9
10
11
12
POWER_SUPPLY_NAME=axp20x-battery
POWER_SUPPLY_PRESENT=1
POWER_SUPPLY_ONLINE=1
POWER_SUPPLY_STATUS=Discharging
POWER_SUPPLY_VOLTAGE_NOW=3862000
POWER_SUPPLY_CURRENT_NOW=523000
POWER_SUPPLY_CONSTANT_CHARGE_CURRENT=1200000
POWER_SUPPLY_CONSTANT_CHARGE_CURRENT_MAX=1200000
POWER_SUPPLY_HEALTH=Good
POWER_SUPPLY_VOLTAGE_MAX_DESIGN=4200000
POWER_SUPPLY_VOLTAGE_MIN_DESIGN=2900000
POWER_SUPPLY_CAPACITY=82
Tests sur le serveur
Vérifications DNS - wireguard
Les commandes suivantes ne fonctionneront que si le paquet “dnsutils” est installé sur votre système Debian!
On teste en utilisant les serveurs DNS locaux, les 3 commandes suivantes ont le même résultat
1
2
3
dig @127.0.0.1 afnic.fr +short +dnssec
dig @10.55.22.1 afnic.fr +short +dnssec
dig @fd87:9aa8:e67c:5a80::1 afnic.fr +short +dnssec
1
2
192.134.5.37
A 13 2 600 20200608204052 20200509084949 30435 afnic.fr. eVchVAseJD5n8W7U8okAz546Ix33hOCqRF7wLrhUV+sOTkwyXo7EwAut k/rN8wsPVpTnTpFyQLKdBTuOpx2UxA==
Propagation DNS
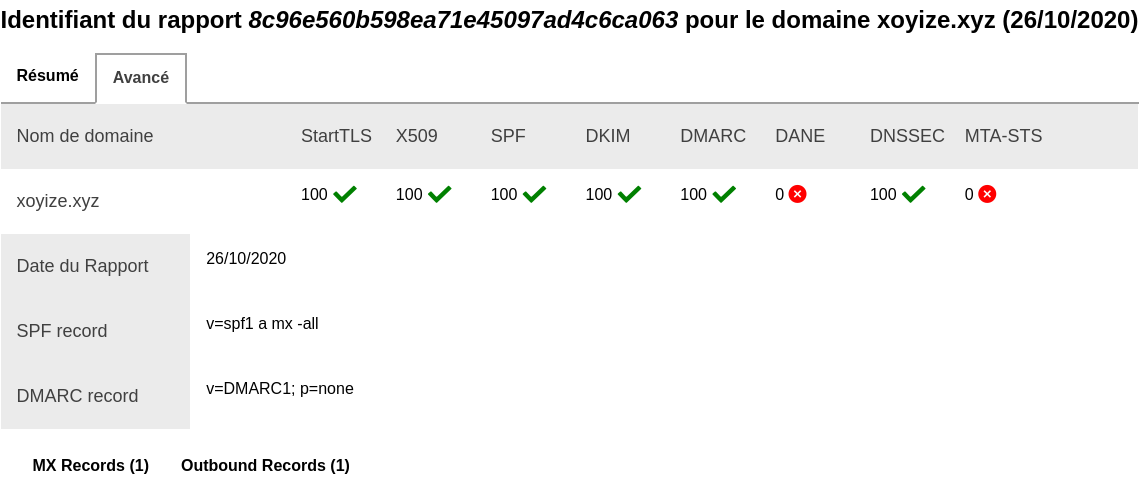
Messagerie
Vérification messagerie https://mecsa.jrc.ec.europa.eu/fr/
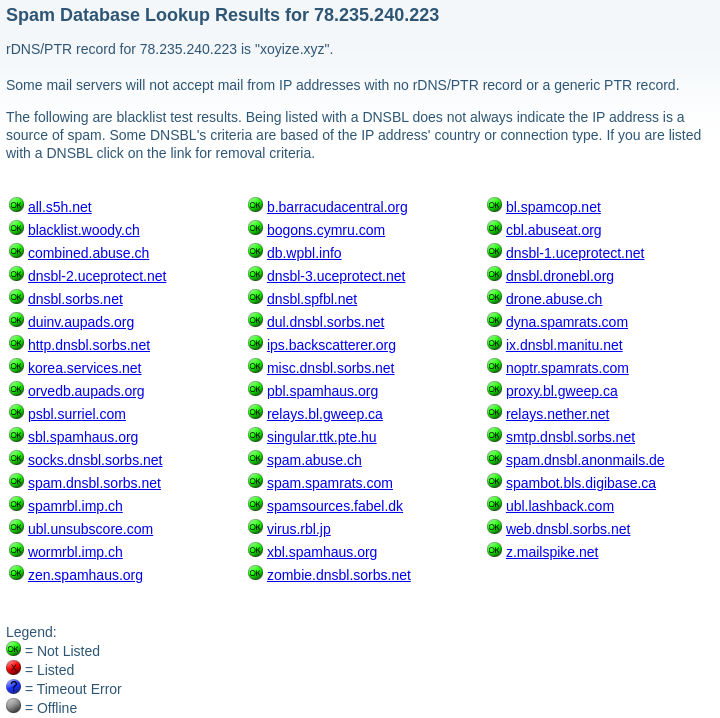
DNS blacklisting
https://www.dnsbl.info/dnsbl-database-check.php
Vulnérabilités
https://www.ssllabs.com/ssltest/analyze.html
SSL Report: xoyize.xyz (78.235.240.223)

SSL Report: xoyize.xyz (2a01:e0a:2de:2c71::1)

Vérifier les ports ouverts depuis un poste linux
1
nmap xoyize.xyz
1
2
3
4
5
6
7
8
9
10
11
12
13
14
15
Starting Nmap 7.70 ( https://nmap.org ) at 2020-10-26 14:15 CET
Nmap scan report for xoyize.xyz (78.235.240.223)
Host is up (0.099s latency).
Other addresses for xoyize.xyz (not scanned): 2a01:e0a:2de:2c71::1
Not shown: 991 filtered ports
PORT     STATE  SERVICE
25/tcp   open   smtp
53/tcp   open   domain
80/tcp   open   http
443/tcp  open   https
587/tcp  open   submission
993/tcp  open   imaps
5222/tcp open   xmpp-client
5269/tcp open   xmpp-server
9091/tcp closed xmltec-xmlmail
Gestion onduleur USB
Matériel
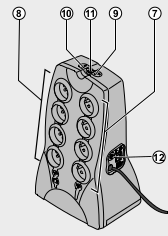
Eaton Protection Station 800 USB
| No | Eaton Protection Station - 650/800 |
|---|---|
| 7 | 4 prises filtrées. |
| 8 | 4 prises secourues par batterie. |
| 9 | Voyant allumé, protection anti-surtensions active sur les 8 prises. |
| 10 | Voyant allumé, défaut de l'Alimentation Sans Interruption. |
| 11 | Bouton de mise en service ou d'arrêt des prises secourues. |
| 12 | Disjoncteur de protection. |
Passer en mode su
1
sudo -s
Connecter l’onduleur liaison USB sur un port disponible du serveur , vérifier par dmesg
1
dmesg | grep -i eaton
1
2
[2746558.690022] usb 4-1: Manufacturer: EATON
[2746560.889094] hid-generic 0003:0463:FFFF.0002: hiddev0,hidraw0: USB HID v10.10 Device [EATON Protection Station] on usb-1c1c400.usb-1/input0
1
lsusb | grep -i ups
1
Bus 004 Device 003: ID 0463:ffff MGE UPS Systems UPS
Déterminer le numéro de série
1
 udevadm info --attribute-walk --name=/dev/usb/hiddev0 | egrep 'manufacturer|product|serial'
1
2
3
4
5
6
    ATTRS{serial}=="AN2E49008"
    ATTRS{manufacturer}=="EATON"
    ATTRS{product}=="Protection Station"
    ATTRS{serial}=="1c1c400.usb"
    ATTRS{product}=="Generic Platform OHCI controller"
    ATTRS{manufacturer}=="Linux 4.19.0-11-armmp-lpae ohci_hcd"
APC UPS (apcupsd)
Installation
1
2
sudo apt install apcupsd # debian
sudo systemctl stop apcupsd.service # arrêt pour paramétrer
Serveur
Configurer APC - apcupsd.conf
Le fichier de configuration principal du démon APC UPS se trouve dans /etc/apcupsd/apcupsd.conf
Les lignes de texte sont modifiées pour prendre en charge un câble de style USB:
1
sudo nano /etc/apcupsd/apcupsd.conf
1
2
3
4
5
6
7
8
9
10
11
12
13
14
15
16
17
18
19
20
21
22
23
24
25
26
27
28
29
30
31
32
33
34
35
36
## apcupsd.conf v1.1 ##
#
UPSCABLE usb
UPSTYPE usb
DEVICE

[...]

# If during a power failure, the remaining battery percentage
# (as reported by the UPS) is below or equal to BATTERYLEVEL,
# apcupsd will initiate a system shutdown.
BATTERYLEVEL 15

# If during a power failure, the remaining runtime in minutes
# (as calculated internally by the UPS) is below or equal to MINUTES,
# apcupsd, will initiate a system shutdown.
MINUTES 5

[...]

# NETSERVER [ on | off ] on enables, off disables the network
#  information server. If netstatus is on, a network information
#  server process will be started for serving the STATUS and
#  EVENT data over the network (used by CGI programs).
NETSERVER on

# NISIP <dotted notation ip address>
#  IP address on which NIS server will listen for incoming connections.
#  This is useful if your server is multi-homed (has more than one
#  network interface and IP address). Default value is 0.0.0.0 which
#  means any incoming request will be serviced. Alternatively, you can
#  configure this setting to any specific IP address of your server and
#  NIS will listen for connections only on that interface. Use the
#  loopback address (127.0.0.1) to accept connections only from the
#  local machine.
NISIP 192.168.0.46
Le fichier /etc/apcupsd/hosts.conf contient les ordinateurs protégés par cet onduleur
1
2
3
4
5
6
7
8
9
10
11
12
13
14
15
16
# Network UPS Tools - hosts.conf
#
# This file does double duty - it lists the systems that multimon will
# monitor, and also specifies the systems that upsstats is allowed to
# watch.  It keeps people from feeding random addresses to upsstats,
# among other things.  upsimage also uses this file to know who it
# may speak to. upsfstats too.
#
# Usage: list systems running upsd that you want to monitor
#
# MONITOR <address> "<host description>"
#
MONITOR 127.0.0.1 "Local Host"
MONITOR 192.168.0.46 "Serveur xoyize.xyz"
MONITOR 10.0.3.19    "Container LXC Debian"
MONITOR 192.168.0.28 "Poste archlinux"
Le fichier /etc/default/apcupsd
1
2
3
# Defaults for apcupsd initscript (unused with systemd as init).
# Set to "yes" to enable startup of apcupsd.
ISCONFIGURED=yes
debian , démarrez apcupsd.service
1
sudo systemctl start apcupsd.service
Ensuite, attendez environ une minute et vérifiez que le démon fonctionne et surveille correctement la batterie:
1
sudo apcaccess status
1
2
3
4
5
6
7
8
9
10
11
12
13
14
15
16
17
18
19
20
21
22
23
24
25
26
27
28
29
APC      : 001,028,0683
DATE     : 2020-11-10 16:07:39 +0100
HOSTNAME : xoyize.xyz
VERSION  : 3.14.14 (31 May 2016) debian
UPSNAME  : xoyize.xyz
CABLE    : USB Cable
DRIVER   : USB UPS Driver
UPSMODE  : Stand Alone
STARTTIME: 2020-11-02 14:18:32 +0100
MODEL    : Protection Station
STATUS   : ONLINE
LOADPCT  : 22.0 Percent
BCHARGE  : 100.0 Percent
TIMELEFT : 12.2 Minutes
MBATTCHG : 15 Percent
MINTIMEL : 5 Minutes
MAXTIME  : 0 Seconds
OUTPUTV  : 230.0 Volts
DWAKE    : -1 Seconds
LOTRANS  : 184.0 Volts
HITRANS  : 264.0 Volts
ALARMDEL : 30 Seconds
NUMXFERS : 0
TONBATT  : 0 Seconds
CUMONBATT: 0 Seconds
XOFFBATT : N/A
STATFLAG : 0x05000008
SERIALNO : AN2E49008
END APC  : 2020-11-02 14:19:00 +0100
Pour tester l’onduleur
- Modifiez TIMEOUT de 0 à 1 dans le fichier
/etc/apcupsd/apcupsd.conf - Coupez l’alimentation murale de l’onduleur.
- Observez que votre box Linux s’éteint rapidement.
- Rebranchez l’onduleur
- Allumez votre box Linux.
- Remplacez TIMEOUT de 1 à 0 dans le fichier /etc/apcupsd/apcupsd.conf
Règles iptables
Pour le client puisse communiquer , il faut ouvrir le port 3351 uniquement pour le réseau local
1
sudo nano /etc/yunohost/hooks.d/post_iptable_rules/96-apcups-iptables
Voici les règles à fixer dans le parefeu
1
2
3
#!/bin/bash
iptables -A INPUT -s 192.168.0.0/24 -p tcp --dport 3551 -j ACCEPT -m comment --comment "APCUPS"
exit 0
Droits en exécution
1
sudo chmod +x /etc/yunohost/hooks.d/post_iptable_rules/96-apcups-iptables
Vérifier la création du hook
1
sudo yunohost hook list post_iptable_rules
1
2
3
hooks:
  - nfs-iptables
  - apcups-iptables
Exécution manuelle du hook et vérification
1
2
3
sudo -s
/etc/yunohost/hooks.d/post_iptable_rules/96-apcups-iptables
iptables -L
1
2
3
[...]
ACCEPT     tcp  --  192.168.0.0/24       anywhere             tcp dpt:3551 /* APCUPS */
[...]
Poste Client
Accès onduleur (connecté sur le serveur) depuis un poste client sur le réseau
Installer apcupsd sur le client
1
2
sudo apt install apcupsd
systemctl stop apcupsd.service # pour configurer
Edition fichier /etc/apcupsd/apcupsd.conf
1
2
3
4
5
6
7
8
9
10
11
12
13
14
15
16
17
18
19
20
21
22
23
24
25
26
27
28
29
30
31
32
33
34
35
36
37
UPSCABLE usb
UPSTYPE net
# The default port for apcupsd is 3551
DEVICE 192.168.1.46:3551

[...]

# POLLTIME <int>
#   Interval (in seconds) at which apcupsd polls the UPS for status. This
#   setting applies both to directly-attached UPSes (UPSTYPE apcsmart, usb,
#   dumb) and networked UPSes (UPSTYPE net, snmp). Lowering this setting
#   will improve apcupsd's responsiveness to certain events at the cost of
#   higher CPU utilization. The default of 60 is appropriate for most
#   situations.
POLLTIME 10

[...]

# If during a power failure, the remaining battery percentage
# (as reported by the UPS) is below or equal to BATTERYLEVEL,
# apcupsd will initiate a system shutdown.
BATTERYLEVEL 15

[...]

# If during a power failure, the remaining runtime in minutes
# (as calculated internally by the UPS) is below or equal to MINUTES,
# apcupsd, will initiate a system shutdown.
MINUTES 5

[...]

# NETSERVER [ on | off ] on enables, off disables the network
NETSERVER on

# NISIP <dotted notation ip address>
NISIP 0.0.0.0
Le fichier /etc/default/apcupsd
1
2
3
# Defaults for apcupsd initscript (unused with systemd as init).
# Set to "yes" to enable startup of apcupsd.
ISCONFIGURED=yes
Démarrez apcupsd.service
1
systemctl start apcupsd.service
Status depuis le client “debian-10”
1
apcaccess
1
2
3
4
5
6
7
8
9
10
11
12
13
14
15
16
17
18
19
APC      : 001,018,0452
DATE     : 2020-11-02 14:33:58 +0100
HOSTNAME : debian-10
VERSION  : 3.14.14 (31 May 2016) debian
UPSNAME  : debian-10
CABLE    : Ethernet Link
DRIVER   : NETWORK UPS Driver
UPSMODE  : Net Slave
STARTTIME: 2020-11-02 14:32:07 +0100
STATUS   : COMMLOST
MBATTCHG : 15 Percent
MINTIMEL : 5 Minutes
MAXTIME  : 0 Seconds
NUMXFERS : 0
TONBATT  : 0 Seconds
CUMONBATT: 0 Seconds
XOFFBATT : N/A
STATFLAG : 0x05000100
END APC  : 2020-11-02 14:33:58 +0100
Redirection (NON INSTALLE)
Ajoutez un lien sur votre panneau d’utilisateur redirigeant vers une autre page ou application.
Il peut s’agir d’une redirection invisible, d’un lien externe, d’une autre application sur votre réseau local, d’un reverse proxy vers une application ou un conteneur Docker…
Certaines applications peuvent même être protégées derrière votre panneau (ce qui signifie que vous devrez vous connecter pour y accéder).
Cette application ajoute seulement un fichier de configuration Nginx avec une règle de redirection ou de proxy_pass, et une tuile YunoHost. Rien de plus.
Installation
1
yunohost app install https://github.com/YunoHost-Apps/redirect_ynh
1
2
3
4
5
6
7
8
9
10
11
12
Available domains:
- xoyize.xyz
- dev.xoyize.xyz
- test.xoyize.xyz
- searx.xoyize.xyz
Choose a domain for your redirect (default: xoyize.xyz):
Choose a path for your redirect (default: /redirect): /prox
Redirect destination path (default: http://127.0.0.1):
Redirect type [public_302 | public_301 | public_proxy | private_proxy] (default: public_302):
Info: Installing redirect...
Warning: /!\ Packagers! This app is still using the skipped/protected/unprotected_uris/regex settings which are now obsolete and deprecated... Instead, you should use the new helpers 'ynh_permission_{create,urls,update,delete}' and the 'visitors' group to initialize the public/private access. Check out the documentation at the bottom of yunohost.org/groups_and_permissions to learn how to use the new permission mechanism.
Success! Installation completed
IMPORTANT : le fichier redirect.conf peut avoir besoin d’être mis à jour en fonction de votre situation !
ATTENTION : de nombreuses applications ne supportent pas d’être redirigées vers un chemin différent à cause des liens relatifs ! Cela signifie que certaines applications hébergées par exemple sur http://127.0.0.1:5050/app/ DOIVENT être redirigées vers http://domain.tld/app/ et NON http://domain.tld/someotherapp/
Exemple concret : le conteneur Odoo Docker fonctionne sur http://127.0.0.1:8069/. Vous ne pourrez pas le rediriger vers http://domain.tld/odoo/ ! Vous devez le rediriger vers la racine, donc par exemple http://odoo.domain.tld/
Rsync
Script de récupération des sauvegardes effectuées sur le serveur backup xoyaz.xyz
1
nano /home/admin/srvxoyaz.sh
1
2
3
4
5
6
7
8
9
10
#!/bin/sh -x
echo "-----------------------------------------------
Récupération des sauvegardes du serveur xoyaz.xyz"
rsync -avz --delete --rsync-path="sudo rsync" -e "ssh -p 55036 -i /home/admin/.ssh/OVZ-STORAGE-128 -o StrictHostKeyChecking=no -o UserKnownHostsFile=/dev/null" \
 usernl@xoyaz.xyz:/srv/data/borg-backups/* /home/admin/serveur_backup/  >/dev/null 2>&1 ; \
 if [ $? -eq 0 ]; then \
 echo "Récupération des sauvegardes du serveur Backup xoyaz.xyz -> OK" | systemd-cat -t rsync_xoyaz -p info ; \
 else \
 echo "Récupération des sauvegardes du serveur Backup xoyaz.xyz -> ERREUR" | systemd-cat -t rsync_xoyaz -p emerg ; \
 fi
Les sauvegardes sont stockées sous /home/admin/serveur_backup/
Droits en exécution
1
chmod +x srvxoyaz.sh
Lancement de la procédure à 3h10
1
sudo crontab -e
1
2
# Récupération des sauvegardes du serveur Backup xoyaz.xyz
10 03 * * * /home/admin/srvxoyaz.sh > /dev/null