Cubieboard2 Debian Stretch xoyize.xyz
Cubieboard2 Debian Stretch
Cubieboard2
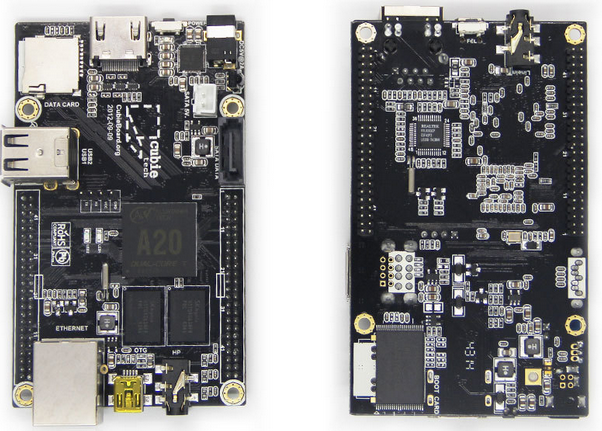
- AllWinnerTech SOC A20 ARM® Cortex™-A7 Dual-Core ARM® Mali400 MP2 Complies with OpenGL ES 2.0/1.1
- 1GB DDR3 @480M
- 3.4GB internal NAND flash, up to 64GB on SD slot, up to 2T on 2.5 SATA disk
- 5VDC input 2A or USB otg input
- 1x 10/100 ethernet, support usb wifi
- 2x USB 2.0 HOST, 1x mini USB 2.0 OTG, 1x micro sd
- 1x HDMI 1080P display output
- 1x IR, 1x line in, 1x line out
- 96 extend pin interface, including I2C, SPI, RGB/LVDS, CSI/TS, FM-IN, ADC, CVBS, VGA, SPDIF-OUT, R-TP, and more
- CRUCIAL M500 (SSD 480Go)
Debian Stretch
Installation via SDcard
Téléchargement image , Armbian_5.38_Cubieboard2_Debian_stretch_next_4.14.14.7z et décompression
Insérer une SDcard dans le lecteur USB/SDcard puis la connecter sur un bus USB de la machine contenant le fichier image.
1
dmesg # pour identifier le système
1
2
[24924.607561]  sdd: sdd1
[24924.611508] sd 4:0:0:0: [sdd] Attached SCSI removable disk
SDcard sur /dev/sdd
On flash la SDcard
1
2
sudo dd if=Armbian_5.38_Cubieboard2_Debian_stretch_next_4.14.14.img of=/dev/sdd bs=4M
sync
Insérer la SDcard dans son logement sur la carte A20-Olinuxino-MICRO
On utilise une liaison USB/SERIAL et le logiciel minicom pour communiquer avec la carte olimex qui est également connecter au réseau.
1
sudo minicom
Connecter le jack alimentation
Login root , mot de passe 1234
Création utilisateur xo
1
2
3
4
5
6
7
8
9
10
11
12
13
14
15
16
17
18
19
20
21
22
23
24
25
26
27
28
29
30
31
32
33
34
35
36
37
38
39
40
41
42
43
44
45
46
47
48
49
50
51
cubieboard2 login: root
Password:
You are required to change your password immediately (root enforced)
Changing password for root.
(current) UNIX password:
Enter new UNIX password:
Retype new UNIX password:
  ____      _     _      _                         _   ____
 / ___|   _| |__ (_) ___| |__   ___   __ _ _ __ __| | |___ \
| |  | | | | '_ \| |/ _ \ '_ \ / _ \ / _` | '__/ _` |   __) |
| |__| |_| | |_) | |  __/ |_) | (_) | (_| | | | (_| |  / __/
 \____\__,_|_.__/|_|\___|_.__/ \___/ \__,_|_|  \__,_| |_____|


Welcome to ARMBIAN 5.38 stable Debian GNU/Linux 9 (stretch) 4.14.14-sunxi
System load:   0.06 0.16 0.17   Up time:       12 min
Memory usage:  4 % of 1000MB    IP:            192.168.0.12
CPU temp:      39°C
Usage of /:    14% of 7.2G

[ General system configuration (beta): armbian-config ]

New to Armbian? Check the documentation first: https://docs.armbian.com


Thank you for choosing Armbian! Support: www.armbian.com

Creating a new user account. Press <Ctrl-C> to abort

Please provide a username (eg. your forename): xo
Trying to add user xo
Adding user `xo' ...
Adding new group `xo' (1000) ...
Adding new user `xo' (1000) with group `xo' ...
Creating home directory `/home/xo' ...
Copying files from `/etc/skel' ...
Enter new UNIX password:
Retype new UNIX password:
passwd: password updated successfully
Changing the user information for xo
Enter the new value, or press ENTER for the default
        Full Name []:
        Room Number []:
        Work Phone []:
        Home Phone []:
        Other []:
Is the information correct? [Y/n]

Dear xo, your account xo has been created and is sudo enabled.
Please use this account for your daily work from now on.
Relever adresse IP
1
ip a
1
2
3
4
5
6
7
8
9
10
11
12
13
14
15
16
1: lo: <LOOPBACK,UP,LOWER_UP> mtu 65536 qdisc noqueue state UNKNOWN group default qlen 1000
    link/loopback 00:00:00:00:00:00 brd 00:00:00:00:00:00
    inet 127.0.0.1/8 scope host lo
       valid_lft forever preferred_lft forever
    inet6 ::1/128 scope host
       valid_lft forever preferred_lft forever
2: eth0: <BROADCAST,MULTICAST,UP,LOWER_UP> mtu 1500 qdisc mq state UP group default qlen 1000
    link/ether 02:c4:04:40:f0:ff brd ff:ff:ff:ff:ff:ff
    inet 192.168.0.12/24 brd 192.168.0.255 scope global eth0
       valid_lft forever preferred_lft forever
    inet6 2a01:e34:eebf:df0:c4:4ff:fe40:f0ff/64 scope global mngtmpaddr dynamic
       valid_lft 85904sec preferred_lft 85904sec
    inet6 fe80::c4:4ff:fe40:f0ff/64 scope link
       valid_lft forever preferred_lft forever
3: bond0: <BROADCAST,MULTICAST,MASTER> mtu 1500 qdisc noop state DOWN group default qlen 1000
    link/ether fe:ce:ac:d1:64:41 brd ff:ff:ff:ff:ff:ff
Mise à jour debian
1
apt update && apt upgrade
Connexion SSH
1
ssh xo@192.168.0.12
1
2
3
4
5
6
7
8
9
10
11
12
  ____      _     _      _                         _   ____
 / ___|   _| |__ (_) ___| |__   ___   __ _ _ __ __| | |___ \
| |  | | | | '_ \| |/ _ \ '_ \ / _ \ / _` | '__/ _` |   __) |
| |__| |_| | |_) | |  __/ |_) | (_) | (_| | | | (_| |  / __/
 \____\__,_|_.__/|_|\___|_.__/ \___/ \__,_|_|  \__,_| |_____|


Welcome to ARMBIAN 5.38 stable Debian GNU/Linux 9 (stretch) 4.19.20-sunxi
System load:   1.64 0.44 0.15  	Up time:       0 min
Memory usage:  5 % of 1000MB 	IP:            192.168.0.12
CPU temp:      47°C
Usage of /:    17% of 7.2G
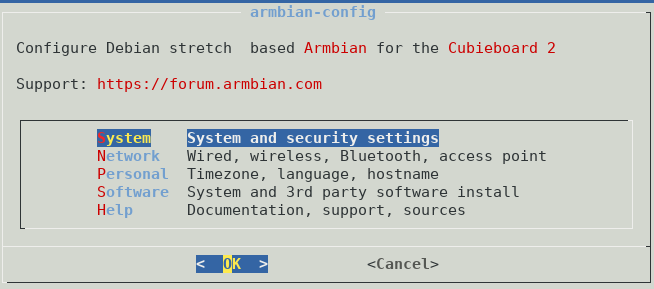
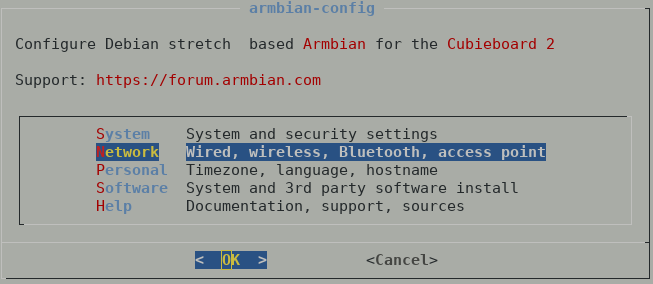
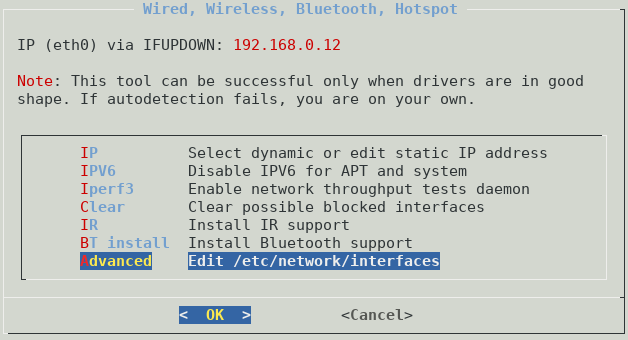
Configuration Armbian Config User Guide
1
sudo armbian-config
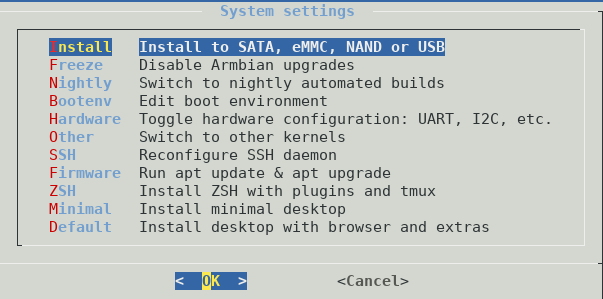
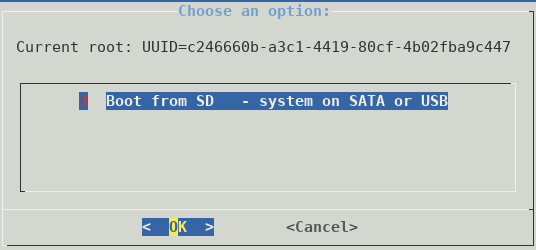
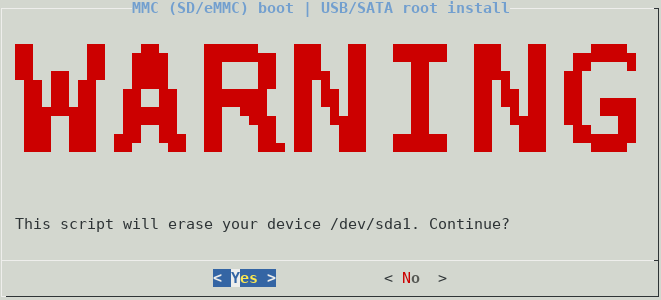
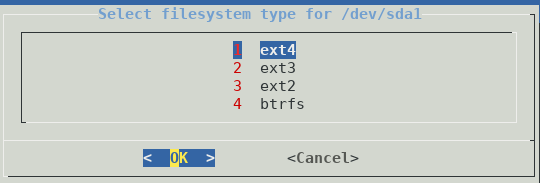
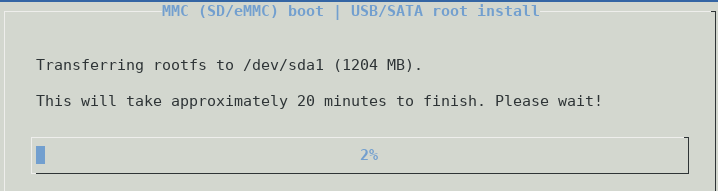
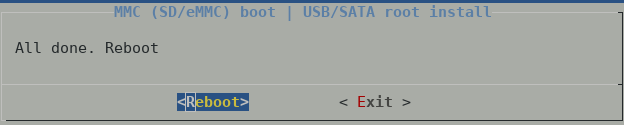
Transfert SDcard → SSD (/dev/sda1)


Connexion SSH
1
ssh xo@192.168.0.12
1
2
3
4
5
6
7
8
9
10
11
12
13
14
  ____      _     _      _                         _   ____
 / ___|   _| |__ (_) ___| |__   ___   __ _ _ __ __| | |___ \
| |  | | | | '_ \| |/ _ \ '_ \ / _ \ / _` | '__/ _` |   __) |
| |__| |_| | |_) | |  __/ |_) | (_) | (_| | | | (_| |  / __/
 \____\__,_|_.__/|_|\___|_.__/ \___/ \__,_|_|  \__,_| |_____|


Welcome to ARMBIAN 5.38 stable Debian GNU/Linux 9 (stretch) 4.19.20-sunxi
System load:   1.37 0.32 0.11  	Up time:       0 min
Memory usage:  5 % of 1000MB 	IP:            192.168.0.12
CPU temp:      47°C
Usage of /:    7% of 20G

Last login: Sat Mar 16 11:59:31 2019 from 192.168.0.28
On relance la configuration
1
sudo armbian-config
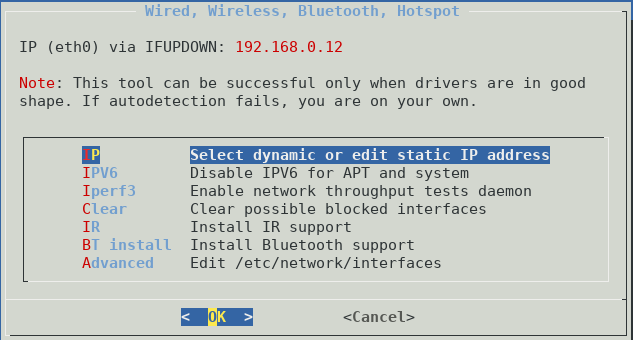
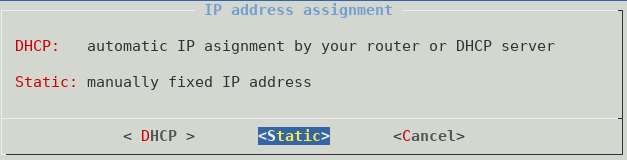
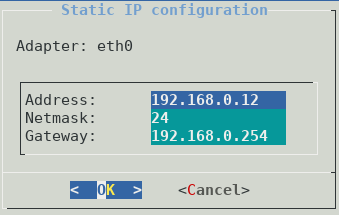
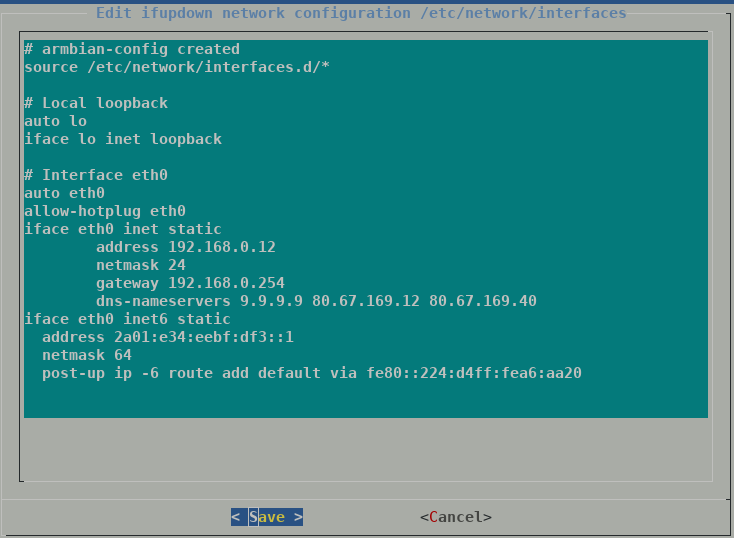
Edition et modification du fichier réseau

Paramétrage freebox
Adresse IPV6 lien local : fe80::224:d4ff:fea6:aa20
Préfixe : 2a01:e34:eebf:df3::/64
Next Hop : fe80::c4:4ff:fe40:f0ff
Ajout IPV6
1
2
3
4
5
iface eth0 inet6 static
  address 2a01:e34:eebf:df3::1
  netmask 64
  post-up ip -6 route add default via fe80::224:d4ff:fea6:aa20
Modifier les dns
1
dns-nameservers 9.9.9.9 80.67.169.12 80.67.169.40
Un reboot
1
sudo systemctl reboot
Connexion SSH
1
ssh xo@192.168.0.12
En mode su
1
sudo -s
On vérifie le réseau
1
 ip a
1
2
3
4
5
6
7
8
9
10
11
12
13
14
15
16
17
18
1: lo: <LOOPBACK,UP,LOWER_UP> mtu 65536 qdisc noqueue state UNKNOWN group default qlen 1000
    link/loopback 00:00:00:00:00:00 brd 00:00:00:00:00:00
    inet 127.0.0.1/8 scope host lo
       valid_lft forever preferred_lft forever
    inet6 ::1/128 scope host
       valid_lft forever preferred_lft forever
2: dummy0: <BROADCAST,NOARP> mtu 1500 qdisc noop state DOWN group default qlen 1000
    link/ether 92:b5:a3:13:7f:88 brd ff:ff:ff:ff:ff:ff
3: eth0: <BROADCAST,MULTICAST,UP,LOWER_UP> mtu 1500 qdisc mq state UP group default qlen 1000
    link/ether 02:c4:04:40:f0:ff brd ff:ff:ff:ff:ff:ff
    inet 192.168.0.12/24 brd 192.168.0.255 scope global eth0
       valid_lft forever preferred_lft forever
    inet6 2a01:e34:eebf:df3::1/64 scope global
       valid_lft forever preferred_lft forever
    inet6 fe80::c4:4ff:fe40:f0ff/64 scope link
       valid_lft forever preferred_lft forever
4: bond0: <BROADCAST,MULTICAST,MASTER> mtu 1500 qdisc noop state DOWN group default qlen 1000
    link/ether 1a:a8:1f:15:7f:fe brd ff:ff:ff:ff:ff:ff
locales
1
dpkg-reconfigure locales
1
2
3
Generating locales (this might take a while)...
  fr_FR.UTF-8... done
Generation complete.
TimeZone : Europe/Paris (facultatif car défini à l’installation de debian)
1
dpkg-reconfigure tzdata
Domaine et certificats xoyize.xyz
https://www.linode.com/docs/security/ssl/install-lets-encrypt-to-create-ssl-certificates/
Serveur , installer et renouveler les certificats SSL Let’s encrypt
Installation client acme
1
2
3
4
5
6
7
8
cd ~
sudo -s  # en mode super utilisateur
apt install netcat socat -y # prérequis
git clone https://github.com/Neilpang/acme.sh.git
cd acme.sh
./acme.sh --install # --nocron
cd ..
rm -rf acme.sh/
Copier les clés d’accès
Génération des certificats
1
/root/.acme.sh/acme.sh --dns dns_ovh --issue --keylength ec-384 -d xoyize.xyz -d *.xoyize.xyz
1
2
3
4
[vendredi 15 mars 2019, 20:08:10 (UTC+0100)] Your cert is in  /root/.acme.sh/xoyize.xyz_ecc/xoyize.xyz.cer
[vendredi 15 mars 2019, 20:08:10 (UTC+0100)] Your cert key is in  /root/.acme.sh/xoyize.xyz_ecc/xoyize.xyz.key
[vendredi 15 mars 2019, 20:08:10 (UTC+0100)] The intermediate CA cert is in  /root/.acme.sh/xoyize.xyz_ecc/ca.cer
[vendredi 15 mars 2019, 20:08:10 (UTC+0100)] And the full chain certs is there:  /root/.acme.sh/xoyize.xyz_ecc/fullchain.cer
Installer sudo et modifier /etc/sudoers pour accès sans mot de passe à l’utilisateur yann
1
2
3
4
apt update
apt upgrade
apt install sudo
echo "cubie     ALL=(ALL) NOPASSWD: ALL" >> /etc/sudoers
Installer les outils
apt install rsync curl tmux jq figlet git tree dnsutils -y
Disques
Les disques LVM
1
2
3
4
5
6
7
8
9
10
11
root@srvxo:/home/cubie# pvs
  PV         VG         Fmt  Attr PSize   PFree
  /dev/sda3  vg-ssd-one lvm2 a--  446.85g 342.85g
root@srvxo:/home/cubie# vgs
  VG         #PV #LV #SN Attr   VSize   VFree
  vg-ssd-one   1   3   0 wz--n- 446.85g 342.85g
root@srvxo:/home/cubie# lvs
  LV   VG         Attr       LSize  Pool Origin Data%  Meta%  Move Log Cpy%Sync Convert
  home vg-ssd-one -wi-ao---- 75.00g
  root vg-ssd-one -wi-ao---- 25.00g
  swap vg-ssd-one -wi-ao----  4.00g
Connexion SSH avec clés
![]()
Se connecter depuis un poste du réseau :
1
ssh cubie@192.168.0.12
Paraméter SSH
Pas de connexion root PermitRootLogin no dans fichier /etc/ssh/sshd_config
Installer libpam-systemd (session SSH ne se termine pas correctement lors d’un “reboot” à distance) :
1
sudo apt install libpam-systemd  # Installer par défaut sur debian 9
Relancer le service ssh
1
sudo systemctl restart ssh
Exécution script .ssh/rc sur connexion SSH
Exécuter un fichier utilisateur nommé $HOME/.ssh/rc si présent
Pour tous les utilisateurs exécuter un fichier nommé /etc/ssh/sshrc si présent
Installer les utilitaires curl jq figlet
Le batch
1
2
mkdir -p ~/.ssh
nano ~/.ssh/rc
1
2
3
4
5
6
7
8
9
10
11
12
13
14
15
16
17
18
19
20
21
22
23
24
25
26
27
28
29
30
#!/bin/bash

#clear
PROCCOUNT=`ps -Afl | wc -l`  		# nombre de lignes
PROCCOUNT=`expr $PROCCOUNT - 5`		# on ote les non concernées
GROUPZ=`users`
ipinfo=$(curl -s ipinfo.io) 		# info localisation format json
publicip=$(echo $ipinfo | jq -r '.ip')  # extraction des données , installer préalablement "jq"
ville=$(echo $ipinfo | jq -r '.city')
pays=$(echo $ipinfo | jq -r '.country')
cpuname=`cat /proc/cpuinfo |grep 'model name' | cut -d: -f2 | sed -n 1p`
iplink=`ip link show |grep -m 1 "2:" | awk '{print $2}' | cut -d: -f1`

echo "\033[0m\033[1;31m"
figlet "`hostname --fqdn`"
echo "\033[0m
\033[1;35m    \033[1;37mHostname \033[1;35m= \033[1;32m`hostname`
\033[1;35m  \033[1;37mWired IpV4 \033[1;35m= \033[1;32m`ip addr show $iplink | grep 'inet\b' | awk '{print $2}' | cut -d/ -f1`
\033[1;35m  \033[1;37mWired IpV6 \033[1;35m= \033[1;32m`ip addr show $iplink | grep -E 'inet6' |grep -E 'scope link' | awk '{print $2}' | cut -d/ -f1`
\033[1;35m      \033[1;37mKernel \033[1;35m= \033[1;32m`uname -r`
\033[1;35m      \033[1;37mDebian \033[1;35m= \033[1;32m`cat /etc/debian_version`
\033[1;35m      \033[1;37mUptime \033[1;35m= \033[1;32m`uptime | sed 's/.*up ([^,]*), .*/1/' | sed -e 's/^[ \t]*//'`
\033[1;35m         \033[1;37mCPU \033[1;35m= \033[1;32m`echo $cpuname`
\033[1;35m  \033[1;37mMemory Use \033[1;35m= \033[1;32m`free -m | awk 'NR==2{printf "%s/%sMB (%.2f%%)\n", $3,$2,$3*100/$2 }'`
\033[1;35m    \033[1;37mUsername \033[1;35m= \033[1;32m`whoami`
\033[1;35m    \033[1;37mSessions \033[1;35m= \033[1;32m`who | grep $USER | wc -l`
\033[1;35m \033[1;37mPublic IpV4 \033[1;35m= \033[1;32m`echo $publicip`
\033[1;35m \033[1;37mPublic IpV6 \033[1;35m= \033[1;32m`ip addr show $iplink | grep -m 1 'inet6\b'  | awk '{print $2}' | cut -d/ -f1`
\033[0m"
#curl fr.wttr.in/$ville?0
Effacer motd
1
sudo rm /etc/motd
Adressage ipv6
Adresse IP : 192.168.0.12
Mac Adress : 02:c4:04:40:f0:ff
1
ip addr
1
2
3
4
5
6
7
8
9
[...]
2: eth0: <BROADCAST,MULTICAST,UP,LOWER_UP> mtu 1500 qdisc pfifo_fast state UP group default qlen 1000
    link/ether 02:c4:04:40:f0:ff brd ff:ff:ff:ff:ff:ff
    inet 192.168.0.12/24 brd 192.168.0.255 scope global eth0
       valid_lft forever preferred_lft forever
    inet6 2a01:e34:ee6a:b270:c4:4ff:fe40:f0ff/64 scope global mngtmpaddr dynamic
       valid_lft 86318sec preferred_lft 86318sec
    inet6 fe80::c4:4ff:fe40:f0ff/64 scope link
       valid_lft forever preferred_lft forever
La carte n’est joignable de l’internet que par son adresse IPV6
NextHop Freebox permet d’attribuer une adresse IPV6)
Prefixe : 2a01:e34:ee6a:b273:://64
Next Hop: fe80::c4:4ff:fe40:f0ff
Modifier interface réseau debian
1
sudo nano /etc/network/interfaces
REMPLACER
1
2
3
4
5
6
7
8
9
10
11
12
13
14
# This file describes the network interfaces available on your system
# and how to activate them. For more information, see interfaces(5).

source /etc/network/interfaces.d/*

# The loopback network interface
auto lo
iface lo inet loopback

# The primary network interface
allow-hotplug eth0
iface eth0 inet dhcp
# This is an autoconfigured IPv6 interface
iface eth0 inet6 auto
PAR
1
2
3
4
5
6
7
8
9
10
11
12
13
14
15
16
17
18
# This file describes the network interfaces available on your system
# and how to activate them. For more information, see interfaces(5).

source /etc/network/interfaces.d/*

# The loopback network interface
auto lo
iface lo inet loopback

# The primary network interface
allow-hotplug eth0
iface eth0 inet dhcp
# This is an autoconfigured IPv6 interface
#iface eth0 inet6 auto
iface eth0 inet6 static
  address 2a01:e34:ee6a:b273::1
  netmask 64
  post-up ip -6 route add default via fe80::224:d4ff:fea6:aa20 dev eth0
Redémarrer la machine
1
sudo systemctl reboot
Après reboot, connexion SSH
1
ssh cubie@192.168.0.12
Vérifier adresses IP V4 et V6
1
ip addr
1
2
3
4
5
6
7
8
9
10
11
[...]
2: eth0: <BROADCAST,MULTICAST,UP,LOWER_UP> mtu 1500 qdisc pfifo_fast state UP group default qlen 1000
    link/ether 02:c4:04:40:f0:ff brd ff:ff:ff:ff:ff:ff
    inet 192.168.0.12/24 brd 192.168.0.255 scope global eth0
       valid_lft forever preferred_lft forever
    inet6 2a01:e34:ee6a:b273::1/64 scope global
       valid_lft forever preferred_lft forever
    inet6 2a01:e34:ee6a:b270:c4:4ff:fe40:f0ff/64 scope global mngtmpaddr dynamic
       valid_lft 86372sec preferred_lft 86372sec
    inet6 fe80::c4:4ff:fe40:f0ff/64 scope link
       valid_lft forever preferred_lft forever
Vérifier avec un autre poste sur le même réseau local
1
ping -6 -c5 2a01:e34:ee6a:b273::1
1
2
3
4
5
6
7
8
9
PING 2a01:e34:ee6a:b273::1(2a01:e34:ee6a:b273::1) 56 data bytes
64 bytes from 2a01:e34:ee6a:b273::1: icmp_seq=2 ttl=64 time=0.798 ms
64 bytes from 2a01:e34:ee6a:b273::1: icmp_seq=3 ttl=64 time=0.328 ms
64 bytes from 2a01:e34:ee6a:b273::1: icmp_seq=4 ttl=64 time=0.295 ms
64 bytes from 2a01:e34:ee6a:b273::1: icmp_seq=5 ttl=64 time=0.310 ms

--- 2a01:e34:ee6a:b273::1 ping statistics ---
5 packets transmitted, 4 received, 20% packet loss, time 65ms
rtt min/avg/max/mdev = 0.295/0.432/0.798/0.212 ms
DNS OVH
Modification domaine xoyize.xyz pour un accès IPV6 uniquement.
1
2
3
4
5
6
$TTL 3600
@	IN SOA dns100.ovh.net. tech.ovh.net. (2018090602 86400 3600 3600000 300)
    3600 IN NS     ns100.ovh.net.
    3600 IN NS     dns100.ovh.net.
         IN AAAA   2a01:e34:ee6a:b273::1
*   3600 IN CNAME  xoyize.xyz.
Après quelques minutes ,pour la validation DNS , test
1
ping -c5 xoyize.xyz
1
2
3
4
5
6
7
8
9
10
PING xoyize.xyz(2a01:e34:ee6a:b273::1 (2a01:e34:ee6a:b273::1)) 56 data bytes
64 bytes from 2a01:e34:ee6a:b273::1 (2a01:e34:ee6a:b273::1): icmp_seq=1 ttl=64 time=0.329 ms
64 bytes from 2a01:e34:ee6a:b273::1 (2a01:e34:ee6a:b273::1): icmp_seq=2 ttl=64 time=0.284 ms
64 bytes from 2a01:e34:ee6a:b273::1 (2a01:e34:ee6a:b273::1): icmp_seq=3 ttl=64 time=0.350 ms
64 bytes from 2a01:e34:ee6a:b273::1 (2a01:e34:ee6a:b273::1): icmp_seq=4 ttl=64 time=0.329 ms
64 bytes from 2a01:e34:ee6a:b273::1 (2a01:e34:ee6a:b273::1): icmp_seq=5 ttl=64 time=0.295 ms

--- xoyize.xyz ping statistics ---
5 packets transmitted, 5 received, 0% packet loss, time 59ms
rtt min/avg/max/mdev = 0.284/0.317/0.350/0.029 ms
Certificats letsencrypt
Installation gestionnaire des certificats Let’s Encrypt
1
 wget -O -  https://get.acme.sh | sh
1
2
[jeudi 6 septembre 2018, 17:38:38 (UTC+0200)] OK
[jeudi 6 septembre 2018, 17:38:38 (UTC+0200)] Install success!
Ne pas tenir compte des erreurs durant l’installation
Pour que le client se mette à jour automatiquement, activer cette option :
1
2
cd .acme.sh
./acme.sh --auto-upgrade
la liste de toutes les commandes possibles s’afficheront en plus…
Se connecter sur l’api OVH pour les paramètres (clé et secret)
1
2
export OVH_AK="votre application key"
export OVH_AS="votre application secret"
Premier lancement pour la génération des certificats
1
./acme.sh --issue --keylength ec-384 -d xoyize.xyz -d '*.xoyize.xyz' --dns dns_ovh
1
2
3
[...]
[jeudi 6 septembre 2018, 17:54:17 (UTC+0200)] Please open this link to do authentication: https://eu.api.ovh.com/auth/?credentialToken=E9ea1VcJEJsjYwlOq9J9Y564zBghrUExbNlKkELDHUCmqNdWhJSCV4684CNi6WKL
[...]
Connecter l’url ci-dessus, s’authentifier puis sélectionner “unlimited” et valider.Le message suivant dit s’afficher.
1
OVH authentication Success !
Lancer une seconde fois la génération des certificats et patienter quelques minutes…
1
./acme.sh --issue --keylength ec-384 -d xoyize.xyz -d '*.xoyize.xyz' --dns dns_ovh
Les certificats sont disponibles
1
2
3
4
[jeudi 6 septembre 2018, 18:02:09 (UTC+0200)] Your cert is in  /home/cubie/.acme.sh/xoyize.xyz_ecc/xoyize.xyz.cer
[jeudi 6 septembre 2018, 18:02:10 (UTC+0200)] Your cert key is in  /home/cubie/.acme.sh/xoyize.xyz_ecc/xoyize.xyz.key
[jeudi 6 septembre 2018, 18:02:10 (UTC+0200)] The intermediate CA cert is in  /home/cubie/.acme.sh/xoyize.xyz_ecc/ca.cer
[jeudi 6 septembre 2018, 18:02:10 (UTC+0200)] And the full chain certs is there:  /home/cubie/.acme.sh/xoyize.xyz_ecc/fullchain.cer
Un certificat Wildcard Let’s Encrypt qui se renouvelle automatiquement
1
crontab -l
1
27 0 * * * "/home/cubie/.acme.sh"/acme.sh --cron --home "/home/cubie/.acme.sh" > /dev/null
Nginx PHP7 mariadb

Cas des processeurs de type arm
1
sudo apt install apt-transport-https
Créer un dossier pour les configurations nginx :
1
sudo mkdir -p /etc/nginx/conf.d/olibox.d
Installer MariaDb :
1
sudo apt install mariadb-server
Initialiser le mot de passe root ( ) + sécurisation
1
sudo mysql_secure_installation
1
2
3
4
5
6
Enter current password for root (enter for none):
Set root password? [Y/n] y
Remove anonymous users? [Y/n] y
Disallow root login remotely? [Y/n] y
Remove test database and access to it? [Y/n] y
Reload privilege tables now? [Y/n] y
https://xoyize.xyz
Certificats sur le site xoyize.xyz
Ajout des certificats , créer des liens
1
2
sudo ln -s /home/cubie/.acme.sh/xoyize.xyz_ecc/xoyize.xyz.key /etc/ssl/private/xoyize.xyz.key.pem
sudo ln -s /home/cubie/.acme.sh/xoyize.xyz_ecc/fullchain.cer /etc/ssl/private/xoyize.xyz.fullchain.cer.pem
Renommer le fichier de configuration nginx
1
sudo mv /etc/nginx/conf.d/default.conf /etc/nginx/conf.d/xoyize.xyz.conf
Le fichier de configuration
1
2
3
4
5
6
7
8
9
10
11
12
13
14
15
16
17
18
19
20
21
22
23
24
25
26
27
28
29
30
31
32
33
34
35
36
37
38
39
40
41
42
43
44
45
46
47
48
49
50
51
52
53
54
55
56
57
58
59
60
61
62
63
64
65
66
67
68
69
70
server {
    listen 80;
    listen [::]:80;

    ## redirect http to https ##
    server_name xoyize.xyz *.xoyize.xyz;
    return  301 https://$server_name$request_uri;
}

server {
    listen 443 ssl http2;
    listen [::]:443 ssl http2;

    server_name xoyize.xyz;
    root /var/www/ ;

    ssl_certificate /etc/ssl/private/xoyize.xyz.fullchain.cer.pem;
    ssl_certificate_key /etc/ssl/private/xoyize.xyz.key.pem;
    ssl_session_timeout 5m;
    ssl_session_cache shared:SSL:50m;

    # As suggested by Mozilla : https://wiki.mozilla.org/Security/Server_Side_TLS and https://en.wikipedia.org/wiki/Curve25519
    # (this doesn't work on jessie though ...?)
    # ssl_ecdh_curve secp521r1:secp384r1:prime256v1;

    # As suggested by https://cipherli.st/
    ssl_ecdh_curve secp384r1;

    ssl_prefer_server_ciphers on;

    # Ciphers with intermediate compatibility
    #----------------------------------------
    # https://mozilla.github.io/server-side-tls/ssl-config-generator/?server=nginx-1.6.2&openssl=1.0.1t&hsts=yes&profile=intermediate
    #ssl_protocols TLSv1 TLSv1.1 TLSv1.2;
    #ssl_ciphers 'ECDHE-ECDSA-CHACHA20-POLY1305:ECDHE-RSA-CHACHA20-POLY1305:ECDHE-ECDSA-AES128-GCM-SHA256:ECDHE-RSA-AES128-GCM-SHA256:ECDHE-ECDSA-AES256-GCM-SHA384:ECDHE-RSA-AES256-GCM-SHA384:DHE-RSA-AES128-GCM-SHA256:DHE-RSA-AES256-GCM-SHA384:ECDHE-ECDSA-AES128-SHA256:ECDHE-RSA-AES128-SHA256:ECDHE-ECDSA-AES128-SHA:ECDHE-RSA-AES256-SHA384:ECDHE-RSA-AES128-SHA:ECDHE-ECDSA-AES256-SHA384:ECDHE-ECDSA-AES256-SHA:ECDHE-RSA-AES256-SHA:DHE-RSA-AES128-SHA256:DHE-RSA-AES128-SHA:DHE-RSA-AES256-SHA256:DHE-RSA-AES256-SHA:ECDHE-ECDSA-DES-CBC3-SHA:ECDHE-RSA-DES-CBC3-SHA:EDH-RSA-DES-CBC3-SHA:AES128-GCM-SHA256:AES256-GCM-SHA384:AES128-SHA256:AES256-SHA256:AES128-SHA:AES256-SHA:DES-CBC3-SHA:!DSS';

    # Ciphers with modern compatibility
    #---------------------------------
    # https://mozilla.github.io/server-side-tls/ssl-config-generator/?server=nginx-1.6.2&openssl=1.0.1t&hsts=yes&profile=modern
    # Uncomment the following to use modern ciphers, but remove compatibility with some old clients (android < 5.0, Internet Explorer < 10, ...)
    ssl_protocols TLSv1.2;
    ssl_ciphers 'ECDHE-ECDSA-AES256-GCM-SHA384:ECDHE-RSA-AES256-GCM-SHA384:ECDHE-ECDSA-CHACHA20-POLY1305:ECDHE-RSA-CHACHA20-POLY1305:ECDHE-ECDSA-AES128-GCM-SHA256:ECDHE-RSA-AES128-GCM-SHA256:ECDHE-ECDSA-AES256-SHA384:ECDHE-RSA-AES256-SHA384:ECDHE-ECDSA-AES128-SHA256:ECDHE-RSA-AES128-SHA256';

    # Uncomment the following directive after DH generation
    # > openssl dhparam -out /etc/ssl/private/dh2048.pem -outform PEM -2 2048
    #ssl_dhparam /etc/ssl/private/dh2048.pem;

    # Follows the Web Security Directives from the Mozilla Dev Lab and the Mozilla Obervatory + Partners
    # https://wiki.mozilla.org/Security/Guidelines/Web_Security
    # https://observatory.mozilla.org/
    add_header Strict-Transport-Security "max-age=63072000; includeSubDomains; preload";
    add_header Content-Security-Policy "upgrade-insecure-requests";
    add_header Content-Security-Policy-Report-Only "default-src https: data: 'unsafe-inline' 'unsafe-eval'";
    add_header X-Content-Type-Options nosniff;
    add_header X-XSS-Protection "1; mode=block";
    add_header X-Download-Options noopen;
    add_header X-Permitted-Cross-Domain-Policies none;
    add_header X-Frame-Options "SAMEORIGIN";

    index index.php;
        location ~ \.php$ {
           fastcgi_split_path_info ^(.+\.php)(/.+)$;
           # fastcgi_pass unix:/var/run/php5-fpm.sock;    # PHP5
           fastcgi_pass unix:/run/php/php7.0-fpm.sock;    # PHP7.0
           # fastcgi_pass unix:/run/php/php7.1-fpm.sock   # PHP7.1
           fastcgi_index index.php;
           include fastcgi_params;
           fastcgi_param SCRIPT_FILENAME $request_filename;
        }
}
Pour le test , on va renommer le fichier info.php en index.php
1
sudo mv /var/www/info.php /var/www/index.php
On teste sur le lien https://xoyize.xyz
Parefeu
Parefeu (firewall) iptables IPV4/IPV6 bureau/serveur
Sauvegarde serveur distants
Création d’un volume logique pour la sauvegarde
1
2
3
4
lvcreate -L 100G -n data vg-ssd-one     # volume logique lvm de 100G étiquette "data"
mkfs.ext4 /dev/vg-ssd-one/data -L data  # format fichier ext4
mount /dev/vg-ssd-one/data /media       # montage du volume sur /media
mkdir /media/sauvegarde                 # création partition sauvegarde
Créer un jeu de clé
1
2
ssh-keygen -f .ssh/backup_cubie -t ed25519 -o -a 100
chmod 400 .ssh/backup_cubie*
Copier la clé publique backup_cubie.pub dans le fichier authorized_keys des serveurs distants à sauvegarder
bash de sauvegarde savdistant.sh
1
2
3
4
5
6
7
8
9
10
11
12
13
14
15
16
17
18
19
20
21
22
23
#!/bin/bash
REPSAV="/media/sauvegarde"
REPSSHKEY="/home/cubie/.ssh"
# -a Archive mode (keep file permissions etc...)
#
echo $(date) "Sauvegarde serveur distant cinay.xyz"  >> $REPSAV/savdistant.log
/usr/bin/rsync -aev \
    --delete \
    --rsync-path=/home/backupuser/rsync-wrapper.sh \
    --exclude={"dev/*","proc/*","sys/*","tmp/*","run/*","mnt/*","media/*","lost+found"} \
    --rsh="/usr/bin/ssh -p 55031 -i $REPSSHKEY/backup_cubie" backupuser@cinay.xyz:/ $REPSAV/cinay.xyz &>> $REPSAV/savdistant.log
echo $(date) "Fin sauvegarde serveur distant cinay.xyz"  >> $REPSAV/savdistant.log
#
echo $(date) "Sauvegarde serveur distant yanfi.net"  >> $REPSAV/savdistant.log
/usr/bin/rsync -aev \
    --delete \
    --rsync-path=/home/backupuser/rsync-wrapper.sh \
    --exclude={"dev/*","proc/*","sys/*","tmp/*","run/*","mnt/*","media/*","lost+found"} \
    --rsh="/usr/bin/ssh -p 55030 -i $REPSSHKEY/backup_cubie" backupuser@yanfi.net:/ $REPSAV/yanfi &>> $REPSAV/savdistant.log
echo $(date) "Fin sauvegarde serveur distant yanfi.net"  >> $REPSAV/savdistant.log

#envoi des logs du jour par mail
# grep "$(date +"%d %B %Y")" $REPSAV/savdistant.log |mail -s "Sauvegarde du $(date +"%d %B %Y")" $desti
Dossiers data musique
Passage en super utilisateur
1
sudo -s
Création de volume logique LVM
1
2
3
4
lvcreate -L 100G -n data vg-ssd-one
mkfs.ext4 /dev/vg-ssd-one/data
lvcreate -L 100G -n musique vg-ssd-one
mkfs.ext4 /dev/vg-ssd-one/musique
Créer les points de montage
1
2
mkdir /mnt/{data,musique}
chown cubie.cubie -R /mnt/{data,musique} # droits utilisateur
Ajouter en fin de fichier /etc/fstab
1
2
/dev/vg-ssd-one/data    /mnt/data               ext4    defaults        0       2
/dev/vg-ssd-one/musique /mnt/musique            ext4    defaults        0       2
Montage
1
mount -a
NFS Serveur
Debian Stretch NFS (Network File System)
Passage en super utilisateur
1
sudo -s
Installation
1
apt install nfs-kernel-server
Vérification de l’installation
Exécuter rpcinfo pour confirmer que le serveur est lancé, et accepte les requêtes sur le port 2049 (UDP et TCP).
1
rpcinfo -p | grep nfs
1
2
3
4
    100003    3   tcp   2049  nfs
    100003    4   tcp   2049  nfs
    100003    3   udp   2049  nfs
    100003    4   udp   2049  nfs
Vérifier que le système supporte effectivement NFS:
1
cat /proc/filesystems | grep nfs
1
nodev	nfsd
Si la commande ne renvoie rien, il se peut que le module NFS ne soit pas chargé, auquel cas, il faut le charger avec :
1
modprobe nfs
Enfin, vérifions que portmap attend les instructions sur le port 111 :
1
rpcinfo -p | grep portmap
1
2
3
4
5
6
    100000    4   tcp    111  portmapper
    100000    3   tcp    111  portmapper
    100000    2   tcp    111  portmapper
    100000    4   udp    111  portmapper
    100000    3   udp    111  portmapper
    100000    2   udp    111  portmapper
Le fichier /etc/exports
1
2
/mnt/data	 192.168.0.0/24(rw,sync,no_subtree_check)
/mnt/musique	 192.168.0.0/24(rw,sync,no_subtree_check)
Seul le réseau local peut accéder aux partages NFS
Redémarrage
1
systemctl restart nfs-kernel-server
iptables
Par défaut, les différents services NFS (lockd, statd, mountd, etc.) demandent des assignations de ports aléatoires à partir du portmapper (portmap/rpcbind), ce qui signifie que la plupart des administrateurs doivent ouvrir une gamme de ports dans leur base de règles de pare-feu pour que NFS fonctionne.
1
rpcinfo -p | grep nlockmgr
1
2
3
4
5
6
    100021    1   udp  51148  nlockmgr
    100021    3   udp  51148  nlockmgr
    100021    4   udp  51148  nlockmgr
    100021    1   tcp  45853  nlockmgr
    100021    3   tcp  45853  nlockmgr
    100021    4   tcp  45853  nlockmgr
1
rpcinfo -p | grep mountd
1
2
3
4
5
6
    100005    1   udp  34435  mountd
    100005    1   tcp  34741  mountd
    100005    2   udp  55003  mountd
    100005    2   tcp  46537  mountd
    100005    3   udp  56680  mountd
    100005    3   tcp  47811  mountd
Il va donc falloir fixer les ports de ces services afin de créer les règles iptables.
1
nano /etc/default/nfs-common
1
STATDOPTS="--port 32765 --outgoing-port 32766"
1
nano /etc/default/nfs-kernel-server
1
RPCMOUNTDOPTS="-p 32767"
1
nano /etc/default/quota
1
RPCRQUOTADOPTS="-p 32769"
Redémarrage
1
2
sysctl --system
systemctl restart nfs-kernel-server
Nous pouvons maintenant fixer nos règles iptables en ajoutant au fichier /usr/local/sbin/config_firewall ce qui suit dans les règles IPV4
1
2
iptables -A INPUT -s 192.168.0.0/24 -p tcp -m multiport --ports 111,2049,32764:32769 -j ACCEPT
iptables -A INPUT -s 192.168.0.0/24 -p udp -m multiport --ports 111,2049,32764:32769 -j ACCEPT
Regénérer les règles
1
/usr/local/sbin/config_firewall
Clients NFS
1
2
yay -S nfs-utils                   # archlinux/manjaro
sudo apt-get install nfs-common    # debian/ubuntu
Visualiser les dossiers accessibles
1
showmount -e 192.168.0.12
1
2
3
Export list for 192.168.0.12:
/mnt/musique 192.168.0.0/24
/mnt/data    192.168.0.0/24
Musique
Dossier /mnt/musique (musique vg-ssd-one -wi-ao—- 100,00g)
Subsonic
1
2
3
sudo apt install openjdk-8-jre # Installation java jre
wget https://s3-eu-west-1.amazonaws.com/subsonic-public/download/subsonic-6.1.3.deb # paquet debsubsonic
sudo dpkg -i subsonic-6.1.3.deb # installation subsonic
Configuration /etc/default/subsonic
1
2
SUBSONIC_ARGS="--port=8090--max-memory=150"
SUBSONIC_USER=cubie
Redémarrer le service
1
sudo systemctl restart subsonic